kgambit
Tech Sergeant
Username: kgambit
Category 2/Intermediate
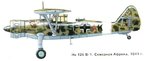
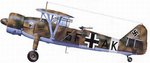
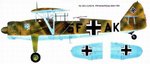
Model: Hs 126 B1
Scale: 1:72
Kit by Italaerei
This is going to be pretty much an OOB build. The only special work on this is going to be a custom build instrument panel, some photoetch seat belts and possibly some aftermarket decals as the ones in the kit are problematic. Given the locale it will be built without the wheel spats in place.


Color Scheme will be standard desert colorscheme: RLM 79/80 over 78
Still deciding on markings. The kit comes with markings 5F+CK and I've seen 5F+FK; both in the same color scheme although the top wing scheme appears to be interpreted in widely different fashions on existing builds.
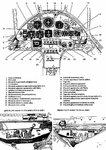
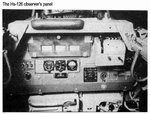
I could use some help with photos of the cockpit; particularly the instrument panel. All I have so far is this:

That's for the K version exported to Greece. According to the write-up,
"The instrument layout of the Greek Hs126s (type K) panel was neither the standard of the Hs 126A-1s nor that of the Hs 126B-ls. It was similar to the Hs126B but it had two very interesting details:
- The Tochterkompass (Repeater Compass) was not installed
- There was a second machinegun handle for the additional front Browning machinegun at the upper left side above the Variometer.
Also, as stated before, there was a simple ring-and-bead sight installed, instead of the Luftwaffe's standard Reflexvisier Revi 12B."
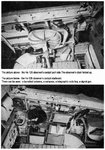
Not installing the second MG handle will be easy (LOL). FIguring out where the missing instrument goes - not so much.
As below:

I actually have the front plate for the replacement instrument panel all drilled out and ready to go (based the K model above). I'm using a front plate of 0.010" card, with holes drilled out for the instruments. The front panel gets painted RLM 66. I'm going to paint some Reheat brass etched bezels gloss black and mount them on the front plate. The back plate will be 0.020" card with slight indentations drilled to match the instrument placements. The indentations will be painted gloss black and given a quick drop or two of future and then instrument decals will be applied. A second coat of future will seal them and the two cards will be glued together. I'll post a couple more pics IF I can ever get my digital cam back and working again.
THere won't be a lot of in-progress shots on this one but I'll see what I can do.
Category 2/Intermediate
Model: Hs 126 B1
Scale: 1:72
Kit by Italaerei
This is going to be pretty much an OOB build. The only special work on this is going to be a custom build instrument panel, some photoetch seat belts and possibly some aftermarket decals as the ones in the kit are problematic. Given the locale it will be built without the wheel spats in place.
Color Scheme will be standard desert colorscheme: RLM 79/80 over 78
Still deciding on markings. The kit comes with markings 5F+CK and I've seen 5F+FK; both in the same color scheme although the top wing scheme appears to be interpreted in widely different fashions on existing builds.
I could use some help with photos of the cockpit; particularly the instrument panel. All I have so far is this:
That's for the K version exported to Greece. According to the write-up,
"The instrument layout of the Greek Hs126s (type K) panel was neither the standard of the Hs 126A-1s nor that of the Hs 126B-ls. It was similar to the Hs126B but it had two very interesting details:
- The Tochterkompass (Repeater Compass) was not installed
- There was a second machinegun handle for the additional front Browning machinegun at the upper left side above the Variometer.
Also, as stated before, there was a simple ring-and-bead sight installed, instead of the Luftwaffe's standard Reflexvisier Revi 12B."
Not installing the second MG handle will be easy (LOL). FIguring out where the missing instrument goes - not so much.
As below:
I actually have the front plate for the replacement instrument panel all drilled out and ready to go (based the K model above). I'm using a front plate of 0.010" card, with holes drilled out for the instruments. The front panel gets painted RLM 66. I'm going to paint some Reheat brass etched bezels gloss black and mount them on the front plate. The back plate will be 0.020" card with slight indentations drilled to match the instrument placements. The indentations will be painted gloss black and given a quick drop or two of future and then instrument decals will be applied. A second coat of future will seal them and the two cards will be glued together.
I'll post a couple more pics IF I can ever get my digital cam back and working again.THere won't be a lot of in-progress shots on this one but I'll see what I can do.
Last edited: