Airfix 1/72 Lockheed Hudson I - Quick start to finish build.

Ad: This forum contains affiliate links to products on Amazon and eBay. More information in Terms and rules

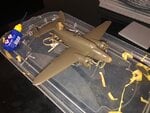
Here you go - rotated in 'Irfanview'.

Could use some filler around that upper seam.


View attachment 579336

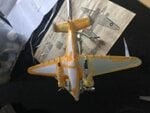
Thanks Terry. It needs a good dose of filler all over to be fair. But, no time and the new stuff hasn't yet arrived. Just want to play around and practice painting.

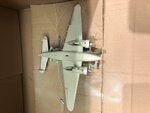
So no more waiting. Just whipped the airbrush out for the first time in many moons.

Just bashed on some light grey. Ohhh that felt good.

Decided to just go with the box decals and colours to save time.
 

Attachments

  • B81671E3-EBA4-425D-8464-F8ED77EB8A87.jpeg
    B81671E3-EBA4-425D-8464-F8ED77EB8A87.jpeg
    32.6 KB · Views: 44
And so the masking begins 🥁
 

Attachments

  • A733E77E-8A2C-41BC-B862-D27D1ED5DBD1.jpeg
    A733E77E-8A2C-41BC-B862-D27D1ED5DBD1.jpeg
    11.8 KB · Views: 39
Thanks guys, I won't hang around now. Will get this finished off so I can crack straight on with Horsa GB build once it drops through the post.

Now it's got some paint on it I'm actually starting to like this little kit.
 
Now I remember why I preferred US aircraft. The dreaded cammo masking..

Nearly there anyway, although impossible to be accurate given then sketchiness of the old airfix instructions (plus my lack of artistic skill) 😀

0746664C-EB19-472F-ABB0-A24A018F7754.jpeg
 
The curse of the Hudson bites again.

1) 100yr old decals disintegrating whilst applying.

After two hours I managed to piece them together. A shot of clear over the top and a bit of weathering tonight should resolve hide any imperfections nicely.

2) Snapped the tail wheel off.

Fetch me the CA

3) Managed to push three of side windows through whilst unmasking.

Outcomes the wire coat hanger and blu tac to reinsert them.


Now to finish off painting the framework of the a canopy, turret and fit the couple of ariels.

DA7186EF-C6DD-4584-9E98-A9ABD8A7F4B6.jpeg
 
You might be able to make the missing windows using PVA, although the openings might be just a tad too large for it to work.
Using a cocktail stick or similar, spread the PVA around the edges of the opening, and move across until it fills the window. Leave to dry, and it should form a clear 'skin'.
It works on opening up to about 1/4 inch - any larger, and it'll either still form a clear film, but have a depression in the center, or it'll just form part of the 'window' around the edges, with a hole in the middle !
If it doesn't work, the the 'film' can easily be peeled off, leaving a clean opening. Windows without glazing may look better than glazing with frosty glue marks.
 

Users who are viewing this thread

Back