Navigation
Install the app
How to install the app on iOS
Follow along with the video below to see how to install our site as a web app on your home screen.
Note: This feature may not be available in some browsers.
More options
You are using an out of date browser. It may not display this or other websites correctly.
You should upgrade or use an alternative browser.
You should upgrade or use an alternative browser.
Designing a siggy need help (1 Viewer)
- Thread starter Vic Balshaw
- Start date
Ad: This forum contains affiliate links to products on Amazon and eBay. More information in Terms and rules
More options
Who Replied?- Thread starter
- #142
Vic Balshaw
Major General
- Thread starter
- #144
Vic Balshaw
Major General
Oh that's good, cause this one did say it was for the complete novice and takes from the basic steps to more detailed and complex functions of the software, so maybe I will be in luck with a good book and a great and patient tutor.

I hope you will. But working with any computer program is like coding it.You can read tons of books for Assembler or other programming languages.You can go through tons of listings but you still need to practise.
An exercise??????
An exercise??????
- Thread starter
- #146
Vic Balshaw
Major General
Oh yes, how about making a border to a picture?
- Thread starter
- #148
Vic Balshaw
Major General
- Thread starter
- #150
Vic Balshaw
Major General
I have a ne layer
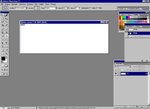
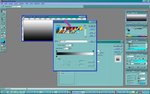
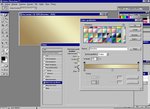
Click with LMB the new layer title in the window on right side.Then click with RMB on it and choose the Blending Options.In the effect selector click LMB the option exactly below the colour overlay option .It should be Gradient overlay option.Then click with LMB the strip with a gradient colour that will appear when clicking the Gradient overly option.
The new window should be opened.Find in this the colour I have marked in the second pic.Finally you should get the screen like in my first pic in the post.
The new window should be opened.Find in this the colour I have marked in the second pic.Finally you should get the screen like in my first pic in the post.
Attachments

- Thread starter
- #152
Vic Balshaw
Major General
- Thread starter
- #154
Vic Balshaw
Major General
Fantastic, I have the shade
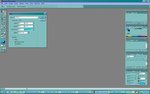
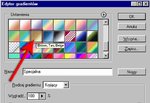
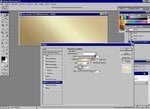
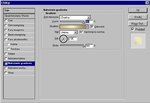
OK. Now you have to modify the gradient range.As you see there are small squares with colours of the GRadient at the bottom edge of the Gradient stripe.Click with LMB on the colour square in the middle of the gradient stripe. The same colour should appear in the bottom left corner of the editor window.( the pic below) Look at the right side of the window please. There is Delete button.Click it and the colour should be removed ( deleted) from the Gradient range.
The same do to the square at the left edge of the Gradient stripe.
The same do to the square at the left edge of the Gradient stripe.
Attachments
- Thread starter
- #156
Vic Balshaw
Major General
It is done
- Thread starter
- #158
Vic Balshaw
Major General
OK, done
- Thread starter
- #160
Vic Balshaw
Major General
Oh boy, this is fun stuff and its looking perfect.
Users who are viewing this thread
Total: 2 (members: 0, guests: 2)