Catch22
Major
Beauty.
Follow along with the video below to see how to install our site as a web app on your home screen.
Note: This feature may not be available in some browsers.
Ad: This forum contains affiliate links to products on Amazon and eBay. More information in Terms and rules
Very nice Wayne. Did you use your pencil method for those lines?
Lovely work, Wayne. One question for you. When in 1/48th, do you think the panel line detail is too over the top? I love the work you do, but the couple of times I have tried it at 1/48th, it just seems too contrived IMO.

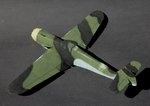


Beautifully done Wayne particularly in that heat, it's a wonder the paint didn't dry in the pot.