**** DONE: 1/48 METEOR F.1 - The Jet Age.

Ad: This forum contains affiliate links to products on Amazon and eBay. More information in Terms and rules

fubar57

General
32,242
18,450
Nov 22, 2009
The Jungles of Canada
User Name: fubar57
Name: George
Category: Advanced
Kit: Tamiya
Accessories: None

My subject of choice is the Meteor F.1 piloted by Canadian Flt. Off. J.R. Ritch, 616 Sqn., who, on 17 Aug. 1944, shot down a V-1.

1glosterBW.jpg


Geo
 
Last edited by a moderator:
While waiting for things to dry over there on GB25 I thought I would get this started. Hopefully being a Tamiya kit it will be quick.

001.JPG

004.JPG

006.JPG

007.JPG

002.JPG


Notice that Tamiya has thoughtfully included a nose weight.
Geo
 
Thanks guys. While I do have a few Meteor books I have no F.1 interior shots. Tamiya would have one paint the cockpit semi-gloss black, X-18, circled...

010.JPG


Also, I have seen one small photo claiming to be of the F.1 control column, showing just the central tube(?), the outer two omitted.

008.JPG


Any thoughts here would be appreciated before I commit to paint.

Geo
 
A such control column for Meteor I have seen in a sketch of F.4. All later ones had a different grip . However the Osprey book "Meteor I vs V-1 flying bomb, 1944" shows a cockpit diagram of Meteor I with a similar column but there is the central tube and one ( on left side ) tappet only. But it seems that there should be two tappets as well.

Meteor column.jpg


Meteor F4 control column
Meteor F4 control column.jpg
 
Last edited:
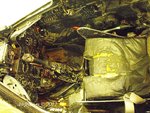
Yep, cockpits were changing to black at this period, although the upper 'head rest' section of the seat/top decking frame was, I believe, still Cockpit Grey/Green (no ejection seat in the earlier Meteors).
The pic below shows a Meteor F8 cockpit, which was similar overall to the earlier versions, although the 'spade grip' on the control column was now replaced by a conventional hand grip. Note, however, that the main section of the column still has the outer frame on each side of the column, represented by the 'tubes' on the Tamiya kit part.
 

Attachments

  • Midland Air Museum 029.jpg
    Midland Air Museum 029.jpg
    177.7 KB · Views: 296
Thanks for that guys, will leave the control column as is. Terry, Tamiya calls for the upper part to be in German Grey, XF-63, which I believe is their equivalent to RLM66. I'll also go with semi-gloss black for the innards.
In the meantime, here is a scoreboard for V-1 kills...

Capture.JPG


Geo
 
Last edited:
I'm sure this will be a fast build since there are relatively few parts and... it's a Tamiya kit!
 
Hopefully John...step 1, join fuselage halves together.

014.JPG


What looks like a step in the seam is actually melted plastic. No matter how much I heated up the plastic, I couldn't force the warped cone halves to cooperate.

011.JPG


Geo
 
Thanks gents. Getting ahead of myself here but is the aircraft letter "J" round at the bottom or squared? The photo on the first page kinda, sorta looks squared. Either way, it's covered...

003.JPG


...I'll get some innards photos shortly. If Karl pops in; did you have any fit issues with the wing fillets? A test fit as per instructions show what could be a problem with the rear. Did you follow the instructions here or did you add the wings to the fuselage first and then the fillets?

Geo
 
J Looks squared to me Geo.

I think I put the upper surfaces on the lower wing surfaces then attached that to the fuselage, then added the engines, the front of the nacelles the jet pipes and the engine covers.

Hope that helps mate
 

Users who are viewing this thread

Back