"Feathering" Camoflage paint technique, How?

Ad: This forum contains affiliate links to products on Amazon and eBay. More information in Terms and rules

Vengeance

Airman
90
2
Jul 2, 2012
Melbourne
Hi Guys,
Another newbie question I guess,
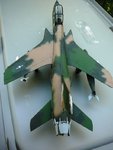
With my past models I've always masked up and painted two or three coloured camoflage and ended up with hard edges at the demarcation. This works for a lot of models however not all!
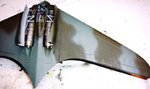
With my next build, a Tamiya F4-U1D Corsair, I'm looking to try the tri-color White/Grey/Blue paint scheme.

This time however I want a feathered or soft edges where the colours meet.

I have heard of a Blu-tac or plasticine rolled into a "snake" and stuck on where the colours meet and then spraying from a 90 degree angle.
My question(s) are, is this a good technique worth trying? Is there a better way?
I was talking to someone with way more experience than me who said he achieves the effect by manipulating his airbrush needle and pressure. I have no other info for this technique other than that.

Do you guys have other techniques you use? Any suggestions for my experimentation?
Any hints/tips/suggestions would be appreciated!

Cheers, Vengeance
 
Yes that works pretty well, I have used just taking paper and cutting it to the area I need covered and using rolled masking tape so that it sets just above and shooting it that way. A really fine low pressure nozzel on your air brush will work just fine for a USAF Camo pattern but work on some card stock to get the hang of it. If you have a steady hand (Not so much any more), you can to the tri color navy paint. But with the white I have a little issue with out the help of the paper. I used to take the instruction (paint guide) and blow it up on a scanner and cut out the camo scheme and then shoot m base color and then mask off with the paper tip and shoot the next and next. Hope that helps. I find it work a bit better for me.
 
Yep, a 'stepped' mask can work well, depending on the spacing between mask and surface, and the angle of the air brush. Og course, on a 'wavy' demarcation, it can be tricky to place the mask, making life difficult.
Instead of b*ggering about with masks, tape, blu tac etc, I normally just spray free hand, controlling the amount of diffusion by varying distance and trigger pressure .
 
With Terry above. Your finest nozzle, low pressure, and paint volume turned down. Paint the base color first then the darker
 

Attachments

  • DCP_1541.JPG
    DCP_1541.JPG
    39.9 KB · Views: 589
  • F105GWildWeasel2RS.jpg
    F105GWildWeasel2RS.jpg
    61.9 KB · Views: 500
I've tried the blu-tac and rolled masking tape but now prefer freehand airbrushing. I find that for 1/48 models, the overspray can still appear out of scale and it most certainly would be for anything in 1/72. To minimize this effect in 1/48, spray the lighter colour first, then when you spray the darker colour, angle the airbrush AWAY from the lighter colour as you carefully spray the demarcation line. In addition, I've often found that going back over the demarcation line again with the LIGHTER colour can minimize the overspray even more. Here's a sample of free hand lines done this was on my current 1/48 Corsair build:

14050903.jpg
 
You can also try without the spray and use the dry-brush method. Use a brush, dip in small amount of paint, wipe on a surface (like a newspaper) until almost none is left and then use to fudge the lines or however you feel is best for the best result.

.
Group102.jpg
 
Thanks Guys,
Might try the free hand technique and do the two colour Corsair for now while learning the technique, 3 colour scheme might be biting more than I can chew for now!
Thanks for the help guys.
Cheers,
Vengeance
 
Freehand is the best way, with the pointers mentioned above, small nozzle, thin your paint right, get your pressures right and away you go... IF you get a little more overspray / feathering than you want...finish the job first don't stop just for one portion. then thin the lighter colour even more and carefully respray slightly away from the demarcation till you have the paint going on nice and thin and light then carefully move up and along the edge of the line to reduce the overspray and improve the feathering effect, same can be done in the opposite with the darker colour if you slip up slightly with the lighter colour, it takes practice but you can get a real fine feathered edge...
 
The post above describes pretty much exactly how I do it. It does take a bit of practice, mainly in getting your paint/pressures right, but there is no need to be scared of having a go free hand.

A good way to practice is on some scrap plastic (in the UK plastic milk 'bottles' are good for this) or even card. Practice spraying pencil thin lines and develop consistent curves and swirls. I still do this, painting my signature! This will enable you to get all the variables of thinning, pressures, distance etc sorted before you commit to your precious model. It's not bad practice for any kind of detailed air brushing, like pre-shading for example.

This 71/02 demarcation, across the cowling of Hegenauer's Fw 190, and the just about visible 02/65 demarcation, was sprayed like this.

IMG_0713_zpsfbf27c1e.gif


Cheers

Steve
 
Last edited:
Steve mentions plastic milk bottles. When I started out with my airbrush I painted 20 - 30 styrofoam boxes. The ones restaurants hand out to take left-over food home. They're perfect to practice on and can generally be had for free. I also had a set of Testor's paints that I knew I'd never use, purples, pinks, ect. that way I was not using up "good" paints that I'd want later on and have to re-buy
 
Ok Guys, A lot of talk of nozzles and pressures, Ive got one nozzle on my air brush so Im guessing I try and adjust it to as thin as possible. I've also go a good air compressor with a pressure gauge, so what pressure are we looking at, Its been a while since I used it so could you guys please suggest the two pressures I should be using? I plan on practicing on some scrap plastic before hitting the model!
1 pressure: The general pressure I should be spraying usually
and 2 Pressure: The pressure I should adjust to to attempt the feathered edge!!
Thanks guys,
 
I tend to use about 15 to 20 psi for general spraying. For finer work, I turn it down to 8 or 10. Now I've heard two schools of thought on this. I think Wayne uses higher pressure for demarcations and, if so, I'll let him explain but I think, intuitively, that if you use a higher pressure, you should get a smaller cone of spray and hence a tighter demarcation. The downside is, in my opinion, less control and increased chance of making a mess. The key is to try lots of combinations and practice til you find what works for you.
 
I spray at much higher pressure than most modellers following the advice of an airbrush artist, a very good one with many years of experience. She was astounded at the low pressures many modellers use and never used less than 35 psi. She doesn't believe that most airbrushes work properly at less than about 25-30 psi.

I typically I spray at around 35 psi for just about everything. Try raising your pressure, you might be pleasantly surprised. It works for me :)

Cheers

Steve
 
Yep higher pressures for me too 30-40 and higher sometimes...BUT you must get your paint thinned right and really know how to control your trigger/finger action to get the fine application without messing it up...3 things to do....Practice, practice practice....
 
I agree about a higher pressure for general us. My current compressor is very basic, and only has two pressure settings - off and on !
When running, it's only around 15 psi, which works well enough, but I'm considering getting a more versatile compressor. I used to have access, years ago, to a compressor designed for heavy-duty graphic arts studio work, and used to operate around the 30 to 38 psi region for most general applications, and I agree with the view expressed by the airbrush artist mentioned. It does take a little more effort to control, and constant practice, and 'trial runs' are recommended.
 
Thanks Guys,
Gonna try general spraying at around 35psi, see how that goes.
What about the adjustment when feathering, what do you guys adjust the pressure to when trying to get that soft edge at the camo demarcation?

Thanks for help so far guys, will report back once i've conducted my experiments!
 
In general I run between 20 -25psi with my 0.30mm nozzle. I start on white paper and make any and all adjustments. Turning down the paint flow I can get lines 1/64in wide. Also as mentioned earlier point away from the line you want to minimize overspray. Cammo some styrofoam boxes and see how it goes varying pressure, feed rate, angle, ect.
 
I paint without masking and use the two techniques that have been discussed for soft edges or soft wayne technique that uses high pressure and normal paint (normal solution) and average distance traveled little needle for hard brodes or little stumped that andy uses low pressure, very thin paint, walking distance to the painting and almost needle path, but these techniques to be controlled rather airbrush, know well as respond and have but also known painting, if not controlled airbrush and paint I recommend the card to the hard edge placed directly over the area to paint to the edge slightly soft placed rolls of masking tape underneath so few raised and to the edge millimeters stays blur I leave more space put up to 3 rolls tape
 

Users who are viewing this thread

Back