First attempt at armour

Ad: This forum contains affiliate links to products on Amazon and eBay. More information in Terms and rules

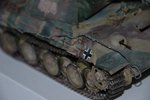
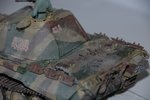
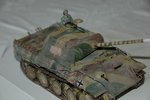
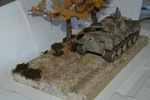
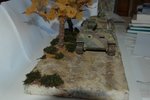
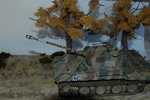
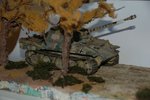
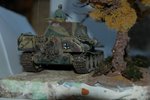
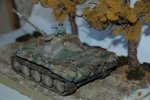
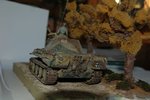
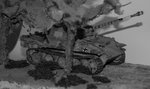
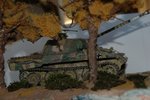
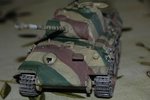
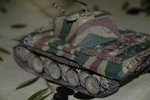
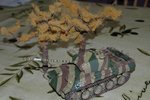
I understood. But you shouldn't exaggerate with the mud effect. Remember about that please.
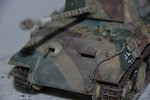
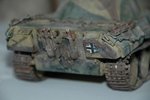
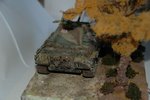
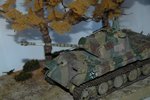
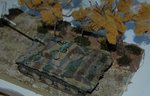
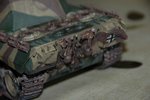
Also you can use a pencil for making these tracks looking more metalic at edges. A such rusted ones were when a tank was abandoned for damages for instance. Or it was hit and burned, in other words, destroyed and staying at one place quite long time.
 
Last edited:
right so i've painted the camo and it looks all right and im on decals and weathering now but i dont know which i should use for the side of the turret. I've used this camo scheme and it says 422 was used but im not sure if i should do that or something else.
rtshthshhy.jpg
 
Last edited by a moderator:
Here is the tank with camo applied and looking at it normally it looks good but through a camera and i can see its really patchy so i might have to go over it again...
Anyway i've given it a wash and outlined some panel lines, theres still more to do but i thought i'd show you it as it is now.
 

Attachments

  • Panther Build - 34.jpg
    Panther Build - 34.jpg
    31.2 KB · Views: 53
  • Panther Build - 33.jpg
    Panther Build - 33.jpg
    32.2 KB · Views: 70
  • Panther Build - 35.jpg
    Panther Build - 35.jpg
    44.3 KB · Views: 58
  • Panther Build - 36.jpg
    Panther Build - 36.jpg
    42.3 KB · Views: 59
  • Panther Build - 37.jpg
    Panther Build - 37.jpg
    38.9 KB · Views: 62
  • Panther Build - 32.jpg
    Panther Build - 32.jpg
    30.8 KB · Views: 72
Not bad at all. The numbers on the turret signify the Kompanie (Company), Zug (Platoon) and individual tank. So tank 422 would be tank No,2, of the 2nd Zug, 4th Kompanie. This would make it part of the 1 Abteilung (1st Battalion).
The numbers, colours and styles would depend on the unit, location and time period, rather like Luftwaffe markings. As you are depeicting the panther in Autumn, and it's an Ausf A, but with later style camouflage, I'd suggest the ETO, post Normandy, possibly Holland.
Units equipped with panthers at the time were:-
Panzer Lehr
2nd Pz Div.
9th Pz Div.
1st SS Pz.
2nd SS Pz
9 SS Pz
10 SS Pz
12 SS Pz.
The second Battalion (Abteilung) of all of these units were equipped with PzKfw IV.
Hope this helps.
 
Ok thanks for that. Just checking would panther 424 of 2nd SS Pz. Div 'Das Reich' be fine to use?
 
I agree, looks pretty good. It's been a loing time since I've tackled armour and it would be a real learning curve to get up to speed. I havew an Italeri Panther in my stash someplace. Good info here guys.
 
Thank you for all of the kind words and tips so here is my tank pretty much finished with bits and pieces and weathering (if the chalk is too heavy i can just brush it off). I didnt like the tow lines that came with the kit so i scratched some from wire on the scrap in my garden. The tracks dont really need superglue because the sprocket wheels decided to come off so they made the tracks sag nicely :)
Just need to make the dio now and maybe add an antennae...
Thanks for looking
Dan.
 

Attachments

  • Panther Build - 46.jpg
    Panther Build - 46.jpg
    30.4 KB · Views: 72
  • Panther Build - 40.jpg
    Panther Build - 40.jpg
    32.3 KB · Views: 73
  • Panther Build - 43.jpg
    Panther Build - 43.jpg
    33 KB · Views: 62
  • Panther Build - 42.jpg
    Panther Build - 42.jpg
    15 KB · Views: 56
  • Panther Build - 45.jpg
    Panther Build - 45.jpg
    31.4 KB · Views: 79
  • Panther Build - 41.jpg
    Panther Build - 41.jpg
    23.5 KB · Views: 65
  • Panther Build - 39.jpg
    Panther Build - 39.jpg
    31.9 KB · Views: 64
  • Panther Build - 44.jpg
    Panther Build - 44.jpg
    28.2 KB · Views: 66
Not bad at all, looks pretty convincing. For the tracks though, fix them down on the second set of road wheels from the front, as the Panther had a characteristic 'sag' of the tracks here. Also, if you want to be really accurate, crews at this time, if not wearing the black Panzer uniform, wore a reed green, one, or two-piece suit, with the cap still in black, If it's SS, then the SS eagle would be on the cap, and the left sleeve, at the bicep.
Good work.
 
Well i've finished the diorama now and here are the pics of the two together.
 

Attachments

  • Panther Build - 51.jpg
    Panther Build - 51.jpg
    56.5 KB · Views: 57
  • Panther Build - 61.jpg
    Panther Build - 61.jpg
    77.3 KB · Views: 50
  • Panther Build - 60.jpg
    Panther Build - 60.jpg
    56.6 KB · Views: 53
  • Panther Build - 63.jpg
    Panther Build - 63.jpg
    51.6 KB · Views: 58
  • Panther Build - 52.jpg
    Panther Build - 52.jpg
    53.3 KB · Views: 47
  • Panther Build - 47.jpg
    Panther Build - 47.jpg
    67.7 KB · Views: 53
  • Panther Build - 53.jpg
    Panther Build - 53.jpg
    59.6 KB · Views: 58
  • Panther Build - 48.jpg
    Panther Build - 48.jpg
    70 KB · Views: 52
  • Panther Build - 62.jpg
    Panther Build - 62.jpg
    46.2 KB · Views: 49
  • Panther Build - 58.jpg
    Panther Build - 58.jpg
    73.2 KB · Views: 50
  • Panther Build - 56.jpg
    Panther Build - 56.jpg
    60.9 KB · Views: 66
  • Panther Build - 54.jpg
    Panther Build - 54.jpg
    59.6 KB · Views: 64
  • Panther Build - 57.jpg
    Panther Build - 57.jpg
    56.7 KB · Views: 63
  • Panther Build - 49.jpg
    Panther Build - 49.jpg
    61.9 KB · Views: 55
  • Panther Build - 59.jpg
    Panther Build - 59.jpg
    55.6 KB · Views: 49
  • Panther Build - 64.jpg
    Panther Build - 64.jpg
    51.4 KB · Views: 52
  • Panther Build - 55.jpg
    Panther Build - 55.jpg
    62 KB · Views: 53
  • Panther Build - 50.jpg
    Panther Build - 50.jpg
    59.1 KB · Views: 57
Nice one, good stuff ! One comment though, the elevation of the gun barrel is rather high, beyond normal, especially for travel on a road/track. But it looks the biz - well done !
 
Thanks for the positive comments and airframes i noticed i had made the barrel too high as soon as the paint dried but i just figured it wouldnt look too bad and i would know for the future.
 

Users who are viewing this thread

Back