Donivanp
Lieutenant Colonel
Doing some really good work there Mat. I do like it.
Follow along with the video below to see how to install our site as a web app on your home screen.
Note: This feature may not be available in some browsers.
Ad: This forum contains affiliate links to products on Amazon and eBay. More information in Terms and rules
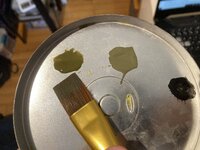
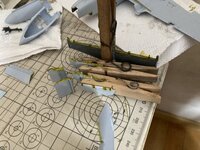
Maty, IMHO one wouldn't see a big difference in the colours on the UNDERSIDE of the a/c. I'm thinking of the real planes used in the Tokyo raid - they were not brand new, but not extremely used as well. These were not a/c from the Pacific or even from the MTO (North Africa), put under harsh conditions for weeks and months before the raid. A slight difference in the colours (just to show the different materials) is probably much more effective. Again IMHO.Another thing I've been working on is trying to get a lighter shade of neutral grey for the fabric.
View attachment 683245
Thank you!Doing some really good work there Mat. I do like it.
I see, that makes sense. I suppose there is no reason for the undersides of the control surfaces to look faded. I don't have Future or any Thinner myself, would water work? If not I might just paint it all unaltered neutral grey and leave the fading for the topsides. I'm currently thinking of using Vallejo or Humbrol's US Olive Drab for the overall finish with Vallejo Dark Olive Brown (which seems a good match for Dark OD 41) for the visible spots where the War Games markings were overpainted. For lighter OD I'll mix the Olive Drab with a bit of white.Maty, IMHO one wouldn't see a big difference in the colours on the UNDERSIDE of the a/c. I'm thinking of the real planes used in the Tokyo raid - they were not brand new, but not extremely used as well. These were not a/c from the Pacific or even from the MTO (North Africa), put under harsh conditions for weeks and months before the raid. A slight difference in the colours (just to show the different materials) is probably much more effective. Again IMHO.
For that matter I've learned a modelling trick many years ago. One uses "FLAT BASE" of Tamiya (or other manufacturers) over the already painted area with the original colour (NG). Mix the FB with Future (or even thinner) differently to achieve lighter or stronger effect. Yes, the area becomes lighter. Subtly lighter though.
Cheers!
If you have the flat base (X-21 from Tamiya or a similar one from a different manufacturer) you can mix it with any clear varnish (clear cote) and dilute it with distilled water + alcohol (e.g. Isopropyl 99% or 91%; 1 part alcochol, 3 parts water or sim.) Make firstly a very thin mixture with the flat base and try it. You don't need to put too much flat base - it becomes very rough. Just go 2-3 times over the area (when waiting the previous layer to dry completely). You can use the same "trick", if it works, for the OD (top) areas as well. Make a small test (on the inside of the model or on a test plastic) and if it works for you, use it further. I'm using an airbrush and the layers are very thin. With a brush you need some patience. For overpainted markings etc. try using darker colour (much easier to mix, than lighter tones). Just a hint darker.Thank you!
I see, that makes sense. I suppose there is no reason for the undersides of the control surfaces to look faded. I don't have Future or any Thinner myself, would water work? If not I might just paint it all unaltered neutral grey and leave the fading for the topsides. I'm currently thinking of using Vallejo or Humbrol's US Olive Drab for the overall finish with Vallejo Dark Olive Brown (which seems a good match for Dark OD 41) for the visible spots where the War Games markings were overpainted. For lighter OD I'll mix the Olive Drab with a bit of white.
If you have the flat base (X-21 from Tamiya or a similar one from a different manufacturer) you can mix it with any clear varnish (clear cote) and dilute it with distilled water + alcohol (e.g. Isopropyl 99% or 91%; 1 part alcochol, 3 parts water or sim.) Make firstly a very thin mixture with the flat base and try it. You don't need to put too much flat base - it becomes very rough. Just go 2-3 times over the area (when waiting the previous layer to dry completely). You can use the same "trick", if it works, for the OD (top) areas as well. Make a small test (on the inside of the model or on a test plastic) and if it works for you, use it further. I'm using an airbrush and the layers are very thin. With a brush you need some patience. For overpainted markings etc. try using darker colour (much easier to mix, than lighter tones). Just a hint darker.
I think the "flat base trick" is an easy one especially for smaller models. But if you don't like it or think it's too labor intensive or else, you can always proceed with your original way of doing the things.
Cheers!
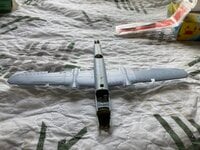
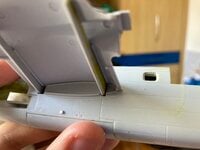
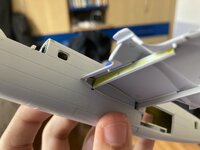
Looking good Matt. The wing gap seems minor to me but maybe I'm missing something.
It's not really a gap, the bottom half of the wing can attach without any issues or gaps. It's moreso the front and rear spars being ever so slightly twisted in relation to each other. I sanded the area completely beforehand, but unfortunately there is nothing I can do to rectify it. The wings have been attached with cement and I'm not confident in the spars' ability to not twist or break if I try to pry them off, and even if I did they are too frail for me to sand the twist away. I did not notice the issue when I was test-fitting earlier sadly.I can see that one wing seems to fit nice and snug and a small gap on the other. Have you checked to see if wither the wing join edge or the fuselage housing is nice and clean, the slightest mould defect bump or scrap of excess plastic could cause this problem.
The airplanes manufactured in the Inglewood Factory (California) were not primed (B-25B incl.). The flaps of those were painted before the final assembly and were covered completely top and bottom.Wanted to get your thoughts on this, are the leading edges of the wing flaps Zinc Chromate or NMF? The real life painting instructions only differentiate between exterior and interior parts, but I'm not sure what these are considered since they are fully hidden when the flaps are retracted. I don't know if these are painted before or after being fitted to the aircraft. If it's done afterwards, then I'd wager it's a simple case of the OD being applied while the flaps were retracted, but that doesn't necessarily mean either NMF or Zinc Chromate.
View attachment 683576
The airplanes manufactured in the Inglewood Factory (California) were not primed (B-25B incl.). The flaps of those were painted before the final assembly and were covered completely top and bottom.
After the complete painting of the planes in the so called "Sunshine Line" (outside the factory) flaps and top surfaces became the same:
This can be seen with the D-models in Kansas, being primed but the flaps were already painted before the assembly.
I'm not sure if the B-model was assembled in the very same way but I guess so.
The Tokyo raiders were not exactly the same to the last detail.
Check the launch here. At 1:35, 5:54, 6:17 etc. one can clearly see the flaps down and no NM area - the flaps' top areas are all painted.
At 2:19 there is an a/c with NM areas on the top of the flaps (IMHO this is the same a/c as on your photo). I believe this is s/n 40-2278, crew # 12 (could be 40-2270, crew #3 though) and I guess it is not the Whirling Dervish.
On this photo of one of the "Raiders" (s/n 40-2242) the lighter area is not at the flap top end but at the edge of the wing - it's an optical illusion:
In case you want to do it with such visible difference, it should be NM.
Cheers!
