Navigation
Install the app
How to install the app on iOS
Follow along with the video below to see how to install our site as a web app on your home screen.
Note: This feature may not be available in some browsers.
More options
You are using an out of date browser. It may not display this or other websites correctly.
You should upgrade or use an alternative browser.
You should upgrade or use an alternative browser.
GB-64 1/48 P-51D "Race 6" - One Trick Pony
- Thread starter N4521U
- Start date
Ad: This forum contains affiliate links to products on Amazon and eBay. More information in Terms and rules
More options
Who Replied?Lost for words Bill, impressive stuff 
- Thread starter
- #83
N4521U
Plastic Pirate
Attempt #1 and #2.............................
#1.........First I did cut away the indicated part of the fuselage,
the two pieces in lower part of photo. Then tried a Kindig trick
of spanning the opening with several layers of tape........
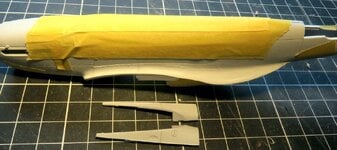
Then cut the replacement sheet template out.
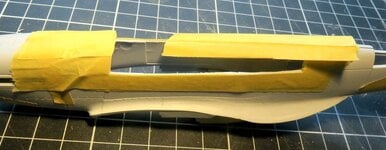
Attached that to a piece of .75mm, then tried .5mm and .25mm
styrene. None worked. Just couldn't get it to keep its shape.
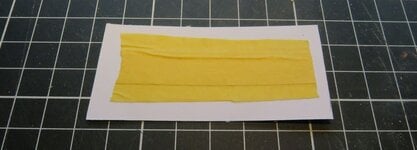
#2. Then a new tac, line the opening with card stock.
cover with industrial paint tape. and Then.........
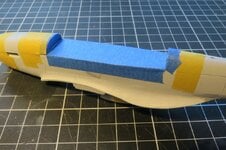
fill with air dry clay. I'll let this set and
try using it as a mold and pull some heated
styrene over it. Couple days drying time!
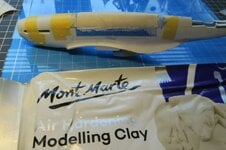
What I go thru, arrrrrrrrrrrgh
#1.........First I did cut away the indicated part of the fuselage,
the two pieces in lower part of photo. Then tried a Kindig trick
of spanning the opening with several layers of tape........

Then cut the replacement sheet template out.

Attached that to a piece of .75mm, then tried .5mm and .25mm
styrene. None worked. Just couldn't get it to keep its shape.

#2. Then a new tac, line the opening with card stock.
cover with industrial paint tape. and Then.........

fill with air dry clay. I'll let this set and
try using it as a mold and pull some heated
styrene over it. Couple days drying time!

What I go thru, arrrrrrrrrrrgh
Crimea_River
Marshal
Lordy that's quite the custom job. Hope #2 works out.
Vic Balshaw
Major General
Got me fingers crossed for you Bill.
Good work so far Bill!
- Thread starter
- #88
N4521U
Plastic Pirate
Thanks for that.Good work so far Bill!
FYI, and in general, the clay was a flop. It warped in drying, and shrunk in length. However.......... I have another approach which I am pleased to say.......... is working! Photos will follow.
- Thread starter
- #89
N4521U
Plastic Pirate
So............ some crap........ and a little bit of success!
First the crap. Shrink and curl......dam.
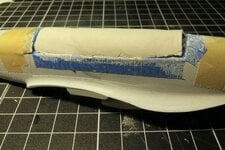
I had some PVC sheet from long ago in the garage! Cut a chunk to fit
then scribed the profiles, front, back and sides with a pencil.
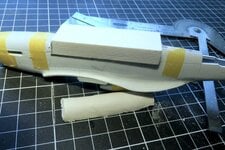
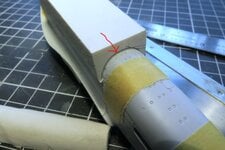
Then back to the garage. Laid my block plane on it's side and pulled that
PVC across the blade to remove the bulk. Then really course sand paper
to bring the ends and sides to my marks. I used the same course sand
paper to lower what was left to a straight line to front and back, sorta.
Held this in place with tape to get the front and back closer to the profile.
Then taped the front and back and took the middle down. It's all close now.
Fuselage is still not glued up. Will do the razor back next!! Fingers crossed.
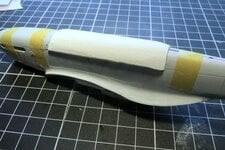
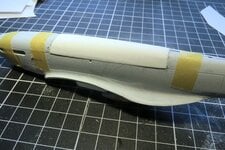
First the crap. Shrink and curl......dam.

I had some PVC sheet from long ago in the garage! Cut a chunk to fit
then scribed the profiles, front, back and sides with a pencil.


Then back to the garage. Laid my block plane on it's side and pulled that
PVC across the blade to remove the bulk. Then really course sand paper
to bring the ends and sides to my marks. I used the same course sand
paper to lower what was left to a straight line to front and back, sorta.
Held this in place with tape to get the front and back closer to the profile.
Then taped the front and back and took the middle down. It's all close now.
Fuselage is still not glued up. Will do the razor back next!! Fingers crossed.


Vic Balshaw
Major General
Genie at work. Well don Bill.
T Bolt
Colonel
Wow! That is really looking great Bill
- Thread starter
- #93
N4521U
Plastic Pirate
My bladder banged up, my wrist banged up, my BP is sh!te...........
I did get an hour or more on the bench. Fuselage halves and main
structural stuff glued up. Gotta cut another piece of PVC sheet for
razor back and shape that. Eat, sleep rest, borrrrrring.
I did get an hour or more on the bench. Fuselage halves and main
structural stuff glued up. Gotta cut another piece of PVC sheet for
razor back and shape that. Eat, sleep rest, borrrrrring.
Vic Balshaw
Major General
If eat, sleep and rest is what your body is telling you what it wants, then go with it. When I have times like this, usually the jigsaw's come out. 
SaparotRob
Unter Gemeine Geschwader Murmeltier XIII
What do you do with the bodies afterwards?..When I have times like this, usually the jigsaw's come out.
Vic Balshaw
Major General
That would be telling!!What do you do with the bodies afterwards?
fubar57
General
Haven't you been following Vic's "What's In My Back Yard (so to speak)? The clues are all thereWhat do you do with the bodies afterwards?
A4K
Brigadier General
With Vic - if you need rest, take it! Hope you're alright soon Bill.
Airframes
Benevolens Magister
Get the rest when you can Bill, and I hope you feel better very soon.
I know the feeling - been very lethargic, no energy, a bit of pain and poor sleep.
I know the feeling - been very lethargic, no energy, a bit of pain and poor sleep.
A4K
Brigadier General
Hope you're alright too Terry.
Users who are viewing this thread
Total: 1 (members: 0, guests: 1)
