Navigation
Install the app
How to install the app on iOS
Follow along with the video below to see how to install our site as a web app on your home screen.
Note: This feature may not be available in some browsers.
More options
You are using an out of date browser. It may not display this or other websites correctly.
You should upgrade or use an alternative browser.
You should upgrade or use an alternative browser.
Grumman TBF-1c Avenger, Commonwealth GB
- Thread starter A4K
- Start date
Ad: This forum contains affiliate links to products on Amazon and eBay. More information in Terms and rules
More options
Who Replied?LDSModeller
Airman
Alan, that is one stunning build...thanks for sharing!
I have 2 Sunderlands myself, one to be an RNZAF Mk.III transporter, the other a later MR.5 (Brought on charge too late to fit in with this build description) ...Sunderland Mk.III it is then!
In that vein, anyone have any info on the reconfigured interior?
(Btw, look forward to seeing your TBF-1c build Alan!)
Cheers, Evan
Hi Evan
For the Mk III Transports (all four) the flight deck was a normal
Sunderland 'Office" the main changes were on th lower decking.
The RNZAF version had mattress type seating similar to this
The Officers ward room would have probably lap belts attached to
strap the passengers in, and as you already know the portholes were
lower down.
Similar to photo in this link
http://www.seawings.co.uk/images/sunderland/RAF%20Mus%20WR/115.JPG
Galley would remain the same, to provide tea and a storage area for the
"bagged lunches" for the passengers - note flying time
between Hobsonville and Laucala bay (or return) was about
nine hours
Bomb bay would have bomb racking removed and seating would have been added
(similar to officers ward room), though the bomb bay doors would still open.
Crew ward room would be converted to seating, bunks again similar to
officers ward room see link.
http://i212.photobucket.com/albums/cc106/pondskater/Seawings/1132.jpg
Seating was also on the raised deck aft of crew ward room,
only till about opposite the rear main hatch
A Sunderland flying from Laucala Bay to Hobsonville carried some
30 passengers, I suspect some would have taken up residence
on the cargo aft of the rear main hatch.Other than that the Mk III
Transport was pretty much the same interior wise.
If you check out my build, and if you want to add the interior
remove the lower part of last bulkhead, it will give more room for the
bunk/seats
Are you planning to sit the aircraft on beaching gear or a water diorama?
If water diorama I have some info on mooring for you
")
HTH
Alan
Last edited:
- Thread starter
- #23
A4K
Brigadier General
Wojtek, dzieki for your comment, and Alan, thanks for the help! Both much appreciated!
 Alot of PE you have got there Evan.
Night Fighter Nut
Master Sergeant
Ok Even. Let's see some action here.
- Thread starter
- #26
A4K
Brigadier General
Cheers for the support guys!
Not too much action from here so far, sorry, had other things to attend to.
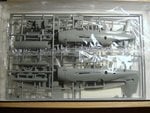
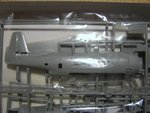
Some great news...got a VERY nice surprise from a friend: a 1:72 Hasegawa TBM-3 Avenger!!!
To make her a kiwi, I'm gonna need to convert the cowl - seems a shame to do that with such an expensive kit, so does anyone have a Hasegawa TBF-1c fueslage to trade for the TBM-3 fues? Can send the PE parts for the TBM-3 as a bonus, including flaps (plus kit markings of course)
In the meantime, I'm going to start with the common components, and cross the conversion bridge when/ if the time comes.
(Also started a C-47 for this build - will start a seperate thread for that)
Evan
Not too much action from here so far, sorry, had other things to attend to.
Some great news...got a VERY nice surprise from a friend: a 1:72 Hasegawa TBM-3 Avenger!!!
To make her a kiwi, I'm gonna need to convert the cowl - seems a shame to do that with such an expensive kit, so does anyone have a Hasegawa TBF-1c fueslage to trade for the TBM-3 fues? Can send the PE parts for the TBM-3 as a bonus, including flaps (plus kit markings of course)
In the meantime, I'm going to start with the common components, and cross the conversion bridge when/ if the time comes.
(Also started a C-47 for this build - will start a seperate thread for that)
Evan
Attachments

Night Fighter Nut
Master Sergeant
Great but you're running out of time. There is only a little more than a month left.
Airframes
Benevolens Magister
Evan, why do you need a whole new fuselage? Can't the cowling be converted?
- Thread starter
- #29
A4K
Brigadier General
Night Fighter Nut
Master Sergeant
What's the difference in the two cowlings? Perhaps someone here knows how to work around it.
- Thread starter
- #31
A4K
Brigadier General
I know the differences well, which is why I'm trying to avoid the conversion if possible - not that it's overly difficult, but more because I'm afraid of screwing up a bloody expensive kit!
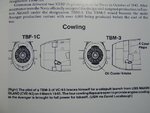
The TBM-3 as you see has 4 cooling gills around the rear of the cowl, while the TBF/TBM-1 and 1c's had 2 large gills on upper rear of the cowl, and a third on the lower. The -1's also had a single built-in airscoop on the upper radiator lip, while the TBM-3 had two, one upper, one lower. There are other minor detail changes too, especially around the exhausts. (Picture courtesy Squadron: TBM/TBF in action)
The TBM-3 as you see has 4 cooling gills around the rear of the cowl, while the TBF/TBM-1 and 1c's had 2 large gills on upper rear of the cowl, and a third on the lower. The -1's also had a single built-in airscoop on the upper radiator lip, while the TBM-3 had two, one upper, one lower. There are other minor detail changes too, especially around the exhausts. (Picture courtesy Squadron: TBM/TBF in action)
Attachments
Last edited:
- Thread starter
- #33
A4K
Brigadier General
It's called 'lack of faith in my ability to do a good job' my friend! I would be braver if it was a cheap Airfix kit or something!
(I will do it though, so no worries! )
(I will do it though, so no worries!
)Airframes
Benevolens Magister
Ah! Now I understand - hadn't realised the cowling was moulded as part of the fuselage. But - a bit of work yes, but I'm sure a man of your abilities could make it a piece of p**s !
It's called 'lack of faith in my ability to do a good job' my friend! I would be braver if it was a cheap Airfix kit or something!
(I will do it though, so no worries!
OK.
- Thread starter
- #36
A4K
Brigadier General
Cheers for the faith guys! I hope to live up to your (and my) expectations!
Btw, forget my comment re a fues trade! Closer inspection of the sprues shows Hasegawa were maybe a little sloppy in their research: While the cowl rings are moulded on seperate sprues (you only get the one for the version you purchased), the fueslage seems to be a common sprue, marked at top as '1/72 TBM-1C/3' !
Seems they picked up on the intake diferences, but not the radiator gills...(conversion, conversion, conversion...)
Btw, forget my comment re a fues trade! Closer inspection of the sprues shows Hasegawa were maybe a little sloppy in their research
Seems they picked up on the intake diferences, but not the radiator gills...(conversion, conversion, conversion...)
Aircraft of World War II - Warbird Forums - Search Results
My build was a Hasegawa 1c (IIRC). It does have the correct cowl.
My build was a Hasegawa 1c (IIRC). It does have the correct cowl.
- Thread starter
- #38
A4K
Brigadier General
Sorry mate, keep getting 'Sorry - no matches' when I hit that link. Is it corrrect?
c'mon Evan, you can get the job done mate!
Users who are viewing this thread
Total: 1 (members: 0, guests: 1)