Navigation
Install the app
How to install the app on iOS
Follow along with the video below to see how to install our site as a web app on your home screen.
Note: This feature may not be available in some browsers.
More options
You are using an out of date browser. It may not display this or other websites correctly.
You should upgrade or use an alternative browser.
You should upgrade or use an alternative browser.
Hasegawa 1/32 FW190A-8
- Thread starter Vaughan
- Start date
Ad: This forum contains affiliate links to products on Amazon and eBay. More information in Terms and rules
More options
Who Replied?- Thread starter
- #22
Airframes
Benevolens Magister
You're welcome Vaughan.
ccheese
Member In Perpetuity
Very good start, Vaughn...
Charles
Charles
N4521U
Plastic Pirate
Great work Vaughn......
Now for some questions.....
Cockpit..... Did you use a silver undercoat then rub away some of the top coat of gray, or visa versa, dry rub silver or lighter gray? I am very afraid of doing this weathering thing!
Inst panel....... They are decals? It looks fantastic.
Cowling..... If you cut out and drop a panel? Is the engine just the one row of cylinders? You'd need a detailed engine eh?
Airframes
Benevolens Magister
I think you're right about the engine Bill - just noticed it looks like only the front half.
On their 'old', ex-Frog kit, the engine was complete, and included the engine bearers. Might not be an option to open up cowlings without using a resin engine.
On their 'old', ex-Frog kit, the engine was complete, and included the engine bearers. Might not be an option to open up cowlings without using a resin engine.
- Thread starter
- #27
Thanks Guys
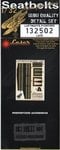
Terry your right the engine is only 1 1/2 cylinders deep so no room for detailing unless as you say use a resin one(way too expensive for me). I had a look at the Hannants site those belts look really good so will have to order some.
Bill the weathering was done once the RLM66 was down, good old dry brushing I use Humbrol silver it's not as difficult as it might appear you just have to make sure you get as much paint off the brush so it is 'dry'. Hand brush detail on the instrument side panels but I used the decals provided for the main panel, as they came as one decal I cut out each individual gauge as it would have been impossible to lay it down as one. The only real shame is you will not be able to see it at all, well I know it's there.
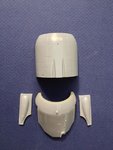
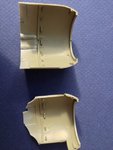
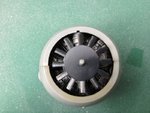
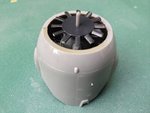
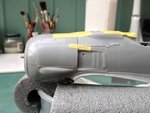
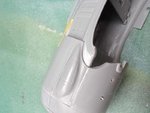
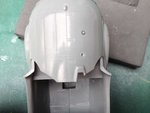
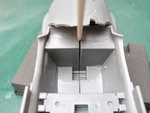
I have made some progress over the last few days. The engine cowling is again in 4 parts as was the P47s but this one goes together a lot easier as the engine fits nicely into slots provided and has been sprayed RLM2. As I thought the engine will all but be hidden once the cooling fan is is in place. A dry fit of the cockpit in the fuselage and all looks good, but mating the forward part of the fuselage looks like there might be issues around the wing roots. I will leave closing the fuselage until the wings are together so I can be sure of a perfect fit.
Terry your right the engine is only 1 1/2 cylinders deep so no room for detailing unless as you say use a resin one(way too expensive for me). I had a look at the Hannants site those belts look really good so will have to order some.
Bill the weathering was done once the RLM66 was down, good old dry brushing I use Humbrol silver it's not as difficult as it might appear you just have to make sure you get as much paint off the brush so it is 'dry'. Hand brush detail on the instrument side panels but I used the decals provided for the main panel, as they came as one decal I cut out each individual gauge as it would have been impossible to lay it down as one. The only real shame is you will not be able to see it at all, well I know it's there.
I have made some progress over the last few days. The engine cowling is again in 4 parts as was the P47s but this one goes together a lot easier as the engine fits nicely into slots provided and has been sprayed RLM2. As I thought the engine will all but be hidden once the cooling fan is is in place. A dry fit of the cockpit in the fuselage and all looks good, but mating the forward part of the fuselage looks like there might be issues around the wing roots. I will leave closing the fuselage until the wings are together so I can be sure of a perfect fit.
Attachments
-
 130504_1831.jpg41.6 KB · Views: 140
 -
 130504_1832.jpg40.1 KB · Views: 146
 -
 130604_1830.jpg46.4 KB · Views: 140
 -
 130804_1842.jpg64.8 KB · Views: 140
 -
 130804_1843.jpg53.3 KB · Views: 141
 -
 130804_1845.jpg48.8 KB · Views: 138
 -
 131004_1834.jpg54.8 KB · Views: 134
 -
 131004_1837.jpg72.8 KB · Views: 142
 -
 131104_1846.jpg26.2 KB · Views: 149
 -
 131104_1850.jpg23.1 KB · Views: 132
 -
 131104_1851.jpg27.3 KB · Views: 141
Last edited:
Airframes
Benevolens Magister
Good stuff Vaughan. Let me know what those harnesses are like when you get them. I normally make my own, but I might try some for one or two future projects.
- Thread starter
- #29
Airframes
Benevolens Magister
Yep, they're reasonable value, as you say, and look much better, and will 'drape' better, than those bl**dy awful metal etched examples!
Somewhere on that well-known on-line auction site, I saw some close-up shots of the Luftwaffe and USAAF belts, fitted to a seat, and they really looked superb - like looking at the real thing!
I read somewhere in a review, or perhaps an advert, that they can be adjusted just like the real thing - don't know how true, or practical that is, but they certainly look the part!
Looking good Vaughan!
N4521U
Plastic Pirate
Egggggzelent work Vaughn.
Vic Balshaw
Major General
Definitely doing nicely and those belts, I'll have to look into them.
- Thread starter
- #34
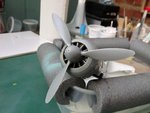
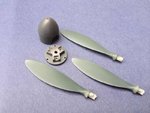
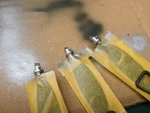
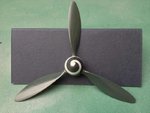
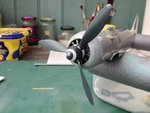
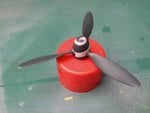
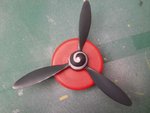
Thanks Guys, Hannants dispatched the belts yesterday but too late for the post so should arrive Monday all being well. While I wait I thought I'd make a start on the prop. Blades sprayed with RLM70 and nose cone with RLM74 which I think is a more realistic black at this scale then a coat of Klear. This afternoon I had a go with the spiral decal my first I may add. Needed a lot of decalsoft to get round those curves. It's not a 100% I started at the bottom of the nose cone working to the tip so things would line up with the cut outs which I succeeded in doing, saying that the end circle is not central but hey I tried my best. Washed and weathered and a flat coat and it looks ok.
The exhaust stacks which are rectangular aren't hollow and will require some attention anyones thoughts on this?
The exhaust stacks which are rectangular aren't hollow and will require some attention anyones thoughts on this?
Attachments
-
 131204_1852.jpg41.3 KB · Views: 154
 -
 131204_1853.jpg45 KB · Views: 155
 -
 131204_1854.jpg44.9 KB · Views: 148
 -
 131204_1855.jpg33.7 KB · Views: 157
 -
 131304_1856.jpg32.5 KB · Views: 157
 -
 131304_1862.jpg39.8 KB · Views: 152
 -
 131304_1871.jpg31.5 KB · Views: 150
 -
 131304_1872.jpg30.3 KB · Views: 147
 -
 131304_1873.jpg39.7 KB · Views: 153
meatloaf109
1st Lieutenant
Drill 'em out and square up the insides with a #11 X-acto.
Crimea_River
Marshal
Exactly. Did it in 1/48 so should be OK for yours. Prop looks good Vaughan.
Airframes
Benevolens Magister
Good stuff Vaughan, and I agree about the exhausts. On the tip of the spinner, the off-center spiral can be touched-in, working from the stripe, around the spinner tip, to correct it.
Agree with all the sugestions too!
Spiral decals can be a real pain, the trick is to keep them wet/soaked on the spinner for as long as possible to get it to slide in to place just right before carefully leeching out the water to settle them.
Spiral decals can be a real pain, the trick is to keep them wet/soaked on the spinner for as long as possible to get it to slide in to place just right before carefully leeching out the water to settle them.
Airframes
Benevolens Magister
I agree - I hate spiral decals! I think that over the years, I've probably only got maybe six to work properly!
Users who are viewing this thread
Total: 1 (members: 0, guests: 1)