How to get started?

Ad: This forum contains affiliate links to products on Amazon and eBay. More information in Terms and rules

looney

Airman 1st Class
186
1
May 6, 2010
The last time I build me a model aircraft was about 25 years ago (I was 5 or 6) and then only out of the box no paint and with as much bombs rockets and guns on it. Now I want to do it a bit better, only I'm not sure I got patience for it.

Therefore I don't want to buy a lot of tools/paint and stuff just the minimum of tools and paint.

What tools can you recommend and if possible are there any good toolsets available?

My goal is to try a few 1:72 scale aircraft just to see if I like it as a hobby, I thinking of spending roughly 30-50 € on gear. Excluding paint and models.

tnx in advance
 
Last edited:
That should be plenty. I'd start with an X-Acto knife, a file, putty, various grades of sandpaper, CA or liquid glue, and some tweezers. Don't forget a couple of paint brushes, one for fine work and one for painting large areas. Cheap ones work OK so don't waste your money on artists' brushes.
 
Tought so..

Am gonna buy a cheap 10€ starter set, 1x tweezer, 1x knife, 1x file 1x sprue cutter.. I will ask more questions at a later date :)

Bought me my 1st model also, a FW190 F8 1:72 I believe
 
Last edited:
That should be more than enough cash and supplies.I always like Testors liquid cement it comes in a bottle w/brush and all you have to do is just touch the 2 pieces of plastic together and let the capillary action do the work for you.
 
I would probably check some of the old Group threads. I know I posted some pics of tools that O used and I believe others have done so. Just so you know, there are quite a few of us who took the loooonngg vacation between builds. :)
 
Last edited:
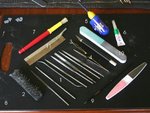
Here's some stuff I use, a minimum of equipment as well. Haunt the (2DS) "two dollar" shops for some of this stuff, or anything else you might see.

TOP PICTURE.
1. Itty bitty files, (2DS) 2. steel brush for cleaning files (2DS) 3. little clamps 4. long clamping tweezer 5. Revell liquid glue, has a tiny outlet and fuses the plastic 6. super glue, any kind (2DS) 7. Long brush, cut the bristles till they are kinda stiff (2DS) 8. Soft cutting baord (2DS) 9. synthetic brushes, come in set of 3-4 (2DS) 10. buffing boards, for girlies (2DS) 11. If you want to spend some more an Exacto saw.

BOTTOM
1. those chinese take away trays make eggggselent parts storage 2. Filler, comes in green or white, don't really know which is best 3. Mr Surfacer, this one is the 1200 thickness, is eggspensive so make sure you want it for filling itty bitty places 4. your spru cutters, exacto will work until you are sure your gonna have 10 models going at the same time like most of us 5. This is green tape available at automotive paint stores. great stuff, will not bleed and is tough enough to file or sand over and next to. paint edge as well 6. if you can find them cheep, they only drill plastic 7. glue tac, I use oit for holding small parts for painting and glueing to 8. is a block of non-hardening clay with a glue wire in a wooden handle I make. it's a very thin wire with a very small loop at the end stuck into the stick. the end of the handle is filed to a taper. I push that end into the clay, I put a drop of super glue into the dimple and fill the loop from there and apply the glue to the surface I want to glue. 10. Is a little block of stone. I glue tac the small parts to it to work on, glueing and painting..... a great extra

I hope I haven't confused you, just hope it helps. cheers, Bill
 

Attachments

  • IMG_2519.JPG
    IMG_2519.JPG
    48.7 KB · Views: 159
  • IMG_2525.JPG
    IMG_2525.JPG
    39.7 KB · Views: 156
Was planning a trip to the DIY stored over here in The Netherlands. but the cheap stores are on my list now also :)

tnx
 
Always check other outlets for tools, and some supplies. Modelling accessories and tools / equipment are in the same league as anything to do with weddings - the price doubles or trebles !
Earlier this afternoon, I was in my local model shop, and had a look for some new tweezers, as my old, straight-ended pair have gone a bit bent and worn. I found a nice pair, stamped with the name of a well-known, Japanese model manufacturer, priced at £5.75 !!!
Ten minutes later, I bought a very similar pair at the Pharmacy across the road - for 75 pence !
Sprue cutters = wire snips = hardware store= 25% of the price of modelling tools.
Modelling knives - forget all the brands, including the well-known (and good) type which has an 'X' in the name, and a round, or tubular handle. The modelling knofe is probably the single most important, and most used modelling tool. Get a surgical scalpel handle, from Swann Morton, and a pack of straight blades and one of curved. The total cost will be the same, and probably less, than the 'modelling' knives, and it will last a lifetime, with the blades being stronger, more resilient, and sharper. But, more importantly, the 'flat' handle is safer to use, offers more control, and is more comfortable - and it won't roll of the bench ! One of the ones I use I've had for about forty years, probably more.
Until about two years ago, my modelling tools consisted of the scalpels, some tweezers, an old 'tin' razor saw, wet and dry paper and nail filing boards, a drawing compass, and some other household bits and pieces. Oh, and a mini power drill, only used for a very few jobs. The paint brushes are from my art equipment, and the airbrush was hardly used, until I bought a newer, fine-line one, inexpensive, just over a year ago.
 
Bought me a set consisting of 1 knife, sprue cutter, file and tweezers at €8,- bought me some needle files (needed those for an DIY job anyway, louse door lock got a small bent piece, and similar stuff)

Biggest problem is paint.. I got this box Revell Germany - 1/72 Focke Wulf 190 F-8 with 3 small bits of paint and the likes (brown blue and green). But I need like 10 different colours. I'm 1st gonna see if I can get away with less colours (ie switch anthracite with normal black).

I looked at the sprues for like 3 hours this afternoon :D damn tiny
 
But I need like 10 different colours. I'm 1st gonna see if I can get away with less colours (ie switch anthracite with normal black).

I looked at the sprues for like 3 hours this afternoon :D damn tiny

I always enjoyed mixing basic colors instead having lots of them. You must think that every single color in the universe is content in the five basic: black, white, yellow, red, blue. If your target is a not so expensive start, try with those five and a can of aluminium for bare metal.
And don´t let small pieces intimidate you, just add a magnifying glass and those pliers that women use for depilation to your tool set.
Good luck and welcome back to modeling world!
 
I agree about the paint. Although i have a fairly extensive range, I always have a stock of the basic colours. These are used not just on their own, but for mixing to achieve a desired shade, either a colour I don't have, or for adjusting an existing colour and so on.
As Matt quite rightly stated, get used to preparing the parts, then assembling, and then painting, before moving on to more 'ambitious' tasks.
A model can have all the PE parts in the world thrown at it it, or be painted with the most expensive, all- singing, gold-plated air brush, but if it's not properly prepared, before construction, by removing, for example, seams, burrs and filling gaps, all the above are a waste of time, effort and money.
And always remember, unless building for a living, for example for movie or museum work, modelling is a hobby, and should be relaxing and enjoyable. (said he, cursing as he kicks the living c**p out of a particular 1/48th scale jet attack aircraft !!!)
 
I agree with the above. I turned 67 and am back in for the second time since I was 16. Last time I started back in again was about 12 years ago. A little old to be hired permanent, so I work on call in a sign shop, doing some work no one else is good at. So back into modeling I came. The first few small kits you just want to get used to preparation again. Try out a few tricky things as experiments, see how they work, or Don't. We learn more by our mistakes than by our triumphs. It's like, "what if I use this? What if I do this"? Working out how to handle small parts and stuff. I've got 9 other kits going before I started on my Defiant for the Group Build. Took that many small starts to get over the Big heebegeeges, but I am enjoying doing the kind of work and results I am getting.

This site has been the best thing to come along for me, these guys give insight into great work. Enjoy mate, just enjoy!
 
Indeed, my goal is not a perfect model, just a model which fits well together and has a faint idea of a realistic paint job.. Heck I need to put on Decals some are like 1 mm squared ... No IDEA how Im goin to manage that, all I know is that it is great fu to try :D
 
Indeed, my goal is not a perfect model, just a model which fits well together and has a faint idea of a realistic paint job.. Heck I need to put on Decals some are like 1 mm squared ... No IDEA how Im goin to manage that, all I know is that it is great fun to try :D

Well, we have a major problem here...:shock:
First make all what goes inside the plane and you will never more can reach: cockpit and engine. Once these two are ready, don´t forget paint the inner walls of the fuselage and engine covers.
Second, bond all together and you are ready to start with the plane itself.
As you can see, the trick is create great groups of assembly instead think about the model as an horrifying bunch of little pieces.

Moreover, read many, many times the manual to see what pieces you will be unable to reach when the fuselage halves be glued and to be familiar with your model. Be sure that you understand every detail of the proccess of assembly.

To be continued... for me or other members.
 
Sand paper........... go to the hardware, get "wet dry paper". 1200 grit would be a place to start. You can use this under water, or just Lick the stuff if your working at the "bench". I use 1200 for finishing off filled areas. I wouldn't recommend buying one of Everything, once you have used 1200 you'll get a feel for what will work best for you.

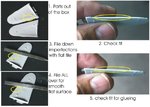
Attached is something I leaned from master builder years ago. He taught me to do this for Any mating surfaces. Wings, fuselage, bombs, rockets, Anything. This helps avoid huge seam filling.

Enjoy.
Bill
 

Attachments

  • start posting.jpg
    start posting.jpg
    36.7 KB · Views: 129
Tnx, haven't glued anything yet, I cut the parts for the cockpit without breaking any of the pieces... I'm happy.

Now deciding if it's worth trying to put a 2d decal on a 3d surface :)
 
Last edited:

Users who are viewing this thread

Back