Kawanishi N1K2-J Shidenkai (George) 1/48 scale

Ad: This forum contains affiliate links to products on Amazon and eBay. More information in Terms and rules

Hotntot

Senior Airman
420
16
Mar 7, 2010
United Kingdom
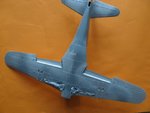
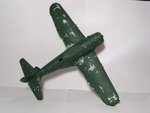
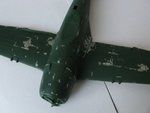
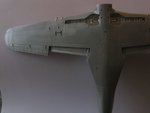
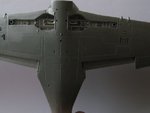
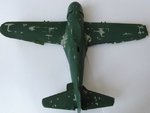
Hasegawa Kawanishi N1K2-J Shidenkai (George) 1/48 scale


After much deliberation on which kit to embark on next from my (small) collection I decided to go for this one, as I've especially wanted to have a go at putting together a Japanese plane - with the weathering options to go with it. With no aftermarket additions purchased this will be a build straight out of the box.


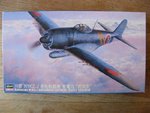
Picture 1: Box illustration - JT73 (09073)
(Forgot to add this initially)

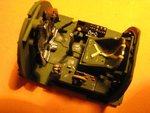
Picture 2: Firstly the interior. The cockpit dash was done using one of the dash decal options from the decal sheet - which came in four separate parts off the sheet. The other decal is in one whole piece and I didn't use it as I wasn't sure how well I would get it to sit on the dash. It was good to know it was there as a spare though in case I made a mistake. With plenty of MicroSol and lots of care the separate parts sat down pretty well. (I've noticed from other projects that it's going to be difficult to see into the cockpit when it's all shunted together and in place).

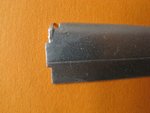
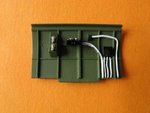
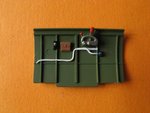
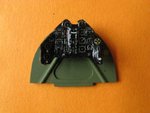
Pictures 34: The cockpit side walls.

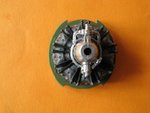
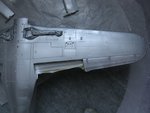
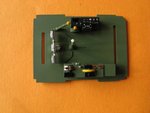
Picture 5: Cockpit floor, pedals and other details. After much consulting I've opted for Humbrol 150 for the interior colour as a match for the Mr Color colours given in the instrucions - a 50/50 mix of 126 127. And as all my paints are Humbrol I decided to stick with the same brand. Plus I can usually get extra tins from a local shop if I find I'm missing a colour - very handy.

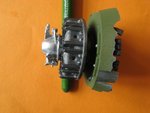
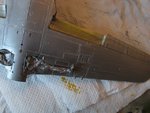
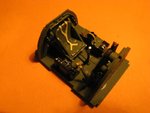
Pictures 67 The dash, seat and bulkheads in place (with a careful dry placement of the sidewalls when glueing to ensure correct alignment when they too are glued in place). And some wear and tear added before moving on.
 

Attachments

  • IMG_9835.JPG021.jpg
    IMG_9835.JPG021.jpg
    79 KB · Views: 459
  • IMG_9834.JPG020.jpg
    IMG_9834.JPG020.jpg
    75.3 KB · Views: 328
  • IMG_9824.JPG016.jpg
    IMG_9824.JPG016.jpg
    65.5 KB · Views: 332
  • IMG_9849.JPG027.jpg
    IMG_9849.JPG027.jpg
    56.1 KB · Views: 454
  • IMG_9844.JPG026.jpg
    IMG_9844.JPG026.jpg
    74.2 KB · Views: 323
  • IMG_9832.JPG019.jpg
    IMG_9832.JPG019.jpg
    78.4 KB · Views: 524
  • IMG_9868.JPG001.jpg
    IMG_9868.JPG001.jpg
    75.9 KB · Views: 358
Last edited:
Thankyou guys. So - on to other parts of the bird; the engine, gueing the wings, the undercarriage, propeller...some of which had been started alongside the cockpit build.

Pictures 1,23: The engine, which has nice detail on it. But I haven't gone as far as adding anything extra which Ive seen others do. That may come later when skills and ability become better. Plus I'm going to put more effort into the weathering of the craft.

Picture 4: Wings glued together and the wheel wells sprayed.

Picture 5: Drop tank assembled - with the joining line filled, sanded and re-scribing started where needed.

Picture 6: Some damage to one of the combat flaps with a repair started using some styrene and which needs further work on to finish off. (Done when I tried to take off the paint which I'd sprayed on too thickly).

Pictures 78: The propeller. I found it difficult to get what I think is approximately the right colour - which is on both sides, unlike some Japanese aircraft which I 've found out had different colours front and back. :confused: If someone can advise me on that and the colour, that'll be great.

Pictures 910: Progress on the undercarriage so far - sprayed and assembled, bar the wheels which need more work.

Picture 11 The wings glued and held in place, (checking that the alignment was correct before leaving to set).

Pictures 1213 Preparation of the underside - which will be a mixture of aluminium and silver tones. Plus the top side aluminium base coat as stage one of the weathering process. (making sure the cockpit opening was tightly sealed to prevent any ingressing of any paint)

Some of the parts have collected a bit of dust, despite being put in a box, so they'll need cleaning off with the airbrush before any further work and assembly but that's where I've got so far until the weekend.
 

Attachments

  • IMG_9870.JPG0002.jpg
    IMG_9870.JPG0002.jpg
    47.2 KB · Views: 311
  • IMG_9875.JPG0003.jpg
    IMG_9875.JPG0003.jpg
    40.5 KB · Views: 308
  • IMG_9876.JPG0004.jpg
    IMG_9876.JPG0004.jpg
    49.2 KB · Views: 363
  • IMG_9881.JPG0006.jpg
    IMG_9881.JPG0006.jpg
    44.7 KB · Views: 301
  • IMG_9882.JPG0001.jpg
    IMG_9882.JPG0001.jpg
    38.3 KB · Views: 305
  • IMG_9840.JPG025.jpg
    IMG_9840.JPG025.jpg
    88.3 KB · Views: 306
  • IMG_9831.JPG018.jpg
    IMG_9831.JPG018.jpg
    69.5 KB · Views: 298
  • IMG_9829.JPG017.jpg
    IMG_9829.JPG017.jpg
    55.8 KB · Views: 305
  • IMG_9776.JPG013.jpg
    IMG_9776.JPG013.jpg
    59.8 KB · Views: 300
  • IMG_9772.JPG010.jpg
    IMG_9772.JPG010.jpg
    59.7 KB · Views: 308
  • IMG_9766.JPG007.jpg
    IMG_9766.JPG007.jpg
    68.3 KB · Views: 298
  • IMG_9855.JPG028.jpg
    IMG_9855.JPG028.jpg
    59.3 KB · Views: 307
  • IMG_9862.JPG001.jpg
    IMG_9862.JPG001.jpg
    43.5 KB · Views: 293
Yesterday and today I sorted out the filler on the nose and I did some more spraying on the wings' and fuselage underside. Then this evening I glossed the whole topside. It's now sitting in a box to protect from any dust. More progress next week in between work...
 
It's been a frustrating few days on the workbench. (that - and juggling home life and work). After spraying the underside - a mix of aluminium and silver to try and get a vaired effect - I realised that I'd sprayed the paint on too thickly in some areas. It could have been partly due to the paint not flowing smoothly and evenly through the airbrush, which I then gave a thorough clean and, on testing, is working much, much better. So I'll be doing that more often for definite.

Picture 1:
In an attempt to sort out the overspray I used my micro-mesh set to knock back the paint layer, taking care not to rub away any of the detail - which took some time and patience - but it seemed to work.

Picture 2:
There was also a very annoying spray splodge on the underside tail section which I sanded down and re-sprayed.

Pictures 34:
Working through the micro-mesh sanding pads worked very well to knock back the paint where it had been sprayed on too thickly.

Pictures 5:
The rear fuselage section needs re-scribing after the sanding and re-spraying. But the variation in panel detail may need further work. The photo's don't show off the variation that well and it looks better in reality than in the picture but, nevertheless, I may need to have another go. However, I don't want to overdo it and wreck things altogether by putting too much paint on... caution needed here me thinks.

Picture 6:

Close up of the port wing underside after the re-spray. [Not the best of light as it had just been placed in its box to dry off and be protected from dust].


Picture 7:
The propellers' yellow bands haven't come out very well at all and I need to rub them down and redo them. I re-did the brown and it's a better colour than my first attempt, so I'm slowly getting there.

Next - I need to glue the canopy in place after I've masked it. Then, do another re-varnish where needed on the underside before flipping over to the topside and starting on the next stage of the hairspray technique. After spraying on a layer of the said hairspray, and letting it dry off for a while, I'll put on a coat of thinned Tamiya XF70 Dark Green (after checking a few sources including the Tamiya site). Then, a lighter coat of the same XF70 to get some fading on some of the panels. After that I'll start doing the weathering - nice and slowly, as this is the first time I will have attempted this technique.
 

Attachments

  • IMG_9911.JPG0001.jpg
    IMG_9911.JPG0001.jpg
    45 KB · Views: 267
  • IMG_9901.JPG0003.jpg
    IMG_9901.JPG0003.jpg
    54.1 KB · Views: 270
  • IMG_9906.JPG0006.jpg
    IMG_9906.JPG0006.jpg
    62.9 KB · Views: 264
  • IMG_9907R.jpg
    IMG_9907R.jpg
    41.1 KB · Views: 256
  • IMG_9912.JPG0001.jpg
    IMG_9912.JPG0001.jpg
    50.6 KB · Views: 295
  • IMG_9904R.jpg
    IMG_9904R.jpg
    40.2 KB · Views: 249
  • IMG_9905.JPG0005.jpg
    IMG_9905.JPG0005.jpg
    61 KB · Views: 261
Last edited:
Excellent stuff, those micro-pads are just the answer to us modellers, they also wash out well.
 
treyzx10r: Looking great so far,just finished this one myself a while back and it was a fun build.
Thanks treyzx10r. It was your finished kit that got me enthused for this one. Got a high bench mark to reach though.

Vic Balshaw: Excellent stuff, those micro-pads are just the answer to us modellers, they also wash out well.
Thanks, those pads certainly work well and have come in very useful.

Thanks Wayne Little and everyone else for the kind comments so far.
Quite busy this week but hopefully I'll get a chance to do some more this weekend before the onslaught of Christmas.
 
Here are some pics on my next step - the start of some weathering using the hairspray technique.

Pictures 1,2 3: On the topside I went for a little variation on the aluminium 'undercoat' colour with some light spraying of silver.

Picures 4,5 6: After re-sanding the underside I did a light re-spray with aluminium and silver to try and get some variation in shading.

Remainder of pics: Then it was on to the topside. A gloss coat seal went on and then, a couple of days later, a start on my first attempt at the hairspray technique. A couple of hairspray coats went on with the airbrush, allowing some drying time inbetween. After the second coat had dried I sprayed on the Tamiya Dark Green - with an alarming crazy paving developing soon afterwards. (I wish I'd taken a photo now). It looked quite interesting but it wasn't the even covering I was after with which to start the technique. Whilst wondering what to do next I let it dry off for 30 minutes or so before giving it a second coat - which stuck on without 'crazing'.

Some more drying time - then onto the gentle removal of the Dark Green with some water and a shaped tooth pick. Also, a very careful use of a blade to get the smaller paint chips and wear.
 

Attachments

  • IMG_N9990.JPG0007.jpg
    IMG_N9990.JPG0007.jpg
    17.8 KB · Views: 211
  • IMG_9970.JPG00050.jpg
    IMG_9970.JPG00050.jpg
    31.4 KB · Views: 219
  • IMG_N9917.JPG0004.jpg
    IMG_N9917.JPG0004.jpg
    29.1 KB · Views: 190
  • IMG_N9920.JPG0007.jpg
    IMG_N9920.JPG0007.jpg
    29 KB · Views: 218
  • IMG_N9921.JPG0008.jpg
    IMG_N9921.JPG0008.jpg
    27.4 KB · Views: 211
  • IMG_N9927.JPG0014.jpg
    IMG_N9927.JPG0014.jpg
    33.3 KB · Views: 212
  • IMG_N9986.JPG0004.jpg
    IMG_N9986.JPG0004.jpg
    16.2 KB · Views: 215
  • IMG_N9924.JPG0011.jpg
    IMG_N9924.JPG0011.jpg
    28.2 KB · Views: 206
  • IMG_N9926.JPG0013.jpg
    IMG_N9926.JPG0013.jpg
    33.9 KB · Views: 216
  • IMG_9990.JPG0001.jpg
    IMG_9990.JPG0001.jpg
    36.2 KB · Views: 240
  • IMG_9980.JPG0003.jpg
    IMG_9980.JPG0003.jpg
    32.1 KB · Views: 248
  • IMG_9984.JPG0004.jpg
    IMG_9984.JPG0004.jpg
    30.8 KB · Views: 235
  • IMG_9986.JPG0005.jpg
    IMG_9986.JPG0005.jpg
    32.8 KB · Views: 222
  • IMG_9987.JPG0006.jpg
    IMG_9987.JPG0006.jpg
    33.9 KB · Views: 221
  • IMG_9988.JPG0007.jpg
    IMG_9988.JPG0007.jpg
    32.2 KB · Views: 224
Last edited:

Users who are viewing this thread

Back