P-51 Mustang "Grim Reaper"

Ad: This forum contains affiliate links to products on Amazon and eBay. More information in Terms and rules

Junior1213

Recruit
5
0
Feb 11, 2012
Hello all,
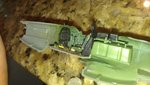
I'm a newbie to modelling but have learned a bit from a friend and looking at other builds online. I'm looking for constructive criticism. This is my first build so please any and all tips or suggestions are welcome. Thanks in advance hope you like what's done so far and I will post more as I progress through the build. Special Thanks to my friend Mike for all his support and assistance.

IMAG0068.jpg
IMAG0069.jpg
IMAG0070.jpg
IMAG0071.jpg
IMAG0072.jpg
IMAG0073.jpg
 

Attachments

  • IMAG0074.jpg
    IMAG0074.jpg
    851.5 KB · Views: 178
Last edited:
Welcome to the site and thank you for sharing your work here. It looks good. However if you want some opinion of mine ... a such kind of silver weathering in a cockpit should be limited to edges of these details there mostly . In fact, a such one appeared very seldom and is more distinctive of derelicted aircraft rather.
Also the oxygene corrugated rubber hose going from the regulator to the pilot's seat side wasn't made of metal. So it is illogical to paint it silver. It was of black or dark grey as memo serves. For colouring of cockpits I would suggest having a look at pictures of a such compartment that can be found via the Internet quite easy.
And additional tip... I would suggest protecting of inner edges of fuselage halves ( also wing ones) including set pins against painting. A paint is a very good preservative against a glue and makes a sticking process of model parts more difficult or even impossible. For masking such edges you can use strips of a masking tape.
 
Done some nice work there, but i agree with Wojtek little bit too much drybrushed silver, the effect you have created is good but now needs to be toned down a bit as the silver stands out just a bit more than it should.
I do a similar thing on some models as you want things to be seen, after the silver drybrush I use pastel chalks to rub in to areas where there is too much silver , in your case a medium Green Pastel on the middle sections/panels of the larger areas where you would not expect to see much of the silver.
 
There's actually no silver on there just a bright flash on my camera lol.I did a black wash then dry brushed white. Thanks for looking to all of you drilling the exhaust was a pain but worth it it looks so much better. The kit is a 1:48 Revell.
 
For a first go that looks pretty good !!! A lot better than the first model I remember building. The paint on the seams can be scraped off with an exacto knife before gluing, also less glue is better than too much glue !
 
Last edited:
First of all Junior welcome to this huge family. Can't say I can add much either for your first build you are doing very well and you did a good job on drilling those exhausts, just a small tip though, get a small piece of fine emery and very gently clean away the rough bits and mould lines. You will find they will come up a treat.
 
Hello everyone,

I am also new to the site. I will be posting a thread about my current build (B-17F "Memphis Belle"). I believe the "silver" you guys may be seeing in the photo is led from a graphite pencil rubbed on some body lines, the seat, rudder pedals, etc. Places of common wear. I personally think this is looking great! But then again... I am a biased opinion 
 
Nope its white alright but I used a graphite pencil to touch up edges that's probably what's reflecting most of the flash from the camera I can always do another wash to tone it down if need be but I was going for a look where the pilot would have gotten into the cockpit and with all his gear and probably caused the wear from such things like the buckles on his parachute etc. For anyone interested Grim Reaper was a rebuild/Redesignation she was originally called Speck IV. She came back pretty badly damaged from a 2 week mission. The asst crew chief convinced the pilot that she needed a new name hence "Grim Reaper"

I'll probably work on her more tonite and post more pics oh and if anyone has any suggestions on which websites to odrer aftermarket parts from im in need of the decal set for this plane I have a superscale part number its 48-732 thanks again guys and thanks for all the advice and compliments thus far
 
hello again all here are some more pics of tonights work not much more to add but im still working just wanted to post an update before it got too late and i forgot to post it...
IMAG0078.jpg
IMAG0079.jpg
IMAG0080.jpg


so basically got the fusilage together and puttied still have to sand and such and my friend mike showed me some more cool stuff like how to cut out the Ailierons so they can be attached to appear functional. also did some simple paint for the gunbay which will be displayed open. wont be able to work on her again till friday or saturday but ill post again then. Hope you like the progress.
 

Users who are viewing this thread

Back