Painting Metallic Colors

Ad: This forum contains affiliate links to products on Amazon and eBay. More information in Terms and rules

Hope I am not abusing this board too much. I gots questions and, well, you gots answers.

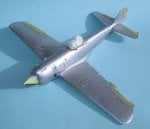
Anyway, I was wondering if there were any tips for painting metallic colors. I use an airbrush and all of my other colors come out perfect, except for metals. The coverage is good, and color is spot on, but they have a distinct 'grainy' look for lack of a better word. No matter how many way I switch it around (different PSI, thinned/unthinned paint, etc.) I get that grainy look. I can get rid of it if I really lay the paint on, but I realize that is not the correct way as I am essentially dumping it on the part in huge quantities. I am using Tamiya acryllics almost exclusively. Namely, silver and aluminum.

Any suggestions?? If it has been covered before just let me know and I will read the thread but don't think I had seen it thus far.

Thanks!

ETA: I am currently using two airbrushes. Both Paasche's. A single action H (external mix, siphon feed) and a double action VL (internal mix siphon feed). As mentioned, I have no problems with any colors just metals.
 
Last edited:
Take it easy...no primer so far OK. Of what firm did you use these metalic paints? Oh, yes... I have had to omit the info - Tamiya..right?
 
Last edited:
OK.. I assumed you used these Tamiya ones and no primer. For a such paints a surface has to be prepered very carefully. The best solution is to wash it up with warm water and soap then make it dry. The next step is to polish the surface. Then you can apply something gloss, for instance Future liquid or black gloss Humbrol. A metalic paint has to be applied with a very thin layer. Sometimes one is enough but two ones are needed usually. The second coat can't be applied until the first layer is dry utterly. The same should be done for a primer. All gloss paints ( especially Humbrol's) need long time of drying ( usually a week or so). Of course these metalic paints have to be stirred fully and thinned.

Also I guess you didn't apply any dope on painted with the matalic paint ,surface.
 
Just food for thought. Dark metallic, dark primer, light metallic, light primer.

When I had my sign shop in the States, too many years ago, I used to spray panels, and some vehicle graphics along with back painting lighted sign faces. In spraying my metallics the first coat was thinned to spray and cover. If sprayed with too much pressure, and to close to the panel, the metalic would bury itself, in itself below the surface. This left a rather uneven metallic finish, distinctive lines of metallic. With this first cover coat still tacky, but not wet, the final coat was thinned just a bit more, sprayed from a bit further off in nice even strokes to cover. This lets the metallic flake float onto the surface evenly and the additional thinner lets it melt into the covering coat. If I was spraying a big flat panel the strokes would be horizontal the full distance of the panel, slightly overlapping, then vertical overlapping slightly.

Like I said, just food for thought when approaching metallics.

*Always spray the edges and recesses first, this prevents loading of paint in these areas which create the runs.

Bill
 
Excellent info,Wurger. Yes, I am currently using Tamiya everything. I have also followed your steps up to the point of spraying a gloss or coat. I will add this step the next time and find it all very interesting. Guess I will chalk it up to lessons leaagain. Thanks again.
 
And thanks for that N4521U.

You reaffirmed a lot of what I am already doing. Spraying just about as far back as I can with pretty thinned metallic paint. Nice to hear everybody's thoughts. Makes me feel better.
 
Marcus, which Tamiya paint are you using....from the bottles or the cans? XF-16 from the bottle will always give you the grainy finish, Ive never used the 'silvers' from the cans but i have read that one of these is much better decanted from the cans and sprayed....I think? I do have a note somewhere on this...

I actually now use the Citadel Acrylic silver/metalics these are finer and give a much better finish. Mithril Silver with the tamiya thinner does the job...
 

Attachments

  • Silver Overall_5703.JPG
    Silver Overall_5703.JPG
    42 KB · Views: 176
Last edited:
And thanks for that N4521U.

You reaffirmed a lot of what I am already doing. Spraying just about as far back as I can with pretty thinned metallic paint. Nice to hear everybody's thoughts. Makes me feel better.

Keep in mind Marcus, it's only the final coat you want to spray from a little farther away, but it still needs to be wet enough to stick to the first coats. The first couple of coats need to be wet enough to adhere to the object being sprayed.

Wayne, that is a nice silver finish. I used Tamiyas silver in the spray can for the gear on the Halifax I am repairing. It's a laquer, but formulated for the plastics we work with. Gave a nice smooth finish and dried quickly. I use it for gear legs now. I will have to look for the Citadel Mithril silver.
 
I am using Tamiya from the bottles. I have heard of decanting paints from cans so I might give that a try.

THAT finish is what i am looking for. Granted, it is just gear bays and by the time I shot Future and put a wash on it the grainy look became less noticeable but I was curious for how to do it in the future.

ETA: The gear struts on my plane called for an aluminum powder type of finish. So, per other posters, I mixed a bit of flat white with the aluminum. Looked great. Yes, it was not a metallic finish but I am wondering if I can put just a drop or two of white or gray in the aluminum from now on and cut that graininess without looking the metallic look.
 
Last edited:
Just remember if you decant the paint into a jar you need to let it sit a while to get rid of the propellant gases, leave the lid open just a tad to let the gas escape but not let any cr@p from the air to settle in it.....
 

Users who are viewing this thread

Back