I have a question regarding polishing clearparts that's been bugging me since I've started work on the Revell 1/72 He-177 kit a week or so ago.
As good practice I (and lots of other modellers too) tend to polish clearparts and dip them in future prior to masking them and installing them on the kit at hand. Information on methods and means can be found all over the interweb. And with a sweet and smooth bubbletop canopy ala P-51D it isn't that hard really
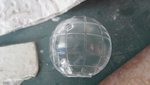
However, the HE-177 clearparts does make me wonder how I might go about this. As the pic shows there's lots and lots of fairly prominent framing on the clearparts (gets a little scared of masking them up here). A checkerboard pattern if you like. I'm kind of in the dark on how to reach the tight corners of these clearparts as they are next to unreachable with your average polishing stick.
How would you guys go about this?
I have a set of Vac-form clearparts for the HE-177 as well. However the fit of these isn't particularly good, and with vacuform parts being so delicate they leave little room to bring out the filler and sandingsticks. The kit part on the other hand fit surprisingly good (compared to other builds of the He-177 kit I've seen) but have lots and lots of irregularities to them and will need considerable polishing before they look good.
As good practice I (and lots of other modellers too) tend to polish clearparts and dip them in future prior to masking them and installing them on the kit at hand. Information on methods and means can be found all over the interweb. And with a sweet and smooth bubbletop canopy ala P-51D it isn't that hard really
However, the HE-177 clearparts does make me wonder how I might go about this. As the pic shows there's lots and lots of fairly prominent framing on the clearparts (gets a little scared of masking them up here). A checkerboard pattern if you like. I'm kind of in the dark on how to reach the tight corners of these clearparts as they are next to unreachable with your average polishing stick.
How would you guys go about this?
I have a set of Vac-form clearparts for the HE-177 as well. However the fit of these isn't particularly good, and with vacuform parts being so delicate they leave little room to bring out the filler and sandingsticks. The kit part on the other hand fit surprisingly good (compared to other builds of the He-177 kit I've seen) but have lots and lots of irregularities to them and will need considerable polishing before they look good.
Attachments
Last edited:
")