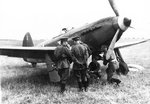
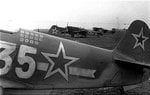
As far as crosses are concerned, French pilots painted them on tails of their Yaks at their own will throughout the war. Actually they were doing it to tease Germans. I attach some pictures where you can see their Yaks both with stars and Lorraine cross. Russian pilots and technicians standing by their planes make it clear that the photos were made in the war time.
Navigation
Install the app
How to install the app on iOS
Follow along with the video below to see how to install our site as a web app on your home screen.
Note: This feature may not be available in some browsers.
More options
You are using an out of date browser. It may not display this or other websites correctly.
You should upgrade or use an alternative browser.
You should upgrade or use an alternative browser.
Post Your Models! (4 Viewers)
- Thread starter Pisis
- Start date
Ad: This forum contains affiliate links to products on Amazon and eBay. More information in Terms and rules
More options
Who Replied?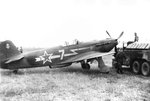
net_sailor
Senior Airman
Good find Schtockus! Could you specify which pictures are taken on Elbląg (Elbing) airfield? Have you other pictures also?
Regards from Elbląg (former Elbing in East Prussia)
net_sailor
Regards from Elbląg (former Elbing in East Prussia)
net_sailor
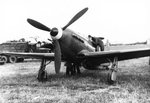
I cann't say where exactly were made those photos but I guess some time in 1944. I attach a photo of a Bf 109 which was shot down by one of the french pilots right above their airfield in Tapiau near Koenigsberg in 1945. You can see the similar "White 7" in the background but with a star on the tail.
Attachments
Negative Creep
Staff Sergeant
Here's my latest pair, made using the airbrush and compressor kit I mentioned in a separate topic. First is an Academy P-40N in RAF desert scheme, and then a Hobbyboss 109E Trop, both 1:72. The P-40 went together well, but problems appeared at the end. First of all, the decals just did not want to sit, they kept coming loose and look very shiny once applied - I'll go and buy some decalcote tomorrow and make sure they stay on. I don't know if all Academy kits have this problem, as the Typhoon I'm also making has run into similar problems. Secondly, the canopy was dreadful - as you can see, it just doesn't fit! So I'll search out an aftermarket replacement and redo it. The 109 was my first attempt at using the airbrush for fine markings, so the results were a bit hit and miss, but not bad for a first attempt.


Also. here is the Italeri Ju 87 D5. I posted it before, but somehow managed to do it in completely the wrong topic. This one I am really pleased with, certainly the best of the three. I made the winter coat as rough as possible by spraying dark green, then random white over the top. It has worked rather well if I don't say so myself. One thing though, I read somewhere that the D5 didn't come with 20mm cannons or dive brakes, and somewhere else that it did. I'm not sure which is correct, the photos seem to show aircraft with both?


Also. here is the Italeri Ju 87 D5. I posted it before, but somehow managed to do it in completely the wrong topic. This one I am really pleased with, certainly the best of the three. I made the winter coat as rough as possible by spraying dark green, then random white over the top. It has worked rather well if I don't say so myself. One thing though, I read somewhere that the D5 didn't come with 20mm cannons or dive brakes, and somewhere else that it did. I'm not sure which is correct, the photos seem to show aircraft with both?
Heinz
Captain
Really great job there NC. Stuka looks ready to take flight
str8jax
Airman
Heinz
Captain
Wow great job str8jax looks magnificent!
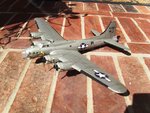
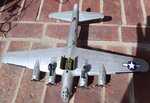
I think I'll get a B-17G soon got the F variant to build first though.
I think I'll get a B-17G soon got the F variant to build first though.
Vince57
Airman 1st Class
Negative Creep, should you use default Academy decals or replacement stuff from dedicated sheets, the best way to have your decals stay in place is:
-first apply them on shiny or smoothed camo paint, and use decalcote when applying.
-then overspray the whole model with either matt or semi-gloss varnish to give the paint and decals the same appearance and lock teh decals underneath the varnish coat to ensure they'll remain in place.
For canopies, default clear plastic parts often don't match very good with the model and are always too thick especially at 1/72nd scale. You can replace them with vacuformed canopies that are much clearer and thinner. They need trimming and sanding to have them fit but the result is far better.
Negative Creep
Staff Sergeant
If you want to weather the model with pastels, would the varnish then hold that in place?
I'm on a roll at the moment, here the Italeri 1:72 mkIX. Even though this is a new kit, it required a lot of sanding and filling to get looking right, and I never quite got the supercharger intake to fit right. The stripes are all painted, I followed the box instructions that the spinner and rear stripe should be light blue, only to find out later it should have been the same colour as the numbers. Oh well, at least the decals went on well, and the cockpit is a photoetched extra, and my camera refused to focus on it


I'm on a roll at the moment, here the Italeri 1:72 mkIX. Even though this is a new kit, it required a lot of sanding and filling to get looking right, and I never quite got the supercharger intake to fit right. The stripes are all painted, I followed the box instructions that the spinner and rear stripe should be light blue, only to find out later it should have been the same colour as the numbers. Oh well, at least the decals went on well, and the cockpit is a photoetched extra, and my camera refused to focus on it
NC the model looks very nice and I like it. But the blue spinner and the strip you should realy repaint using the Sky type S colour.Besides I can see that the transition between the wings ( on both sides of fuselage ) and the fuselage wasn't corrected by you.I mean there aren't engraved the lines of the transition panels.And there is something wrong with the ailerons.If the right one is down the left one should be up.But I may be wrong.
But the blue spinner and the strip you should realy repaint using the Sky type S colour.Besides I can see that the transition between the wings ( on both sides of fuselage ) and the fuselage wasn't corrected by you.I mean there aren't engraved the lines of the transition panels.And there is something wrong with the ailerons.If the right one is down the left one should be up.But I may be wrong.Negative Creep
Staff Sergeant
I did correct somewhat (the original was terrible) but I agree it's not perfect. I read on another forum that a very good thing to use is a Tipp ex (correction fluid) pen to fill fine lines, I'll try this out next time. The ailerons I just put down to make it a bit more interesting, I did the same with the exhaust flaps and rudder, although you can't really see it in the pictures.
Oh and the B-17 is very nice! Was it a straightforward build?
Oh and the B-17 is very nice! Was it a straightforward build?
str8jax
Airman
net_sailor
Senior Airman
The ailerons I just put down to make it a bit more interesting
Wurger is right, usually one aileron goes down and second goes up.
This blue band on the rear fuselage seems very very suspect. The colour named "sky type S" is rather begie green than blue.
Soundbreaker Welch?
Tech Sergeant
A lot of models being posted up.
Heinz
Captain
Negative Creep nice spit and yes the aileron needs one up and one down or just level LOoks great I must say!
Str8jax onto yet another good start the cockpit is lovely!
Str8jax onto yet another good start the cockpit is lovely!
Negative Creep
Staff Sergeant
Wurger is right, usually one aileron goes down and second goes up.
This blue band on the rear fuselage seems very very suspect. The colour named "sky type S" is rather begie green than blue.
Ok I'll remember that in future! Could sky type S be the colour of the numerals? The back of the box shows then and the band to be 'light blue' so that's what I followed.
Would matt varnish be safe to use with an airbrush?
net_sailor
Senior Airman
Yes, I know, this box profile is a crap. RAF colours occures in limited shades. Even on interim periods when colours schemes were changed (Dark Green/Dark Earth -> Dark Green/Ocean Green) and no Ocean Gray paint were delivered to the combat unit, there were instructions published which specified proportions black and white paint in the mixture to achievie exactly the same shade. For painting "Sky type S" colour I use Humbol no. 90 or 23.Ok I'll remember that in future! Could sky type S be the colour of the numerals? The back of the box shows then and the band to be 'light blue' so that's what I followed.
Of course, only if you mix the varnish carefuly.Would matt varnish be safe to use with an airbrush?
Users who are viewing this thread
Total: 5 (members: 0, guests: 5)
Similar threads
- Replies
- 0
- Views
- 272