Thank you! It's a totally different modeling experience than what I'm used to. It's serious metalworking. The fact that 47 years ago I was a metal shop teacher is a good thing. I'm surprised how many things I remember even though I haven't used them for almost 50 years. Example: knocking off the sharp cutting edge on a drill when cutting brass, copper or bronze so the drill doesn't hog in and jam.
All the engine struts are in place and the engines are securely soldered to the main wing. I built and installed the V-sharped mid-braces using 2-56 allen cap screws and only broke one 2-56 tap. It caused me to make an emergency trip to the hobby shop to get two more of them. I re-soldered one of the floats that was hanging loosely. Finally, I was able to drill out the old threads that held the mounting bolts with a "Q" drill and tapped them for an NPS 1/8-27 lamp tube thread. There Q drill was just big enough to totally remove the old threads and provide a clean surface for the new threads.
Using screws relieved me of the worry of de-soldering the struts that were right next to the mid-braces. The tap broke on the second of the four holes. I had completely tapped the hole, tried the screw in it and it didn't go deep enough. Instead of shortening the screw, I attempted to tap the hole deeper. When trying to back out the tap it jammed. Instead of freeing it, I broke it. I drilled another tap drill hole near the old one and re-tapped successfully.
I think my finger got into this picture.
I'm going to take the fuselage with these standoffs to the airport and fit it to the globe to make sure it goes on easily. The fuze weighs 20 pounds and is fairly easy to manipulate. The total plane weighs about 50 pounds and will be much harder to handle. I wanted to check the mounting before attempting to hold the monster over the globe 8 feet in the air. Note: one of the standoffs is upside down. I just dropped them on to see if the threads were okay.
Couldn't take the fuselage to the airport today for the trial fitting, but I did make some more progress. Got the fuze situated on the build table and trial fit the main wing on top. I also clamped and soldered the tail back on. The tail was one part that hadn't been separated in the great fall. That responsibility fell to me. I had the wing on a couple of stools in the shop. It was behind me when I was working on my little lathe. I rolled back my desk chair and knocked the wing onto the concrete floor. The noise was horrendous and the tail was separated. Luckily, it didn't deform badly and I was able to refit it and solder it back together today. No harm, no foul. One of the struts was slightly out of position and I corrected that too.
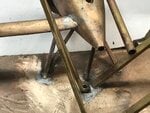
I soldered this strut about a 1/4" to close to center and a little bit too far forward. The other struts lined up beautifully.
I modified my fixture to support the tail during the soldering operation. The tail has some 3/64" bras wire details that I need to replace. These will be easy compared to all the massive parts that needed to be reattached. Notice the model is actually supported by the fancy brass standoffs and lamp pipes. I drilled the base board so they would sink to the proper depth. I then leveled the model and level the main wing. Lines up well.
With the acetylene air torch soldering has become much more predictable. It's no longer a worry. The joints are coming out relatively clean and well bonded. The repositioned strut now joints the other at the bottom end as it should.
I used some small C-clamps to lock the tail down tight, applied flux and was able to refuse the previous solder. I just had to add a little bit more to fill some more voids. There are a couple of spots that will need some filler before painting. Two are seen in this image. They're from the two pins that hold up the nacelle tapered end. I cleaned off the wing with baking soda and water to neutralize the acid flux and then went over it with some 240 grit abrasive on an oscillating multi-tool.
With a successful trial fit I'm quite confident that the entire plane will come together as it should and be quite strong. Once I got the soldering process lined out the project became must less onerous.
It has a 41" wing span and will weigh almost 50 pounds (22.7 kg) when it's all assembled. It will be reasonably strong, but dropping it on concrete would re-kit it all over again. The team for whom I'm doing the work is very pleased and it's exceeding their expectations (mine too) since considering where we started it did seem almost too much to think it could be close to as-built condition. I would love to know who built it in 1937. The dome is about 1/2" thick bronze and a member of the Bowman Field Heritage Foundation Team and I got it into position. I had to drill out the three existing holes and we got it to slip into position. It was much easier doing this with only a 20 pound fuselage without the 30 additional pounds of complicated soldered assembly hanging on. This is over 7 feet in the air so it took both of us on ladders to work up there. I thought ahead and ground negative rake on the drill's cutting edges so it would better cut the non-ferrous metal. It kept the drill from grabbing on exit and kept it from breaking my arm. Now it's back the shop to combine the main parts into a single hole.
Today was a big deal day. I finished putting the last of the support struts on the fuselage. The wing end is soldered. The fuze end was fastened with a 2-56 cap screw into a hole that I drilled and tapped. These six center struts were strong enough to support the fuselage weight. I was able to lift the 50 pound beast up from the build table and set it on the arms of our old knock-off Eames chair, but I am not able to lift it, hold it and position it onto the build table right side up.
To do the great reversion I enlisted the help of my daily-growing, 15 year-old grandson. He came over tonight and we were able to turn it and set it properly onto the build table. I've started doing the final cleaning and finishing in preparation for painting. I also added the hanging brace that suspends the tail of the fuselage from the tail booms. This piece is steel wire and replaces another piece of steel wire. We had to cut that wire to release the fuselage from the wing when we removed it from the memorial. All of the rest of the struts (the hot glued ones) had let go and only this wire was holding the mess together. I was gratified that the piece I made ended up being the same length as the wire it replaced indicating that the geometry was still pretty good. There are only four or five more solder joints to finish the job. There are some non-load-bearing cross wires that go between the tail booms. I'm going to epoxy these instead of soldering because of their proximity to the hanging brace.
Now that it's sitting correctly I find that one strut on one side is a bit long (about 3/32") and on the other side it's a bit short. It wouldn't be hard to de-solder and move the mounting position, but I can't do that with the model in this orientation. It's hard enough to solder this model. It would be near impossible to solder upside down. So I'm going to trim the long one in situ, and either shim the other with a piece of brass or just tie it to the small wing slightly separated from the other strut. I epoxied the landing gear so they're ready for paint too. I'm painting them separately and will epoxy them to the plane when it's actually on the dome. They're delicate and will most certainly be destroyed when we're attempting to maneuver the model into position. The props also will go on at the end.
The S-38 is mechanically done. I tied the main struts to the small wings. I fixed the slight length deviations by trimming the long one and adding a little chunk of brass under the slightly short one. This was a much easier solution than turning model over again, de-soldering and re-soldering the errant struts in a different position. I also added the cross wires on the tail booms and with that the model was complete. I did some more heavy cleaning. There's still some more to do before painting, but I need to get the right weather since it has to be either outside or in the garage.
Props are not glued in. That'll wait until the model is in final position on the memorial.
Finally was able to make respectable solder joints. I guess I need to do another to use my newly refined skills.
The model is very heavy, but quite strong. It will last a long time as long as no one drops it from seven feet in the air onto concrete. With the new mounting system I'm employing, it will not fall down.
It would be nice to keep it natural bronze, but the landing gear are going to have to be painted. So I'm painting the whole thing.
The Bowman Field Heritage Team is very happy with the outcome and they really didn't think it would happen. I wasn't sure it would either. They're planning a big deal for the memorial re-dedication, including newspapers and a presentation by me at the Louisville Filson Historical Society.
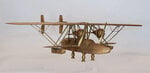
Here are some more (better) images of the completed project. The model is going to be left in natural metal with just the LG painted a bronze color to match the metal. My sister, the antique dealer, suggested to NOT clear coat the model, but let it age naturally.
Thanks all. Yesterday, I had a professional photographer shoot a lot of pictures with proper lighting. In some of the pictures I temporarily put on the composite landing gear and the stress fractured one of the hubs where the brass cylinder is epoxied to the resin. This required me to build "landing gear version 3.0". I machined a steel hub out of key stock, drilled the wheel 1/8" to accept the hub and soldered the existing brass strut into it. It was the first time I was able to use my newly acquired four-jaw independent chuck to hold the rectangular 1/8 X 1/4 stock. This was a sweet little project and will work great. I was concerned about the integrity of that resin hub and now my worries are over. I trimmed the extended pin on the cylinder legs.
The hub goes deep inside the wheel and has a lot of meat around it.
I bought the 4-jaw because I was planning on using it to shape the struts, but didn't. But I did get to use it today to turn the key stock into the wheel hub. It's been 45 years since I had to center a 4-jaw. It's fun.
I also ground a slant on the upper end of the cylinder so I could more easily rock it sideways to get the gear legs into those holes. Fits very nicely. With the stronger hubs I think the gear can be put on in my shop. The hinge pin is simulated.
A couple of fancier pictures and the painted landing gear.
The "Artist" with his work.
In the above, the resin part of the landing gear weren't painted. I did that today. I prime coated it with Tamiya white primer, then air brushed a mixture of Tamiya Gold, White and Clear Red. Didn't like the result. It was too tan and had no life. I then overcoated it with Venetian Gold, a nice rose gold shade (almost copper) that was better. I brush painted it and didn't worry about making it too smooth since the rest of the model is sand cast and has a rough finish. I then aged it a bit with AK dark wash. After removal of the excess, I think it works.
From a distance, it looks better. The model will be over 2 meters in the air and you can't get very close to it, so it will not be viewed this close…ever. From this distance and light level you can't see much difference.