Special hobby 1/72 p59 air comet

Ad: This forum contains affiliate links to products on Amazon and eBay. More information in Terms and rules

TimEwers

Airman 1st Class
224
0
Aug 28, 2010
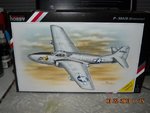
This kit is nice I highly recommend it. The only problem would be the color call out are for gunze sangyo numbers with no equivalent for other brands or even fs numbers.
 

Attachments

  • Picture 947.jpg
    Picture 947.jpg
    108.6 KB · Views: 169
  • Picture 932.jpg
    Picture 932.jpg
    103.6 KB · Views: 170
  • Picture 933.jpg
    Picture 933.jpg
    100.7 KB · Views: 186
  • Picture 934.jpg
    Picture 934.jpg
    99.6 KB · Views: 175
  • Picture 935.jpg
    Picture 935.jpg
    98.9 KB · Views: 186
  • Picture 938.jpg
    Picture 938.jpg
    99.3 KB · Views: 175
  • Picture 940.jpg
    Picture 940.jpg
    106.5 KB · Views: 158
  • Picture 941.jpg
    Picture 941.jpg
    106.6 KB · Views: 179
  • Picture 944.jpg
    Picture 944.jpg
    104.8 KB · Views: 173
So here is where I'm at but instructions say 30 grams in the nose what do I use? BB's or would a pine car derby weight work as you see there is not much room in the nose.
 

Attachments

  • Picture 1002.jpg
    Picture 1002.jpg
    97.2 KB · Views: 159
  • Picture 1006.jpg
    Picture 1006.jpg
    94.5 KB · Views: 163
Well I'm on hold for this kit till next week, Rent was this week. Next week I can stop at the hardware store and hopefully get some suitable weights.
 
I agree, lead fishing weights and Plasticine or Blue Tac to hold them (Don't need superglue - mold the Plasticine/Blue Tac around the lead, and press into the void).
There's a lot of room in the nose void, in relation to the size of the fuselage and C of G, so cram in as much as possible - better to have a lot than not enough.
As a test, before continuing construction, add the weight, tape the fuselage halves together, and slot the wing in place, taping it if needed, to hold it in place. Then, balance the model by the wing tips, on your fingertips. If the nose drops, fine - if it doesn't, add more weight until it does!
 
With the exception of the undercarriage doors, legs and wheels, any aerials and canopy, I'd put most of the kit together and do your painting giving the separate undercarriage doors a coat at the same time. If the canopy needs paint, mask and do this as well, remembering the inside colour is usually different, that is if you want to go to that detail.

Paint legs and wheels separately before assembly, but before you add any of the hanging or aerial bits, do the decals and seal them in.

When all that is done, add the legs and undercarriage doors, then aerials and if doing a protective clear coating, apply this before you finally add the canopy.
 
Looking good so far. And I agree with Vic - anything which can get in the way, or be broken off, can be added after the painting, and probably after decals and finishing coat.
 
Well I am at the point of painting but question what color were the wheel wells? Same as the cockpit or same as the rest of the plane which is going to be aluminum.

And unfortunately I did not add enough weight to the nose as it still sets on its tail but I'm not cutting it apart to try and add any more as I know I'll just mess something else up.
 

Users who are viewing this thread

Back