Wright Bros' Flyer: Super detailing a Guillow's kit.

Ad: This forum contains affiliate links to products on Amazon and eBay. More information in Terms and rules

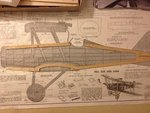
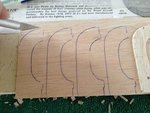
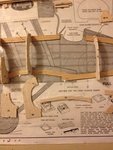
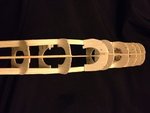
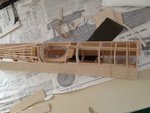
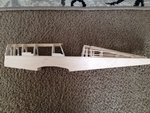
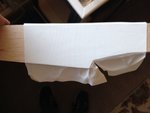
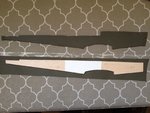
Actually, I tried it both ways. Full sized photos take up the whole screen. Thumbnail sized photos, gives the viewer the option of clicking onto the picture and enlarging it themselves. The thumbnail sizes seem to work best for me. I've seen several full sized pictures posted on this site and they're very nice. I guess it's really up to the person doing all the posting to determine whether or not the full sized pictures are more appropriate for the information needed to be conveyed. When doing a build thread, like what I just did with the Wright Bros' Flyer, using multiple pictures to illustrate the sequence of fabrication of a particular item or construction of the model, I think thumbnail sized photos work best; but this is just my humble opinion.
 
Gentlemen,

Good afternoon. I thought I would start this S.E.5 build sequence by showing a few samples of my "proof-of-concept" practice sections of scrap fuselage. As can easily be seen, I practiced several different ways of covering, decaling, stitching, painting and more. It was through these practices that helped with me some ideas of what would work and what does not work. A good example is painting. Trying to use masking tape on a soft covering definitely does not work. Because the covering "gives" under pressure of applying the tape, I could not burnish it along the edges of the tape and make the tape stick tightly to the surfaces without risk of tearing the covering or poking a hole. So, in this case of the white stripes you see here, it can easily be seen that much of the paint seeped under the tape and I couldn't get a good straight edged line. Instead, of paint, I used my own homemade decals. The stitching will be explained later, but you can see how much I practiced and which worked and which didn't work at all. During the build sequence, I will occasionally refer back to this stage to help give a better understanding of some of the techniques used here. I hope you don't mind.
 

Attachments

  • SE5 # 12.jpg
    SE5 # 12.jpg
    269.4 KB · Views: 72
  • SE5 251.jpg
    SE5 251.jpg
    258.8 KB · Views: 75
Getting started with the build, I thought it best to get right to the heart of the matter and discuss the fuselage. As previously mentioned, I altered the original build of the model considerably in order that I may recreate a model that more closely replicates the full sized plane. Comparing the pictures of the plans and the skeletal image of the original model, one can easily see that the results will be a very nice, simple, and easy to build wooden model. For those who do not build wooden models or do not know much about building models, the (many) long thin strips of wood are called "stringers." They are also used on many of the full sized planes for different reasons, but the nomenclature is the same. In this case, the stringers help give shape to the fuselage when covering. The large rounded shapes inside the stringers are called "formers" (in naval parlance they are also called "bulkheads").
 

Attachments

  • S.E.5 plans # 2.JPG
    S.E.5 plans # 2.JPG
    282.3 KB · Views: 61
  • S.E.5 plans # 3.JPG
    S.E.5 plans # 3.JPG
    319 KB · Views: 66
To get the desired effect of the model to more closely resemble that of the real aircraft. I altered the nose profile by lowering the keel. To compensate for the differences in separation between the upper and lower keels, I fabricated new (& larger) formers. At this point, I purposely left out many of the stringers. This was due to two reasons: 1) to help give me access to the cockpit area so I can get my hands into the small confines of the interior and 2) because I wish to change the overall outlook of the model from a skeletal one to more of a realistic one.
 

Attachments

  • SE52.jpg
    SE52.jpg
    34.3 KB · Views: 63
  • SE5 3.jpg
    SE5 3.jpg
    31.2 KB · Views: 55
  • SE5 12.jpg
    SE5 12.jpg
    38.6 KB · Views: 61
  • SE5 6.jpg
    SE5 6.jpg
    33.6 KB · Views: 59
As you can see, there really isn't much wooden support. At this stage, the framework is very fragile. I purposely posed the framework against a dark background to give it photographic contrast.
 

Attachments

  • SE5 7.jpg
    SE5 7.jpg
    17.5 KB · Views: 54
  • SE5 14.jpg
    SE5 14.jpg
    15.2 KB · Views: 53
Now, I'm going to get ahead of myself and show you what I have in mind to help compensate for the absence of stringers and to also get the desired smooth look of the full sized aircraft. At this stage, the wood sheet is not glued to the fuselage, but only temporarily in place to show for photographic purposes. The reason is because I still need to gain access to the cockpit interior and also to cover the "inside" of the framework as well. I noticed that the covering appears slightly 'white" in color inside the cockpit interior, but olive drab on the outside. To this, I will also do the same thing.
 

Attachments

  • SE5 30.jpg
    SE5 30.jpg
    173.1 KB · Views: 50
  • SE5 51.jpg
    SE5 51.jpg
    255.8 KB · Views: 54
As can be seen here, I've jumped ahead of myself to help convey the ideas of what my goals are to achieve the desired results. I only covered with white colored film over the area that will be seen inside the cockpit interior. The outside will be covered with olive drab film. For those who wish to know, I used Solartex, This product, unfortunately, is now out of production. I've been told a German company called Lanitz-Prena has taken over producing this type of heat-shrink covering. It has a beautiful fabric weave patter on the surface. This company will sell direct in the European countries but in the USA, it's supposed to have an authorized distributor: Horizon Hobbies. My calls and emails have resulted in nothing. Maybe someone can help?
 

Attachments

  • SE5 162.jpg
    SE5 162.jpg
    156.6 KB · Views: 50
  • SE5 164.jpg
    SE5 164.jpg
    256.8 KB · Views: 50
  • SE5 165.JPG
    SE5 165.JPG
    219.6 KB · Views: 47
As you can see from the previous posts and this photo taken by myself while visiting the RAF museum in Hendon, London many years ago, there is a very good resemblance to the final covering and this full sized aircraft. Hmmmm not bad, eh?
 

Attachments

  • SE5 259.jpg
    SE5 259.jpg
    37.2 KB · Views: 58
I also experimented with many different wood stains against different woods such as balsa, wood, bass wood, hardwood, and others. This was to see what I will get when using different stains for the wood struts and woods seen inside the cockpit interior.
 

Attachments

  • SE5 248.jpg
    SE5 248.jpg
    356.1 KB · Views: 49

Users who are viewing this thread

Back