Looks good so far Bill!
Navigation
Install the app
How to install the app on iOS
Follow along with the video below to see how to install our site as a web app on your home screen.
Note: This feature may not be available in some browsers.
More options
You are using an out of date browser. It may not display this or other websites correctly.
You should upgrade or use an alternative browser.
You should upgrade or use an alternative browser.
Dazzled 1/48 NA-91 / P-51A? kit
- Thread starter N4521U
- Start date
Ad: This forum contains affiliate links to products on Amazon and eBay. More information in Terms and rules
More options
Who Replied?- Thread starter
- #82
N4521U
Plastic Pirate
So now the kit landing light hole is filled, sanded and primed.
This one shows my bottle of Sprue melted at the bottom of the bottle of Acetone.
It is rather fluid, but more like soft butter. I use the S.S. mixer to extract it from the jar.
It will not stick to the steel so can be testy to get it out. But can be spread very thin like Bondo.
Let it dry many hours, over night would be best as even this thin it takes some time for the Acetone to evaporate.
I filed first, then sanded smooth. I also scribed new panel lines.

And here is the result after priming with a white coat. The under side of the wings will be white with black dazzle.
The new landing light lense is next to the cannon. Gear doors are stuck with blue tac only for painting & masking.

This one shows my bottle of Sprue melted at the bottom of the bottle of Acetone.
It is rather fluid, but more like soft butter. I use the S.S. mixer to extract it from the jar.
It will not stick to the steel so can be testy to get it out. But can be spread very thin like Bondo.
Let it dry many hours, over night would be best as even this thin it takes some time for the Acetone to evaporate.
I filed first, then sanded smooth. I also scribed new panel lines.
And here is the result after priming with a white coat. The under side of the wings will be white with black dazzle.
The new landing light lense is next to the cannon. Gear doors are stuck with blue tac only for painting & masking.
Vic Balshaw
Major General
Nicely done old chap! 

Last edited:
fubar57
General
Beauty
Crimea_River
Marshal
Neat trick.
- Thread starter
- #87
N4521U
Plastic Pirate
And I saw this Sprue and Acetone trick on this forum!!!!!!Neat trick.
- Thread starter
- #88
N4521U
Plastic Pirate
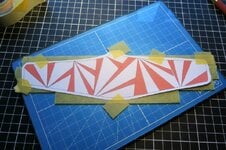
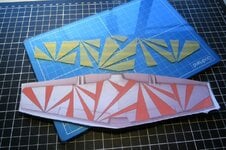
Painted the underside of the wing today.
Cut masking for the same, the process!!!!!
From my artwork I printed full scale.
The orange will be painted black.
The blue is a piece of Tempered or as it
is called over her Toughened, samo samo.
I put 3/4" tape on the glass then taped
the printed pattern over. Using a new X-acto
blade I cut along the edges of the Orange,
then the printed edge of the wing outline.

I then removed the cut-up pattern pieces
and picked out what was orange. These
pieces will mask the white first coat and
I will spray the black. I'll be doing the same
for the sides of the fuselage. Wing and
fuselage will be painted Before I attach
the wing to the fuselage. Top is already O.D.

It goes on and on..................
Cut masking for the same, the process!!!!!
From my artwork I printed full scale.
The orange will be painted black.
The blue is a piece of Tempered or as it
is called over her Toughened, samo samo.
I put 3/4" tape on the glass then taped
the printed pattern over. Using a new X-acto
blade I cut along the edges of the Orange,
then the printed edge of the wing outline.

I then removed the cut-up pattern pieces
and picked out what was orange. These
pieces will mask the white first coat and
I will spray the black. I'll be doing the same
for the sides of the fuselage. Wing and
fuselage will be painted Before I attach
the wing to the fuselage. Top is already O.D.

It goes on and on..................
Vic Balshaw
Major General
It looks like a solid plan Bill. Fingers crossed for you. 

fubar57
General
Sweet
Lucky13
Forum Mascot
- Thread starter
- #93
N4521U
Plastic Pirate
Thanks for looking in on this unusual build. Masking? Yikes!!!! It's been a bit of a chore.
The underside of the wing is now ready for paint. There is some seams work to be done on the
fuselage. The edges are not that square and flat!! It goes on and on.

The underside of the wing is now ready for paint. There is some seams work to be done on the
fuselage. The edges are not that square and flat!! It goes on and on.
fubar57
General
Gonna be worth it in the end Bill
Vic Balshaw
Major General
This is so different and will be an eye catcher. 

- Thread starter
- #97
N4521U
Plastic Pirate
Yes, it is different, just like myownself!!!! Wing is painted!!!!!!!!!!!!!!!!!!!!!!!!!!!!!!!!!

Now the difficult part, the fuselage! O.D., white and black! Gadzooks.
Now the difficult part, the fuselage! O.D., white and black! Gadzooks.
fubar57
General
Looks great Bill
Vic Balshaw
Major General
Very arty. 

Users who are viewing this thread
Total: 1 (members: 0, guests: 1)
