Navigation
Install the app
How to install the app on iOS
Follow along with the video below to see how to install our site as a web app on your home screen.
Note: This feature may not be available in some browsers.
More options
You are using an out of date browser. It may not display this or other websites correctly.
You should upgrade or use an alternative browser.
You should upgrade or use an alternative browser.
1/24 MK V Spitfire
- Thread starter javlin
- Start date
Ad: This forum contains affiliate links to products on Amazon and eBay. More information in Terms and rules
More options
Who Replied?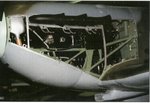
- Thread starter
- #22
") I am getting to the point somewhat I need to see things in two pictures at least from different subjects for a confirmation and that pic did that.Cheers
I am getting to the point somewhat I need to see things in two pictures at least from different subjects for a confirmation and that pic did that.CheersPS: is that the generator the bl/box?black cable it looks like not oil/coolant I think?
Last edited:
- Thread starter
- #23
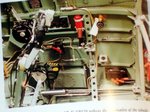
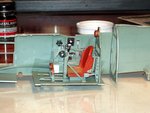
Thought I show what I have gotten done in the last few nights.I have a drawing briefly showing what it took to make the piece with the lines attatched.I like picking things like this out in a copit of this scale and trying to build it up.I did this on the 109 with the O2 regulator it had 11 pieces the body of this one is only 5 pieces.I have started on the box in the lower right side with 3 cables coming out of it.I just need to put the rest of the plumbing in after the box,some placards and the R/side is done.The last pic is from the book "Spitfires and Polished Metal" and excellant reference book it shows what I am striving to obtain.Thks for looking in.Cheers
Attachments


Crimea_River
Marshal
Going out to town there Kevin! Great stuff on those details. The twitching should stop within 3 weeks.
- Thread starter
- #25
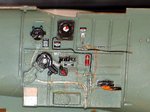
Thanks Andy I even found some more pics tonight that I think answer ALL of my questions of the pit.I see I have a couple of corrections to make on colors here and there but not bad.I also have to make the pneumatic relaoding switch for this side now no biggee and should not be hard.The plumming and valve I made earlier and showed was for the de-icing system for the windscreen and thier is even a rod that goes up front of the windscreen that works with this system that needs to added .Cheers
Ps: the site w/pics http://spitfiresite.com/2010/07/anatomy-of-spitfire-cockpit.html
I even found some more pics tonight that I think answer ALL of my questions of the pit.I see I have a couple of corrections to make on colors here and there but not bad.I also have to make the pneumatic relaoding switch for this side now no biggee and should not be hard.The plumming and valve I made earlier and showed was for the de-icing system for the windscreen and thier is even a rod that goes up front of the windscreen that works with this system that needs to added .CheersPs: the site w/pics http://spitfiresite.com/2010/07/anatomy-of-spitfire-cockpit.html
Last edited:
Crimea_River
Marshal
Yes, that is a very good series of pics. I used those as reference for my builds as well.
Airframes
Benevolens Magister
Nice work and a good collection of pics Kevin. Note one thing though - the landing gear selector lever as moulded in your kit is in the 'Up' position. It needs removing and re-fixing in the four o' clock position.
- Thread starter
- #28
Nice work and a good collection of pics Kevin. Note one thing though - the landing gear selector lever as moulded in your kit is in the 'Up' position. It needs removing and re-fixing in the four o' clock position.
Already cut off Terry. I kept noticing that in all the pics it was in a different location and decided to fix it but thks all the same for the info.
Cheers- Thread starter
- #29
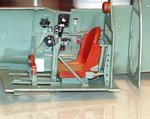
I got alittle more going on with the pit.The only thing really left for this side of the pit is the 4 hydraulic lies that come underneath the IP to the chassis lever and another piece I think part of the deicer?I feel good about it the placcards add that little touch.Cheers
Attachments
Last edited:
T Bolt
Colonel
Fantastic detail work Kevin!
Airframes
Benevolens Magister
Looking very good Kevin.
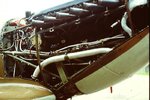
I finally found them! Been looking for some more of my 'reject' slides and found these at last.
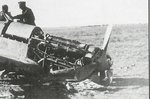
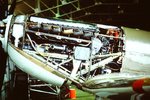
This is the BBMF Spit MkIIA, photographed in 1982, when she was fitted with a four-blade prop and six stack exhausts, but the engine layout is basically similar to the MkV. And yes, the 'black box' is electrical, the voltage regulator, AFAIK, for the generator. Note that the cable fitted here is a 'modern' yellow one.
I finally found them! Been looking for some more of my 'reject' slides and found these at last.
This is the BBMF Spit MkIIA, photographed in 1982, when she was fitted with a four-blade prop and six stack exhausts, but the engine layout is basically similar to the MkV. And yes, the 'black box' is electrical, the voltage regulator, AFAIK, for the generator. Note that the cable fitted here is a 'modern' yellow one.
Attachments
looks great Kevin
- Thread starter
- #33
zaxos345
Senior Airman
Great work so far Kevin and very nice details.
John
John
Coming along nicely!
vikingBerserker
Lieutenant General
Well done!
That looks a bit of alright.....
- Thread starter
- #40
Well boys I appreciate the feedback had to go out of town overnight.I am going to do some shading on that side tonight I hope and John your build inspirer me some as what can be done.By the way John will be using tha cross member deal you did for the harness on this one here.Cheers and thks again for the comments 
Users who are viewing this thread
Total: 1 (members: 0, guests: 1)