Navigation
Install the app
How to install the app on iOS
Follow along with the video below to see how to install our site as a web app on your home screen.
Note: This feature may not be available in some browsers.
More options
You are using an out of date browser. It may not display this or other websites correctly.
You should upgrade or use an alternative browser.
You should upgrade or use an alternative browser.
1/48 Airfix Hawker Hurricane Mk1
- Thread starter tigerdriver
- Start date
Ad: This forum contains affiliate links to products on Amazon and eBay. More information in Terms and rules
More options
Who Replied?JohnAnthony
Senior Airman
- 340
- Jul 26, 2010
That looks great Wurger! I'll try the foil someday as well.
Crimea_River
Marshal
Doing good TD.
Night Fighter Nut
Master Sergeant
Wow... that is awesome. Tigerdriver, when you paint the windows free hand you can clean up the edges with a wooden toothpick or wooden match with a sharp edge. The wood is able to scrape off the excess paint without damaging the plastic windows. ")
Airframes
Benevolens Magister
Good improvement on the canopy. The seat belts, made from foil and wire, are a lot easier than you think, it just takes a little time, and above all, patience.
If you have a look at the decal sheet, you'll find there is a decal for the instrument panel. If you have doubts about it settling onto the raised detail, without decal solvent, then it can be cut out, still on the backing paper, and glued into position. OK, it'll look a bit 'flat' that way, but more than good enough for viewing through a closed canopy.
To help for future builds, always look at everything provided in the kit, test fit, test fit test fit, and plan ahead for each stage of the build. If potential problems show up in the test-fitting, then you are pre-warned, and can plan and then execute a solution. This 'planning' should be in the form of 'How can I do this? What if..?" etc.
I agree with Airframe's post above. And one more tip...that's true it is easier to paint parts of a model when these are still sitting in mould frames. However it is not the best way of it. I'm sure you can ask me why... firstly, you have to cut off pieces that had already been painted. It can't be done without damages to a paint layer. So you have to paint these areas twice.Usually it is a good opportunity of going wrong with painting. About removing of traces of a sprue I don't mention at all because sanding is needed for that mostly. Secondly, fitting of parts...what will you do if painted parts don't fit correctly?
Thirdly, almost all glues damage or destroy a coat. ALso a paint makes sticking quite difficult or makes it impossible. And finally every touch of painted part with fingers makes the paint layer dirty ( often, finger prints appear on them) and causes getting of a glossy surface. Also a very small drop of a glue you won't notice on your fingers can cause a disaster....Am I right?
Thirdly, almost all glues damage or destroy a coat. ALso a paint makes sticking quite difficult or makes it impossible. And finally every touch of painted part with fingers makes the paint layer dirty ( often, finger prints appear on them) and causes getting of a glossy surface. Also a very small drop of a glue you won't notice on your fingers can cause a disaster....Am I right?
Last edited:
Night Fighter Nut
Master Sergeant
The Great Wurger Has Spoken...
Airframes
Benevolens Magister
And yeah and verily let it be noted, for it is so !
- Thread starter
- #30
tigerdriver
Staff Sergeant
thanks for the pointers
i am sort of grateful and nervous all at once
last time i did this was 25 years ago when i was about 15, its gonna take a while to catch up with some of the skills on show here
no progress tonight, tapas beer and spanish red have stopped play
i am sort of grateful and nervous all at once
last time i did this was 25 years ago when i was about 15, its gonna take a while to catch up with some of the skills on show here
no progress tonight, tapas beer and spanish red have stopped play
Vic Balshaw
Major General
You're doing very well TD and you have some great brains working for you.
On the canopy masking, another method I've recently read about, so as yet it's untried by me. The guy placed a wide Tamiya masking tape over the panel, with a pencil followed the outline of the frame, he was not keen on using a sharp knife for fear of slipping and scoring the plastic, he removed the tape and then cut it on a firm surface and then reapplied it to the canopy. I may give it a whirl on my next GB, so I'll let you know how it goes. Failing that, I do tend to do a lot of canopy painting by hand.
Airframes
Benevolens Magister
Another way is to paint strips of tape, lightly stuck to a smooth surface (glass is good), then cut them to the required size(s), and apply them to the canopy. Seal them with clear gloss (Future/Klear) and, when dry, run the dull coat along with a fine brush. If you're nervous about the last stage, then omit the clear gloss. As long as the painted strips are burnished down, they should stay put. I've got a 1/48th Ju88 done this way, about twenty years ago, and the tape hasn't moved.
And don't worry, there are a lot of us here who have had long breaks from the hobby, myself included, so we know what it's like.
The only dumb question is the one you don't ask !
And don't worry, there are a lot of us here who have had long breaks from the hobby, myself included, so we know what it's like.
The only dumb question is the one you don't ask !
The only dumb question is the one you don't ask !
Absolutely right!
- Thread starter
- #35
tigerdriver
Staff Sergeant
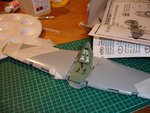
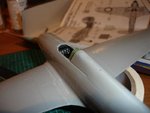
ok next thrilling episode
put the main structures together
yes i did straighten the seat up after i took the pics
needs a bit of work with the filler and sandpaper over the weekend once its settled down
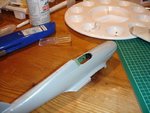
then it will be ready for my first ever go with the airbrush
modellers of a nervous disposition may need to look away
put the main structures together
yes i did straighten the seat up after i took the pics
needs a bit of work with the filler and sandpaper over the weekend once its settled down
then it will be ready for my first ever go with the airbrush
modellers of a nervous disposition may need to look away
- Thread starter
- #36
tigerdriver
Staff Sergeant
ok next thrilling episode
put the main structures together
yes i did straighten the seat up after i took the pics
needs a bit of work with the filler and sandpaper over the weekend once its settled down
then it will be ready for my first ever go with the airbrush
modellers of a nervous disposition may need to look away
put the main structures together
yes i did straighten the seat up after i took the pics
needs a bit of work with the filler and sandpaper over the weekend once its settled down
then it will be ready for my first ever go with the airbrush
modellers of a nervous disposition may need to look away
Attachments
Airframes
Benevolens Magister
Looks OK so far.
Crimea_River
Marshal
Very nice.
- Thread starter
- #40
tigerdriver
Staff Sergeant
havent died or given up
had some poorly dad issues , so time has been short and what little i have had i have devoted to practising painting with an airbrush
not so easy if you have never done it before, its sort of a case of trial and error both to get a feel for the technique and to see what variables do what
had some poorly dad issues , so time has been short and what little i have had i have devoted to practising painting with an airbrush
not so easy if you have never done it before, its sort of a case of trial and error both to get a feel for the technique and to see what variables do what
Users who are viewing this thread
Total: 1 (members: 0, guests: 1)