Navigation
Install the app
How to install the app on iOS
Follow along with the video below to see how to install our site as a web app on your home screen.
Note: This feature may not be available in some browsers.
More options
You are using an out of date browser. It may not display this or other websites correctly.
You should upgrade or use an alternative browser.
You should upgrade or use an alternative browser.
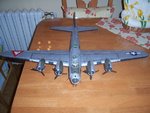
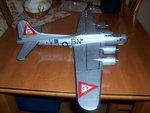
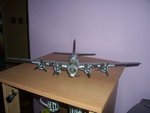
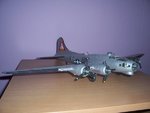
1/48 B17G Flying Fortress [Revell]
- Thread starter Maglar
- Start date
Ad: This forum contains affiliate links to products on Amazon and eBay. More information in Terms and rules
More options
Who Replied?Airframes
Benevolens Magister
I agree with Wojtek, good work so far. There are some moulding seam marks on the gun barrels that you might want to get rid off though - they'll really show up when the model is painted. Check your references for the interior, as many B17G's were unpainted internally, with just some of the framework and fittings in Interior Green. The doors into the bomb bay were varnished plywood BTW.
- Thread starter
- #23
Airframes
Benevolens Magister
For the plywood, just use a light brown or tan colour - the wood grain wouldn't be visible in that scale. The instructions are more or less correct for the interior in aluminium; the cockpit was painted, mainly Interior Green, as were the seats, with the cockpit soundproof cladding in a paler green. The seat-back cushions, if fitted, were dull yellow. All fittings such as seats, tables, racks etc, the top turret and the bomb racks were Interior Green, and often the entire bomb bay was also, as on earlier aircraft. Ammunition boxes were wood, so paint as per the doors into the bomb bay. The front bulkhead, visible at the rear of the nose (bombardier's) compartment, was Interior Green, with the soundproofing again in a paler green. If you want to improve this area, cut-out the 'doorway' that is moulded onto the bulkhead, and glue some rolled tissue or similar to one side, to represent the curtain that covered the hatchway. This will give more depth to this area, and emphasise the internal detail. Same with the doors from the cockpit and radio room into the bomb bay; cut them out, and make new ones from plastic sheet or card, posed open.
The 'bare' interiors were introduced on the later production blocks of the 'G', to save production time. Earlier 'G's' had a painted interior, like the 'F' model, and some were painted as far as the radio room, with the fuselage aft of this in bare aluminimum. So, you can vary the interior if you wish, depending on the particular aircraft, which might make it more interesting! The kit represents a late version of one of the earlier production blocks, with parrallel waist-gun positions and standard tail-gun position, so the possibilities are many.
The 'bare' interiors were introduced on the later production blocks of the 'G', to save production time. Earlier 'G's' had a painted interior, like the 'F' model, and some were painted as far as the radio room, with the fuselage aft of this in bare aluminimum. So, you can vary the interior if you wish, depending on the particular aircraft, which might make it more interesting! The kit represents a late version of one of the earlier production blocks, with parrallel waist-gun positions and standard tail-gun position, so the possibilities are many.
- Thread starter
- #25
Airframes
Benevolens Magister
Yep!
seesul
Senior Master Sergeant
seesul
Senior Master Sergeant
This might be helpful for you ModelForum • Zobrazit téma - B-17G Flying Fortress (1/48 Monogram)
Writen in Czech and Slovak language but I guess all you need is pics.
Hand made riveting
Writen in Czech and Slovak language but I guess all you need is pics.
Hand made riveting
Tony Hill
Tech Sergeant
Seesul, very nice!
Maglar, nice solid start...more pictures soon please.
Darryl
Maglar, nice solid start...more pictures soon please.
Darryl
seesul
Senior Master Sergeant
 thank you Tony but check this ModelForum • Zobrazit téma - B-17G Flying Fortress (1/48 Monogram)
Amazing!
- Thread starter
- #31
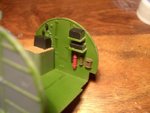
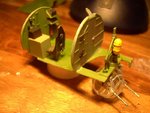
Seesul, Thank you for the link.. that guy is nuts! I also thing your b17 looks quite good for being brushed on a plane this big! Finished this just now, Its the compartment above the underside gun turret, luckily I can pop the bubble off its spinner so when I paint it later the clear plastic wont need to be masked or have a chance of being ruined. Nothing fancy here, I will go heavier on the cockpit and such since that is more readily visible!
Attachments
I have this kit. I plan on building it as part of one of th future group builds. So I will be watching you for hints on how to do it.
Here are two questions for all. Does anyone make any 305th Bomb Group decals for this kit? I would like to open the bomb bay doors. The kit has good bomb bay detail. Is there any after market details for this? I have seen detail sets for every other part of this kit.
Bill G.
I have it too, Bill. Wondering how it'll come out.
Me too also as well. Going to do a bare metal finish. Pray for me.
seesul
Senior Master Sergeant
Meglar, I keep my fingers crossed!
Do I remember those hours spent on painting details that one will never see them as they are inside the fuselage
Good luck!
Do I remember those hours spent on painting details that one will never see them as they are inside the fuselage
Good luck!
- Thread starter
- #34
Soundbreaker Welch?
Tech Sergeant
Looks real nice mate.
Keep it up!
Keep it up!
Heinz
Captain
Looking great mate!
I'll try and find that mag and scan her in before work tonight
I'll try and find that mag and scan her in before work tonight
Airframes
Benevolens Magister
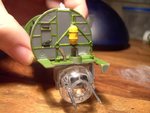
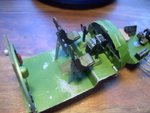
Looking very good so far mate. The ball turret needs a bit more of the framework painting though - only the front and the small apertures on the sides were perspex, the rest was metal. And yes, the turret, and its whole gimble mounting, can be removed whilst you paint the model.
109ROAMING
2nd Lieutenant
Nice B-17 Seesul 8)
Coming along nicely mate
Coming along nicely mate
- Thread starter
- #39
I'd have to rip the glue job apart then Airframes, I just saw some real pictures and yeah its basically all covered up. The instructions highlighted which parts to paint grey so I followed that.. maybe I should do extensive research for the other turrets and make those perfect and let this be since it is a bottom rider?
- Thread starter
- #40
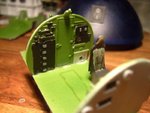
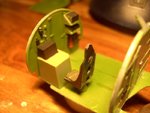
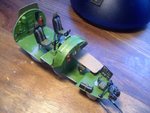
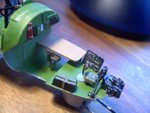
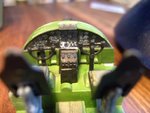
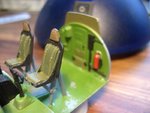
Cockpit done.. normal painting and did some "tape rips" to the floor for some wear.. time to get get some damn lunch, im starving!
time to get get some damn lunch, im starving!Attachments
Users who are viewing this thread
Total: 1 (members: 0, guests: 1)