1/48 B17G Flying Fortress [Revell]

Ad: This forum contains affiliate links to products on Amazon and eBay. More information in Terms and rules

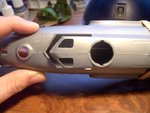
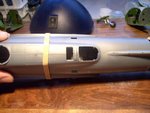
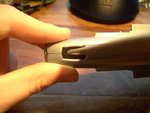
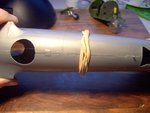
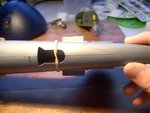
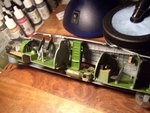
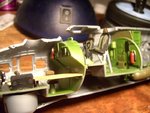
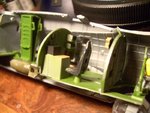
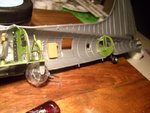
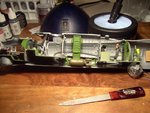
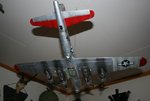
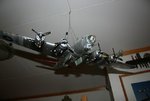
This is a little thing I decided to run to benefit the model. I have dry fitted the fuselages and tried to simulate glue with rubber bands and some finger pressue. Im hoping our expert seam / gap filler experts will be able to help me with suggestions so I can repair it precisely and not damage the detail. I have sanded out all the areas where it was attached to the spur mould and have gotten rid of all the flash. Im still doing the interior but thought I would post this up ASAP so I could give you guys some time to figure a solution. :D
 

Attachments

  • PICT0571.JPG
    PICT0571.JPG
    72 KB · Views: 197
  • PICT0572.JPG
    PICT0572.JPG
    79.4 KB · Views: 198
  • PICT0573.JPG
    PICT0573.JPG
    61.6 KB · Views: 199
  • PICT0574.JPG
    PICT0574.JPG
    68.5 KB · Views: 198
  • PICT0575.JPG
    PICT0575.JPG
    65.2 KB · Views: 198
  • PICT0576.JPG
    PICT0576.JPG
    65.6 KB · Views: 198
Nice work so far Maglar!

...with raised panel lines you are going to lose some surface detail as you fill and sand you need to be real careful, some you can live with some not.....never did like raised panel lines...
 
I have discovered painters tape put 2mm out on each side of the seam to be good at reducing detail loss since the sand paper wont shred a heavy blue tape [Rivets right near the seam will get lost but that is repairable]. Also nothing is harmed because there is no paint on the model yet. My experience though..
 
All interior in place, thought this would be a fair salute before the other fuselage comes on. :-({|=
 

Attachments

  • PICT0585.JPG
    PICT0585.JPG
    104.8 KB · Views: 196
  • PICT0584.JPG
    PICT0584.JPG
    86 KB · Views: 195
  • PICT0583.JPG
    PICT0583.JPG
    86.7 KB · Views: 202
  • PICT0582.JPG
    PICT0582.JPG
    92.8 KB · Views: 200
  • PICT0581.JPG
    PICT0581.JPG
    107.9 KB · Views: 196
As I promissed.The idea with the tape is a very good one.It is known to most of modellers.Here you are one of your pictures as an example.When the halves of the fuselage are glued together follow that :

In the first pic:

1. The first step is to stick two stripes of the masking tape going along the seams with a gap of 2mm.If you need you can go with 3mm one.But these two milimetres should be enough.
2. The second step is to apply a putty.Of course the putty can be put on the tape as well.As the putty you can use a mixture of talc powder and a light grey paint or any standard putty for example the Tamiya White one.Don't use the epoxy ones.
3, The third step is to remove the tape.Do it slightly trying to not damage the 2mm putty strip.So it is better to do it when the putty is not hardened totally.

In two next pics you can see a very useful tool you can make yourself.The B-17 is a quite big model so for the tool you can use a wider ( larger) piece of a slat.Shape the slat ends like in these pics and then glue some sandpaper stripes of 600-800 grade.

In the fourth pic :

Sand these fuselage seams with the tool going from one panel to the next trying to avoid the raised panel lines sanding off.When all is finished remember about polishing these seams .

I hope it can help you with understanding the idea.
 

Attachments

  • PICT0571_.JPG
    PICT0571_.JPG
    85.1 KB · Views: 149
  • tool1.jpg
    tool1.jpg
    63.1 KB · Views: 154
  • tool2.jpg
    tool2.jpg
    63.9 KB · Views: 151
  • PICT0571_1.jpg
    PICT0571_1.jpg
    49.9 KB · Views: 152
Why cant epoxy putty be used? I will be able to make that tool, will have to find some 800 grit sandpaper though, home depot probably. My LHS might have tamiya putty but im not too certain.
 
The epoxy putty is tough rather when hardened.As a result you have to use much more of your vigour for sanding.So there is a possibility of sanding off much more than you need.But there you need to sand soft putty and a little bit of the fuselage plastic at these seams only .Am I right?
 
Yes, there is a few chips as you can see but most of it is seam misalignment and such. It is going to be the a hell race when I bring the fuselages together trying to get the best position in each area. With my dry fit I am able to align the fuselages more accurately but it requires time and strength, the glue will only slow me down..
 
Wojtek, how or where could I get a special decals for a specific airplane that is not delivered with the kit?
Perhabs for less known machines crashed close to my born town...
Is there some specialized company that produce the decals on your wish, or you compose the numbers from all and not used decals?
I can´t paint it with my shaking hands:rolleyes:
 
Ahoj Romku,

There is a firm from Czech as memory seves named Tally Ho! Look for their offer.Here is one of the net links I found.

Tally Ho! 1/48 Stencil Decals: Mosquito, Spitfire Mustang

Generally these decal manufacturers are interested in huge series and don't make such individual marking for ordering rather.But if yes these decals are quite exensive.That's way modellers make these decal markings themself mostly.As well there is a possibility of fitting some markings from standard decal sheets for aftermarked offers.
 
Yes, there is a few chips as you can see but most of it is seam misalignment and such. It is going to be the a hell race when I bring the fuselages together trying to get the best position in each area. With my dry fit I am able to align the fuselages more accurately but it requires time and strength, the glue will only slow me down..

Therefore you need a soft putty.Also you can use a putty in a liquid.MrHobby offers a such one.
 
Righto Wurger, I iwll buy more supplies tomorrow.. hopefully that shop has some dang putty! Im on delay until I get the putty and sandpaper / stick. Not rushing things here :D
 
Looking good. If you heat and stretch plastic sprue into filaments you can lay them into the seams with superglue. Then, instead of sanding you can scrape along the seam to contour the filament(s) into conformity. Sandpaper leaves a lot of unnecessary scratches along a seam. Scraping the joint doesn't and then it can be blocked down with 1500 grit for final smoothing. It should be a snap on a model of that size. Scraping can be done with a #11 blade or any other blade that's stiff enough and won't flex when pressure is applied.
 
that is a lovely kit. I made one some years ago ( now hanging in the roof. ) there is a updatekit aviable..with bomb bay doors and lots of cool stuff.. i bought the upgrade kit from Verlinden

looking forward to see yours
 

Attachments

  • B-17 001.jpg
    B-17 001.jpg
    31.8 KB · Views: 131
  • B-17 002.jpg
    B-17 002.jpg
    30.7 KB · Views: 126

Users who are viewing this thread

Back