1/48 B17G Flying Fortress [Revell] (1 Viewer)

Ad: This forum contains affiliate links to products on Amazon and eBay. More information in Terms and rules

Its not that lol, im usually doing prolonged homework or studying or playing a video game.. when I model I like to know that I have 3+ hours ahead of me without disruption, I hate that stop / go thing, unless its paint. But when the paint is curing hey, start another kit eh?!
 
Those International afflictions known as modelling and WW2 aircraft forum! No one gets to bed at the proper time!
Corey, the basis of the bomb bay are already in the kit. This is a super kit to try out some scratch building in the bomb bay, where any foul-ups can't be fully seen! All that is required is to carefully cut out the bomb bay doors from each fuselage half, and add some framework to them. For your first exercise in this field, thin plastic strip would be good enough to simulate the frames and formers and, when painted, would look convincing enough. A couple of bomb carrier frames , one each side of the bay, again from plastic strip, assembled rather like ladders, would virtually suffice to 'fill out' this area, especially if at least two of the bombs are 'loaded aboard'.
Not only would it look rather good, it would also do justice to the kit, and give you a huge sense of achievement.
If you need any detail pics of this area, or other parts of the interior, let me know and I'll find some for you.
Now, as the clocks have changed for Spring, it's time I too went to bed!
Terry.
 
I dont think would be the kit to 'try' scratchbuilding.. My mom has a dremel and I guess thats the tool of choice for cutting right? I would love to attempt to make a bomb bay with open doors but I dont think I can. I plan on making this a diorama with simple grass then the figures and the bomb cart with the idea of the B17 restocking its bombs, and that open bay would make the most sense..
 
You could use the Dremmel, on a slow speed, with the circular saw attachement, but you'd need to be very careful; a razor saw would be better if you can get one.
The reason I mentioned this kit as a good one to 'try' scratch-building, is for exactly the reason you would like to portray the finished model. With the doors open, it would look great with the bomb cart. I think you COULD do it, as it's a straightforward cutting job. Even if you didn't attempt the framework/ribs on the inside of the doors, once painted, they'd be passable. The kit parts alone are good enough to serve as the bomb bay interior, as not much can be seen, unless you turn the model upside down, and use a torch to look inside! (Incidentally, the reason the bay parts are included, is that this kit was also originally issued with one half of the fuselage in clear plastic, so that the interior could be seen).
I personally think that you'd be able to do it without problems, as you seem to have the 'right approach' to planning ahead and improving your skills; this little exercise would give you much more confidence to attempt further, albeit small, detailing work, and the sense of achievement you'd feel afterwards would be enormous, adding to your confidence and, of course, your experience. If you look closely at the fuselage halves, you'll notice that the bomb bay door joints are well defined, and therefore provide a good guide to making the cuts required to separate them. If you do decide to tackle this, leave off the doors until the model is finished and painted, then fix them in position. You can mask the open bay before spraying the Alclad, the job of which is going to be much more complex than attempting the bomb bay job!
This time, I AM going to bed!!
Terry.
 
For a second I looked through the different moulds trying to find the doors, until I looked at the inside of the fuselage and saw the interior lines. This should be an easy project, down, across, down, sand.. will have to repaint some spots and reposition the bombs because if its resupplying the bombs in there would be on the top. Guess im not so much of a speed-modeler anymore Airframes :D
 
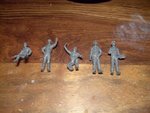
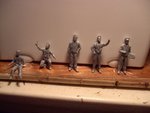
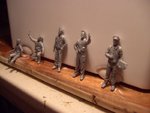
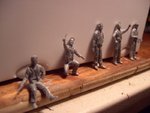
Being my constructive self I figured hey, if im sitting here waiting for supplies and such why now move forward in another way. Yes gents, its figure time! Just sanded them down and I will say that the whole damn body was a seam. Still need to do some sanding in the inside of the legs but everything else that is important went well. [I didnt know they made the ww2aircraft.net moderators in 1/48 scale! :p]
 

Attachments

  • PICT0590.JPG
    PICT0590.JPG
    101.5 KB · Views: 141
  • PICT0591.JPG
    PICT0591.JPG
    69.3 KB · Views: 139
  • PICT0592.JPG
    PICT0592.JPG
    65.3 KB · Views: 138
  • PICT0593.JPG
    PICT0593.JPG
    60.6 KB · Views: 179
Lots of creases and detail, so when I do my wash it there will be many highlights like that pilot.. yay!
 
Wojtek is the one with the clipboard. Now how could the good doctor fix this, lets plan it out!
 
Nice going with the build mate! Remember building this one, the B-24 still have a P-61 sitting in the box.......in Sweden! :oops:
 
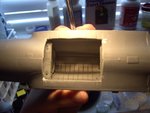
Used the dremel on this one.. didnt come out flawless but it was my first go.. sanded down a lot then I used some putty on edge I went too far. STILL, it is now open and I have have my crooked doors hanging. Once the plane is on all 3 no one will notice so i'm content.. :D

Also knocked out about 3 inches of seam work..!
 

Attachments

  • PICT0597.JPG
    PICT0597.JPG
    61 KB · Views: 133
No Cory all is fine.You did well.I have forgotten that it is 1/48 scale model that's way the bomb bay seems to me very big. Sorry if you got me offencing.:oops:
 
Ian I am not bored but rather impressed! I am doing the NMF one and my figures are a field crew and not pilots or gunners. I still need to sand that damn bay down because looking at my pic is I see its uneven. May I ask how did you fill the seam because our kits seemed to have similar issues based on pics.. Also one of my doors doesnt have those interior lines which will be awkward. Biggest worry is those two fuselages combing, ive been practicing with dry fits and there just something keeping em apart until I get em right. More sanding!!
 

Users who are viewing this thread

Back