1/48 Me 410A-1/U-2 Dietrich Puttfarken - Me/FW Group Build

Ad: This forum contains affiliate links to products on Amazon and eBay. More information in Terms and rules

May be an option Glenn. There are two clear sections, both of which are cracked. The upper section is flat and is easily replaces with clear sheet. The bottom section, however is curved. I mat get away with using a thin enough sheet that should bend easily. I wasn't able to get at it tonight.
 
Thats a tough one Andy ,hate to see that happen. Still a stunning build coming together the engine is a jaw dropper. Any aftermarket options worth a look? I know clear alternatives makes a lot of different canopies,see 'em on evil-bay all the time just my .o2.
 
Andy, I would go with TBolt's suggestion if you can. Although my build problem in that area was a bit different I did realize that most of that area is framing leaving me to work and paint while the clear areas were ok. That being said, most of what is cracked may be frame and not windscreen and you may be able to cut out the clear area and back up with clear sheet - like TBolt's suggestion. I thought all was lost until I really looked at what was there.
 
Beautiful work on the engine, Andy. Tough on the perspex, though. Be interested to see if you can make the repair or if you have to replace. Keep up the good work.
 
Thanks Gerry, David. It'll be a home made replacement. Empty plastic cashew container will go under the knife soon. Should have it solved by Sunday.
 
Ok. Operation Cashew Jar was a success!

First off, I pulled a plastic cashew jar out of the recycle bin after noticing it might give me the shape of the clear glazing I need to replace the broken bit on the nose. I cut a rough coupon out of the curved section of the jar:

111126 Nose Glaze 1.jpg


Next, I laid out a centerline across the curve and drilled the holes for the cannon which would serve as the alignment points. I was pleasantly surprised at how pliable this plastic was, enbabling me to bend it to more of a curve as needed without breaking the thing.

111126 Nose Glaze 3.jpg


Next, I carefully measured the opening and laid out the shape onto tape that I stuck on the glazing to serve as cut lines. I purposely made it a bit big so I could file the edges down to fit tightly.

111126 Nose Glaze 4.jpg


A lot of careful dry-fitting and trimming got me to this point. As you can see, I needed to bend the piece near the cannon holes even more.

111126 Nose Glaze 5.jpg


Bending the curve tighter was easy. I forced it to bend around a paint brush handle cold and it stayed where I bent it. Then I cut a section from the straight part of the container and trimmed it down and bent it until everything dryfitted nicely to the model:

111126 Nose Glaze 6.jpg


The joint line between the lower and upper section of glazing is exactly where the framing ends on the real 410, making this a convenient break point. Satisfied that everything fit nicely, I cleaned up the parts and dipped them in Future to set for a day or two before I glue them in permanently. The cannon holes will then be drilled out again to match perfectly.

111126 Nose Glaze 7.jpg


I was pretty happy with this material. I think I'm going to hang onto this jar in case I need it again! Thanks for looking in and for your continued interest.
 
Vic, Terry, thank-you both. It may very well look better Terry.

I've decided to leave these part off for a while until other work is complete so as no risk damage to them and mess up the inside with sanding dust.
 
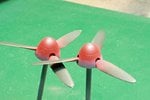
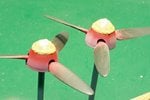
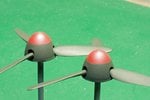
As promised, pics of the prop/spinner development follow. Initially, I had painted the prop/hubs separately but once I realized that the back plate on the spinner had edges that sat flush with the spinner sides, I decided to glue all these bits together and paint them as an assembly since the back plate seam and edges would likely have to be sanded to blend in with the spinner surface. That's what I ended up doing and once blended, I rescribed the back plate seam as it would have been visible.

I realize the colours remain debatable and that no difinitive pictures exist to support the scheme, as stated in post 281, but nevertheless I proceeded to paint the spinners RLM 70 with red caps for a 5 Staffel machine. The red colour is Testors flat red with a dab of black to reduce the extreme vividness of this particular paint. The pics below speak for themselves, showing the sequence of painting. Thanks looking.
 

Attachments

  • 111128 Prop 1.jpg
    111128 Prop 1.jpg
    53 KB · Views: 82
  • 111128 Prop 2.jpg
    111128 Prop 2.jpg
    53.9 KB · Views: 82
  • 111128 Prop 3.jpg
    111128 Prop 3.jpg
    49.2 KB · Views: 79
Must have been a relieve to be able to work on a little less complicated sub-assembly after the clear parts issue and such ;) Having to deal with loads of complicated steps one after the other can really be a pain if you have to deal with them all the time.
 

Users who are viewing this thread

Back