<-- 1/48 Mosquito PR.IX -Twin Engined Aircraft WWII

Ad: This forum contains affiliate links to products on Amazon and eBay. More information in Terms and rules
Thanks chaps.
Back at the bench, but working on the Gee controller for the FB.VI.
 
Thanks Hugh.

Still working on the Gee controller/switch box for the FB.VI, but took a break to get the canopy finished on the PR.IX.
The internal frames have been finished and sealed, the canopy cleaned on the inside, and masked ready for painting - over four hours for the masking, due to the compound curves and those side blisters, what a fiddly job !
The canopy has now been attached to the fuselage, and the frames painted in the interior colour. Once fully dry, the joints will be blended-in to the fuselage, and then work can continue, adding a little more detail to the exterior of the fuselage, before moving on to the engine nacelles, which will need some work to improve and correct the shape of the intercooler and carb intakes.

PICS 1 and 2. The internal 'tubular' frames, made form painted clear tape. Only the rear section frames were exposed, hence the foreshortened lines of tape on the horizontal frames. Although not as good as actual tube or rod, which would be nigh on impossible to attach without marring the canopy, the painted tape looks rather good in 'real life', and is an effective solution to a tricky modelling problem.
PICS 3 and 4. The canopy masked, ready for painting of the external frames.
PICS 5 and 6. The canopy was fixed in place initially with a bead of Humbrol Clear Fix, then, when set, the joint was reinforced with small spots of CA adhesive. The acetate type material used in vac-formed canopies is not normally affected by fogging from the CA fumes, but a test was done first on the scrap clear material of the mould form from the canopy - just in case !
A further bead of Clear Fix was then applied, to partially seal the joint line. Further filling, to blend--in the canopy, will be done later.
PIC 7. The main external identification feature between the PR.IX and the PR.XVI is the canopy, the PR.XVI canopy having a modified frame, with the blister on the roof, and single-piece, 'blown' side panels replacing the side blisters seen on the earlier 'bomber style' canopies. Most of the later Mark of bomber and PR Mosquitoes had the 'blown' side panels, as did the late FB.VI types. The Airfix canopy shown here, has separate side panels, to be used on either the PR or bomber version (bomber canopy lacks the roof-top blister), and the fit of these panels is far from good, needing some sanding and fiddling to get them to 'seat' properly - they are only tacked in place for the photo.
PIC 8. Once the canopy had set, the frames were painted in the interior colour, looking rather pale here, due to the flash. The red arrows indicate the line of the joints which will be filled, probably using 'Milliput', and blended-in to the contours of the fuselage, the aim being to get the canopy to look like part of the aircraft, rather than an afterthought stuck on top. This is particularly important in this instance, as the model will be finished in a single colour overall, which is more likely to show up any defects, compared to a disruptive camouflage scheme, where the various colours distract the eye from such imperfections, at least to a small extent.
Bearing in mind that this vac-form canopy was designed for use with the Tamiya kit, I'm quite pleased with the fit, which only needs minimal filling and blending to achieve, I hope, a perfect fit.

Once the canopy work has been completed, the model will be put aside for a little while, whilst I continue with the FB.VI in the other build thread, but I'll be back fairly soon with another up-date.


Mosquito PR.IX build 156.JPG
Mosquito PR.IX build 158.JPG
Mosquito PR.IX build 159.JPG
Mosquito PR.IX build 160.JPG
Mosquito PR.IX build 161.JPG
Mosquito PR.IX build 163.JPG
Mosquito PR.IX build 167.JPG
Mosquito PR.IX build 171.JPG
 
Thanks Andy.
Got the canopy rim filled with 'Milliput', the gap in the entrance hatch rim filled, and marked some areas which need attention or additions, which I hope to complete tomorrow.
I want to get the fuselage finished, before returning to the FB.VI and finishing the cockpit and attaching the canopy.

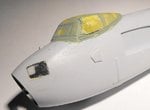
PIC 1. The nose window rim has been filled, and the canopy has been blended-in to the fuselage, using 'Milliput', which will be sanded when fully cured. Any blemishes or depressions can then be filled with 'porridge' - a mix of light grey enamel paint and talcum powder, a sort of home-made 'Mr. Surfacer' - allowed to cure, and then be lightly sanded. After a coat of primer, the finish paint, and the gloss and matt clear coats, it should be smooth enough, and look part of the aircraft.
PIC 2. The camera ports have been filled around the periphery and masked, and the red dots mark the areas where rain deflectors need to be fitted, probably using stretched sprue sanded to shape, The red arrow indicates the very feint outline where an I.D. lamp was sanded off, as the PR.IX (and PR.XVI) had the lamps in a row of three on the rear starboard underside (see below).
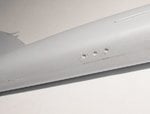
PIC 3. The two I.D. lamps will be countersunk, and a third lamp added, indicated by the red arrow. These will be painted silver, glazed, and then be coloured red, amber, green (from the front) using transparent paint, after the model has been painted.
PIC 4. There should be a faired intake for the fuel cooler radiator in the location shown by the arrow, and this will be made and fitted, before setting the model aside for the time being. If it works, I'll probably cut down and sand one of the exhaust shrouds from the 'spare' FB.VI parts included with the kit, which will hopefully end up looking like the real rad fairing.

That's all for now, but I'll be back soon.


Mosquito PR.IX build 174.JPG
Mosquito PR.IX build 176.JPG
Mosquito PR.IX build 177.JPG
Mosquito PR.IX build 178.JPG
 
Thanks chaps.

Andy, I've seen red, green, amber, and red, amber, green, and blue, red, green, and other combinations.
On aircraft such as the Lancaster and Mossie, and most US aircraft, the sequence is normally the same as UK traffic lights (which is how I can remember them !), which, from the top (or front) is red, amber, green, so I've just gone with a combination of all variants.

Got the canopy rim sanded and nicely blended in, after checking by applying a light coat of the interior colour, and hope to get the rest of the mods to the fuselage done later tonight, if my hands will cooperate - they're a bit stiff and painful today, too much so to attempt more fiddly work on the FB.VI. - but if I don't get it done, I'll at least post pics showing what's required for the next stage, improving the shape of the longer engine nacelles.
Thanks again to everyone for their continued interest, and I'll be back fairly soon.

EDIT:- Just done some more checking, and the I.D. lamps on the Mosquito should indeed be Red/Green/Amber, reading from the front. Thanks for the prompt Andy.
 
Last edited:
The fuselage mods are now virtually all done, with the canopy blended and checked, the extra I.D. lamp added and the others countersunk, and the fuel cooler radiator fairing made and fitted.

PIC 1. After lightly sanding the 'Milliput' around the canopy joint, it was checked by giving it a coat of the interior colour, and, when dry, more gentle sanding was done. I'm happy with this, and any minor blemishes will be hidden by the successive coats of primer, paint and clear coats.
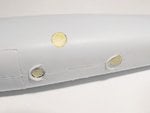
PIC 2. The third (rear) I.D. / signal lamp was engraved and, along with the others, countersunk to provide the lamp housing. These will be masked, and then painted and glazed after the model is painted and clear coated.
PIC 3. The rain deflectors around the forward rim of the underside camera ports were added, using stretched sprue, carved and sanded to shape. A little more work is required to tidy them up a bit.
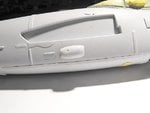
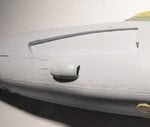
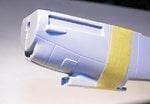
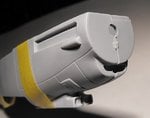
PICS 4 to 6. As mentioned previously, there should be a fuel cooler radiator fairing on the starboard fuselage side, above the line of the bomb bay doors. Strange that parts were not provided, as there are what could be locating points on the kit fuselage, and inside the bomb bay, the fuel galley is moulded onto the side wall. So, the fairing was made, by cutting down one of the exhaust shrouds from the spare FB.VI parts in the kit, which was then carved and sanded to shape. The inside was blocked-off by a scrap of plastic, to prevent seeing though an empty shell, and the front and rear faces of the scrap were painted brown, to simulate the radiator screens. Once fixed in place, two screw holes were added, by lightly drilling.
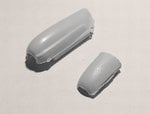
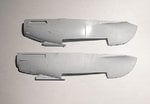
PIC 7. The two types of nacelle seen on the Mosquito are shown here, with the original single-stage Merlin nacelle on top, from the FB.VI kit, and the longer, two-stage, two-speed Merlin 76 nacelle below. The latter, although reasonable in general shape and outline, requires some work to correct the intakes, and add some missing details.
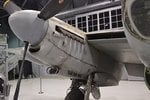
PICS 8 to 10. A comparison between the kit parts, and one of Paul's (Micdrow) excellent photos of a Mosquito TT35 / B.35 nacelle, shows the differences, with the kit part being too 'square' around the intercooler intakes, and lacking the 'waisted. shape at the extreme front, and with the carb intakes also being too square and flat. The ventilator 'gills' on the latter also need to be removed, being a compromise of parts also used on the Airfix Mosquito NF.30 kit, released at the same time as the original B.XVI / PR.XVI kit.
The intercooler louvres also need some improvement, being moulded flat, when they should be angled open, as in Paul's pic.

I'll be going back to the FB.VI build before tackling the mods to the nacelles, but I'll be back on to this very soon.
 

Attachments

  • Mosquito PR.IX build 179.JPG
    Mosquito PR.IX build 179.JPG
    31.5 KB · Views: 106
  • Mosquito PR.IX build 180.JPG
    Mosquito PR.IX build 180.JPG
    25.9 KB · Views: 115
  • Mosquito PR.IX build 181.JPG
    Mosquito PR.IX build 181.JPG
    24.7 KB · Views: 119
  • Mosquito PR.IX build 184.JPG
    Mosquito PR.IX build 184.JPG
    29.2 KB · Views: 137
  • Mosquito PR.IX build 186.JPG
    Mosquito PR.IX build 186.JPG
    35.7 KB · Views: 120
  • Mosquito PR.IX build 187.JPG
    Mosquito PR.IX build 187.JPG
    31.8 KB · Views: 112
  • Mosquito PR.IX build 188.JPG
    Mosquito PR.IX build 188.JPG
    34.5 KB · Views: 126
  • Mosquito PR.IX build 190.JPG
    Mosquito PR.IX build 190.JPG
    35.2 KB · Views: 130
  • Mossie Naccelle comparison.jpg
    Mossie Naccelle comparison.jpg
    124.2 KB · Views: 135
  • Mosquito PR.IX build 191.JPG
    Mosquito PR.IX build 191.JPG
    34.9 KB · Views: 135
Terry, for what it's worth, here's a scale drawing of a Merlin 72 engine cowl arrangement.
 

Attachments

  • L984269 Engine Installation Merlin 72 SCAN_0067.pdf
    365.8 KB · Views: 108
Thanks Andy. I have a couple of drawings, but having the factory drawing is useful. I see it's one of the Australian production items ....
 
Thanks very much chaps.
The PR.IX has been put aside temporarily, until I get the final cockpit bits done on the FB.VI, and the canopy attached. Once that's done, it'll be back to jumping between the two builds, and the final bits on the NF.XII, with the engine nacelles next in line for the PR.IX.
It's getting confusing now, with a PR.XIIFBIXNFVI !!!!
 

Users who are viewing this thread

Back