Good work so far!
Navigation
Install the app
How to install the app on iOS
Follow along with the video below to see how to install our site as a web app on your home screen.
Note: This feature may not be available in some browsers.
More options
You are using an out of date browser. It may not display this or other websites correctly.
You should upgrade or use an alternative browser.
You should upgrade or use an alternative browser.
1/48 Special Hobby Reggiane Re.2005 Sagittario
- Thread starter Grant Barr
- Start date
-
- Tags
- 1/48 re.2005 special hobby
Ad: This forum contains affiliate links to products on Amazon and eBay. More information in Terms and rules
More options
Who Replied?Lucky13
Forum Mascot
- Thread starter
- #43
Grant Barr
Senior Airman
Quick update. I've not had much free time to get my photos sorted for upload to this thread, but I have been progressing steadily through construction and adding some colour splashes as required.
I have noted several times in this build that their is a lot of flash and some annoying short shots on certain parts. This is probably to be expected from low pressure short run productions but it does mean that you need to spend A LOT of time making sure the parts all fit properly and that you can fix/adjust where the part joints are less than ideal. Needless to say this is where I have been spending my time - which means that it feels like I am not making any progress.
Enough whinging! Some update photos I do have to hand are below:
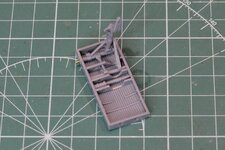
This is the port undercarriage assembly now completed and ready for paint. If you zoom in a bit you can see where I added a brass rod reinforcement to the main oleo leg rotation shaft - I was not happy with the strength of the part as supplied and decided to beef it up a bit.
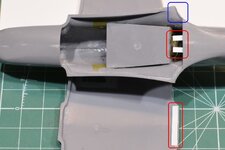
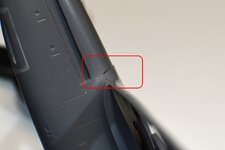
In these next two shots illustrate some of the fit issues with the kit. The rear wing to fuselage joint wanted to pop inside the fuselage, leaving a hollow that would otherwise need to be filled. To stop this from happening I added some styrene packing to the wing and some tags to the inside of the fuselage to stop the wing from popping inside the line of the fuselage. The blue box encloses one of the short shot areas for the fuselage - its not a huge issue but it does require attention and some careful filler application. At the front there was a pronounced lip where the lower engine cowl meets the wing. Close inspection of the issue and comparison to photos of the real thing revealed that the engine cowl seemed a little misshapen so I decided to use some more plastic card to build the cowl up to the level of the wing. You can see this (and the work on the rear joint) in the third photo, with the lower cowl now looking much flatter in lateral cross section like that for the actual aircraft.
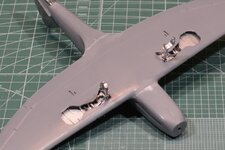
Finally the installation of the top wing halves gave me no end of trouble. The next photo shows were I needed to add some card to lengthen the panels so they lined up with the lower wing panel. What I didn't take any shots of was where I had to spend hours thinning the trailing edges inside the top and bottom halves so that there was no gap between the two when glued together. Both top and bottom halves had "bulges" in the plastic about 2 to 5 mm inboard of the edge which created an unsightly gap on the trailing edge. The other issue I had which really bugged me as well was the poor fit of the upper wing half over the wheel well inserts - I had to remove nearly 1mm of height from the inserts/upper wing to get it to fit properly. Lots of scraping and grinding of plastic!
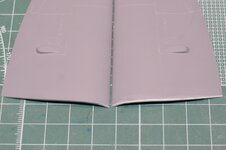
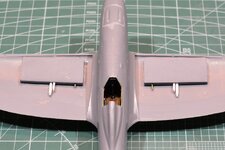
The other addition I made to the kit was to add some styrene card boxing around the shell ejection shutes so it looks a bit less empty if viewed from the underside. Tiny detail and probably a bit over the top but I prefer to have something in there rather than seeing an empty void if you look in there otherwise.
I have done some more work on the kit but don't have any photos prepped. Once I get more time I'll pop them up.
As always - thanks for looking in on my latest project.
I have noted several times in this build that their is a lot of flash and some annoying short shots on certain parts. This is probably to be expected from low pressure short run productions but it does mean that you need to spend A LOT of time making sure the parts all fit properly and that you can fix/adjust where the part joints are less than ideal. Needless to say this is where I have been spending my time - which means that it feels like I am not making any progress.
Enough whinging! Some update photos I do have to hand are below:

This is the port undercarriage assembly now completed and ready for paint. If you zoom in a bit you can see where I added a brass rod reinforcement to the main oleo leg rotation shaft - I was not happy with the strength of the part as supplied and decided to beef it up a bit.
In these next two shots illustrate some of the fit issues with the kit. The rear wing to fuselage joint wanted to pop inside the fuselage, leaving a hollow that would otherwise need to be filled. To stop this from happening I added some styrene packing to the wing and some tags to the inside of the fuselage to stop the wing from popping inside the line of the fuselage. The blue box encloses one of the short shot areas for the fuselage - its not a huge issue but it does require attention and some careful filler application. At the front there was a pronounced lip where the lower engine cowl meets the wing. Close inspection of the issue and comparison to photos of the real thing revealed that the engine cowl seemed a little misshapen so I decided to use some more plastic card to build the cowl up to the level of the wing. You can see this (and the work on the rear joint) in the third photo, with the lower cowl now looking much flatter in lateral cross section like that for the actual aircraft.


Finally the installation of the top wing halves gave me no end of trouble. The next photo shows were I needed to add some card to lengthen the panels so they lined up with the lower wing panel. What I didn't take any shots of was where I had to spend hours thinning the trailing edges inside the top and bottom halves so that there was no gap between the two when glued together. Both top and bottom halves had "bulges" in the plastic about 2 to 5 mm inboard of the edge which created an unsightly gap on the trailing edge. The other issue I had which really bugged me as well was the poor fit of the upper wing half over the wheel well inserts - I had to remove nearly 1mm of height from the inserts/upper wing to get it to fit properly. Lots of scraping and grinding of plastic!


The other addition I made to the kit was to add some styrene card boxing around the shell ejection shutes so it looks a bit less empty if viewed from the underside. Tiny detail and probably a bit over the top but I prefer to have something in there rather than seeing an empty void if you look in there otherwise.
I have done some more work on the kit but don't have any photos prepped. Once I get more time I'll pop them up.
As always - thanks for looking in on my latest project.
Last edited:
Vic Balshaw
Major General
Wow, lot of good stuff going on here, I like the way you work, you have a good eye for detail. 
Nicely done so far!
Crimea_River
Marshal
Your patience and attention to detail will pay dividends Grant. Good stuff.
SANCER
Senior Master Sergeant
Hola Grant, what an entertaining thread, with challenges and adversities very well fought you have on your hands. =D>
We started with pleasure noting the good detail in the cockpit parts, the landing gear area and some other parts. As Andy mention, this Special Hobby brand has been a bit "special" when it comes to assembling its pieces.
And in part it is appreciated, because it allows us to develop our inventiveness, creativity and practice of alternatives to overcome obstacles that various kits always present us with;... The simple fact of looking for modifications that allow us to make models closer to the real ones is what makes this hobby so exciting for many.
The chosen model of your Italian bird is a nice plane with very aerodynamic lines, ... I will be attentive to the progress of your thread.
Congratulations on what you have achieved so far... a lot to continue learning.
Saludos
Luis Carlos
We started with pleasure noting the good detail in the cockpit parts, the landing gear area and some other parts. As Andy mention, this Special Hobby brand has been a bit "special" when it comes to assembling its pieces.

And in part it is appreciated, because it allows us to develop our inventiveness, creativity and practice of alternatives to overcome obstacles that various kits always present us with;... The simple fact of looking for modifications that allow us to make models closer to the real ones is what makes this hobby so exciting for many.
The chosen model of your Italian bird is a nice plane with very aerodynamic lines, ... I will be attentive to the progress of your thread.
Congratulations on what you have achieved so far... a lot to continue learning.
Saludos

Luis Carlos
fubar57
General
Good fixes
- Thread starter
- #50
Grant Barr
Senior Airman
Thanks for all the positive feedback guys, being my first foray into Special Hobby - its been an interesting kit to build. First I really liked it, then I hated it and now I am back to at least appreciating the fact it is helping me improve my skills and technique. So, after a lot of unplanned interruptions to progress I finally got something done in the past couple of days.
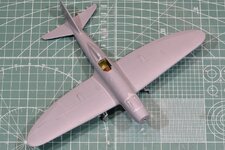
First up - the top half of the wings have been fitted. A small bit of filler was still required - just used a wipe of Mr Surfacer 500 to fill the gap and re-scored the panel line.
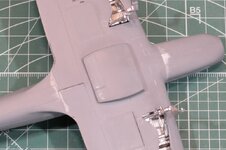
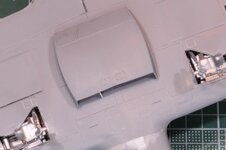
The radiator, which needed so much fettling to sit properly under the wing, has now been glued in place. The joints look pretty good, only a small amount of touch up will be required where I was overly generous with the glue. I am really happy with how thin the edges of the panels are - all the scraping and sanding is now starting to pay off.
Lastly I have now attached the horizontal stabilisers. When I started this kit I thought to myself that I would make it easier and not detach any flying surfaces. So when I found myself removing them the other day I thought that I must be a masochist - why else would I do this??? (idiot....?)
The joints were really bad, with the fuselage moldings being very wavy - almost like they slumped once removed from the molds or maybe short-shot. I spent an inordinate amount of time straightening the joint and then thinning them so they matched to the contours of the stabilisers. Its still not great with some filler required; done after I took these photos.
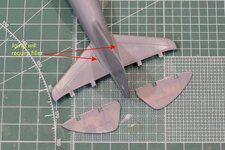
Next steps will be to fit the elevators and then prep all the surfaces for paint. I am planning on experimenting a bit with surface prep, making the fabric surfaces a bit "rougher" than the metal ones to see if this makes any difference to the final finish. All part of the learning process for me.
Thanks to all for popping by, with luck I will add another post tomorrow with more progress.
First up - the top half of the wings have been fitted. A small bit of filler was still required - just used a wipe of Mr Surfacer 500 to fill the gap and re-scored the panel line.

The radiator, which needed so much fettling to sit properly under the wing, has now been glued in place. The joints look pretty good, only a small amount of touch up will be required where I was overly generous with the glue. I am really happy with how thin the edges of the panels are - all the scraping and sanding is now starting to pay off.


Lastly I have now attached the horizontal stabilisers. When I started this kit I thought to myself that I would make it easier and not detach any flying surfaces. So when I found myself removing them the other day I thought that I must be a masochist - why else would I do this??? (idiot....?)
The joints were really bad, with the fuselage moldings being very wavy - almost like they slumped once removed from the molds or maybe short-shot. I spent an inordinate amount of time straightening the joint and then thinning them so they matched to the contours of the stabilisers. Its still not great with some filler required; done after I took these photos.

Next steps will be to fit the elevators and then prep all the surfaces for paint. I am planning on experimenting a bit with surface prep, making the fabric surfaces a bit "rougher" than the metal ones to see if this makes any difference to the final finish. All part of the learning process for me.
Thanks to all for popping by, with luck I will add another post tomorrow with more progress.
fubar57
General
Looking good. More patience than I
Vic Balshaw
Major General
Your doing a great job Grant, I was never a fan of Special Hobby kits so you have my admiration. 
Crimea_River
Marshal
You are doing fine work on this challenging kit Grant. Good on you.
- Thread starter
- #55
Grant Barr
Senior Airman
Small progress to report. I managed to slip this little jewel into my last order of bits and bobs.
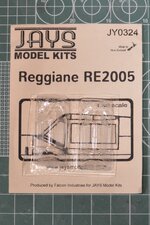
I spent a bit of time last night cutting one of the canopies from the mold stock. It's the first time I've actually used a vac-formed canopy so I was a little nervous when removing it, but all-in-all I am happy with the way it looks.
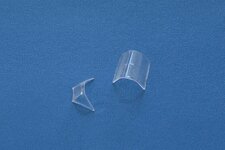
Just need to get it masked, fitted and then painted now.
Cheers all.

I spent a bit of time last night cutting one of the canopies from the mold stock. It's the first time I've actually used a vac-formed canopy so I was a little nervous when removing it, but all-in-all I am happy with the way it looks.

Just need to get it masked, fitted and then painted now.
Cheers all.
Vic Balshaw
Major General
They look good, you did well. 
Nice work so far!
- Thread starter
- #59
Grant Barr
Senior Airman
A bit more progress to report on the kit. As I noted I wanted to experiment a bit with the surfaces of the model before being painted. I had lightly sanded most of the model when re-scribing the panel lines and generally cleaning up joins. What I wanted was for the fabric flying surfaces to keep a slightly rougher surface whilst getting the rest of the metal surfaces as polished as possible. I read somewhere where one modeller used a fabric linisher wheel in his Dremel to bring the surface back to a shine. I thought I might give this a shot - the results for which are below.
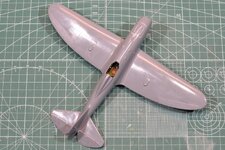
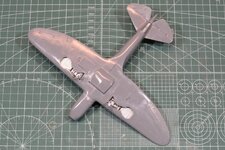
It looks nice and shiny now - not sure if it will make one iota of difference once I get the paint on... Its a bit hard to see the difference between the metal and fabric surfaces but the elevators and ailerons are not polished like the main surfaces.
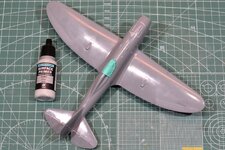
I've also now managed to mask up the areas to keep primer away from. I used the kit canopy which is lightly attached with white glue and just plastered it with liquid mask (if you think it looks odd - for some reason it has gone all gloopy in the bottle, probably time to get some new stuff). On the bottom I spent forever masking up the wheel wells and undercarriage. It will take less time to paint the model than it did to mask it!!
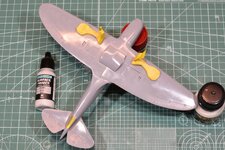
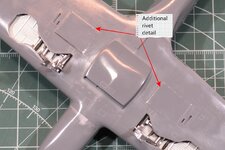
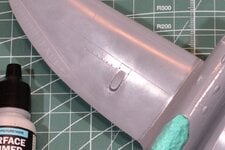
Finally I added some extra detail to the kit that was strangely omitted from the mouldings. For the two panels under the wings just aft of the undercarriage, both photos and drawings indicate some pretty obvious flush rivets. The same goes for the gun bulges and adjacent panel on top of the wing. I used what I am hoping is about the right size rivet press once I scaled out their locations on each panel. I think they look pretty good - probably over-represented at this scale, but I'm happy.
It's been quite cold and wet here of late and I am hesitant to attempt painting, especially with acrylics, but if its at least dry tomorrow I will have a shot a laying down some primer. I'm keen to get the colour onto this kit and get it done. I might get this one done in record time if this keeps up!!!!
Thanks to those who gave feedback and also to those who just pop in for a look.


It looks nice and shiny now - not sure if it will make one iota of difference once I get the paint on... Its a bit hard to see the difference between the metal and fabric surfaces but the elevators and ailerons are not polished like the main surfaces.
I've also now managed to mask up the areas to keep primer away from. I used the kit canopy which is lightly attached with white glue and just plastered it with liquid mask (if you think it looks odd - for some reason it has gone all gloopy in the bottle, probably time to get some new stuff). On the bottom I spent forever masking up the wheel wells and undercarriage. It will take less time to paint the model than it did to mask it!!


Finally I added some extra detail to the kit that was strangely omitted from the mouldings. For the two panels under the wings just aft of the undercarriage, both photos and drawings indicate some pretty obvious flush rivets. The same goes for the gun bulges and adjacent panel on top of the wing. I used what I am hoping is about the right size rivet press once I scaled out their locations on each panel. I think they look pretty good - probably over-represented at this scale, but I'm happy.


It's been quite cold and wet here of late and I am hesitant to attempt painting, especially with acrylics, but if its at least dry tomorrow I will have a shot a laying down some primer. I'm keen to get the colour onto this kit and get it done. I might get this one done in record time if this keeps up!!!!
Thanks to those who gave feedback and also to those who just pop in for a look.
fubar57
General
Good stuff Grant
Users who are viewing this thread
Total: 1 (members: 0, guests: 1)
