1/48 Spitfire Mk V 401 Sqdn - Home Country Modern Aircraft/Spitfire Marks GB

Ad: This forum contains affiliate links to products on Amazon and eBay. More information in Terms and rules

Crimea_River

Marshal
46,217
14,279
Nov 16, 2008
Calgary
Username: Crimea River
First name: Andy
Category: Judge – Non competing
Scale: 1/48
Manufacturer: Tamiya
Model Type: Spitfire Mk Vb
Aftermarket addons: This will be an OOB Build. You heard right - (an OOB build! The only aftermarket bits will be Eduard seat belts and Watermark decals scammed from Wayne (Thanks mate!)

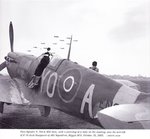
The aircraft I will depict is a clipped wing Spitfire V coded YO-A flown by F/O Jack Sheppard. As you can see, it had a rather racy bit of nose art. Pics below are sourced from "Spitfire - The Canadians" by Robert Bracken. This should be a quick build that will be worked on as I wait for the finish of my Mk VIII to set between coats.

Note that the aircraft also had a non standard camo pattern ahead of the cockpit.
 

Attachments

  • Painting Spit V YO_A EN921 and YO_Q 401 Sqdn Sheppard and Ibbotson Reduced.jpg
    Painting Spit V YO_A EN921 and YO_Q 401 Sqdn Sheppard and Ibbotson Reduced.jpg
    70.2 KB · Views: 513
  • Spit V YO_A EN921 401 Sqdn Jack Sheppard 1.jpg
    Spit V YO_A EN921 401 Sqdn Jack Sheppard 1.jpg
    97.3 KB · Views: 251
  • Spit V YO_A EN921 401 Sqdn Jack Sheppard 2.jpg
    Spit V YO_A EN921 401 Sqdn Jack Sheppard 2.jpg
    99.5 KB · Views: 252
Last edited by a moderator:
Made some quick progress already on this one. I had picked up this model for 15 bucks at the model show on June 2 and I started to paint the parts on the sprues if and when I had left over paint in the cup from my Mk VIII build. The first two pics below show that I had some cockpit green left over and a bit of black.

120715 Sprue.jpg

120715 Fuselage.jpg


The inner surfaces of the upper wing halves have been painted black where visible through the ejector chutes.

120715 Black in Wings.jpg


And here's the progress as of the end of today. The wings went together beautifully and the fit of the clipped wing tips and cannon roots was superb.

120715 Overall.jpg
 
Well, the price was right. I'd still like to do Northcott's rig too and Wayne's sending me those decals as well so some day you may see me tackle that one. In the meantime, I'll plug away on this one but not tonight - Marguerita's going down too well.
 
Some of the ICM parts are remarkably similar, if not identical, to their Tamiya counterparts especially in the cockpit and radiators. The nose area is completely different though.
 
Thanks David.

Some progress on the cockpit today. In the two pics below, I have so far managed to resist adding wires and such but did end up adding hand drawn placards on the left and right cockpit walls. The basic cockpit green was first enhanced along the structural framing with a slightly darkened version of the base coat. Following that, a lightened version of cockpit green was dry-brushed over the frames to make them stand out. After this was done the various details were picked out with black, white and red paint as well as a fine .5mm permanent ink black felt pen fro the placards and wiring.

120721 Port Pit.jpg

120721 Stbd Pit.jpg


Here's the instrument panel with instrument picked out in white and the bezels on the right in yellow, red, and green. Future has been dabbed on but another application tomorrow may be needed.

120721 IP.jpg


Here's the seat and rear bulkhead. The bulkhead was highlighted in a similar fashion to the cockpit walls and "bashed up" with a plain pencil to simulate chipping of the paint on the steel.

120721 Seat.jpg


In local contests, OOB usually allows aftermarket seat belts to be added so these will go in before long. Thanks everyone for your interest.
 
I use some old bottles of Testors flat red and brown mixed together. Don't know the ratio. I just mix it til it looks right.
 

Users who are viewing this thread

Back