Navigation
Install the app
How to install the app on iOS
Follow along with the video below to see how to install our site as a web app on your home screen.
Note: This feature may not be available in some browsers.
More options
You are using an out of date browser. It may not display this or other websites correctly.
You should upgrade or use an alternative browser.
You should upgrade or use an alternative browser.
1/72 Bf 109E-4 - Your Favorite Aircraft of All Time GB
- Thread starter Rogi
- Start date
Ad: This forum contains affiliate links to products on Amazon and eBay. More information in Terms and rules
More options
Who Replied?- Thread starter
- #22
So far just shading the canopy a bit with darker greys then a lighter grey on top of the main color, since the aircraft looks like its taken a beating from the outside I might do some paint chipping on the inside to match the whole vibe.
Cockpit assembly

Fuselage with a bit of a greener grey added to it, later on I'll whipe lightly with a rag + thined down thiner.

Finally Wings whiped with thiner, the only thing that remains is the outline of the wash.Before

and After (been too lazy to post these in the last couple days)

Today was a early morning and I wanted to make good work of it, I had applied Putty over night, let it dry and sanded. I checked my sanding with some silver paint to see if the putty was visible, fortunatley everything looked good, so I did re-scribing and another wipe with Thiner and washed a bit. Shes almost ready to be put together with the fuselage.
I added a bit of chiping to the Landing gear bay. I won't weather this section too much. Just a tad of the green and a wipe, maybe a little darker hue later on to match everything else and it'll be good.

Cockpit assembly
Fuselage with a bit of a greener grey added to it, later on I'll whipe lightly with a rag + thined down thiner.
Finally Wings whiped with thiner, the only thing that remains is the outline of the wash.Before
and After (been too lazy to post these in the last couple days)
Today was a early morning and I wanted to make good work of it, I had applied Putty over night, let it dry and sanded. I checked my sanding with some silver paint to see if the putty was visible, fortunatley everything looked good, so I did re-scribing and another wipe with Thiner and washed a bit. Shes almost ready to be put together with the fuselage.
I added a bit of chiping to the Landing gear bay. I won't weather this section too much. Just a tad of the green and a wipe, maybe a little darker hue later on to match everything else and it'll be good.
Last edited:
Crimea_River
Marshal
Nice progress Igor.
Vic Balshaw
Major General
Coming along nicely.
Aaron Brooks Wolters
Brigadier General
Excellent work Igor, I'm not sure what the discoloration is around the 65 though. It may be the previous camo scheme underneath, not sure.
Airframes
Benevolens Magister
Good work so far, although slightly puzzled why the painting/shading has been done before the main assembly is complete. If any filler is needed, it'll then need re-painting.
A4K
Brigadier General
Good work mate, though echo Wojtek's (Wurger) and Terry's (Airframes) comments.
Btw, what areas needed filling? Have the same kit in the stash.
Btw, what areas needed filling? Have the same kit in the stash.
brucejscott
Staff Sergeant
Nice work Igor.

- Thread starter
- #31
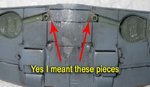
The "plastic plates" you guys are mentioning are they next to the circular objects? I filled the holes in the bomb rack section that the previous owner of the kit had attached the bomb rack, so I yanked it off with a Xacto and placed filler to cover the gaps. I mostly shaded it before hand so I could check the re-scribing work on the bottom of the aircraft. Most of it vanishes anyway after painting the bottom I'm very nervous when it comes to scribing and I like to "double check" the work. New step coming up.
Oh A4K Just a addition to the putty, I've dry fitted the fuselage to the wings a couple times and it looks like a perfect match so not a lot of putty will be needed (if any) to the aircraft. I'll have some new steps up today.
I'm very nervous when it comes to scribing and I like to "double check" the work. New step coming up. Oh A4K Just a addition to the putty, I've dry fitted the fuselage to the wings a couple times and it looks like a perfect match so not a lot of putty will be needed (if any) to the aircraft. I'll have some new steps up today.
meatloaf109
1st Lieutenant
Wurger's refering to the very tops of the 109's landing gear covers. When the gear is in the retracted position, you can still see a "square" of the main gear retraction knuckle.
Wurger's refering to the very tops of the 109's landing gear covers. When the gear is in the retracted position, you can still see a "square" of the main gear retraction knuckle.
...
Attachments
back later....
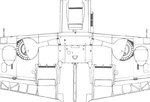
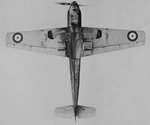
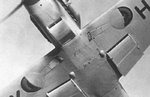
Igor, here you are the diagram and a pic that might help you to grasp what I meant. The last one image posted here shows undersides of Bf109F but the areas are almost the same looking like.
Attachments
- Thread starter
- #36
meatloaf109
1st Lieutenant
Only thing is, if you do make a wheels up 109, the hole can look wrong. I cut out the mounting hole and install a couple of pieces of sprue to replicate the "knuckle".
A4K
Brigadier General
Yep, agree with Wojtek - if they weren't on the original, you don't need them here either!
- Thread starter
- #40
This last week and this week have been frustrating, first with the instrument panel not being able to come off like I wanted it (its 1/72 so the paint blobs up easy and makes it look messy if you arn't careful) I spent 8 trys to get it right, then today as I'm taking the photos my camera is turning out the pictures darker than usual I'll post the update and try to fix her by next build update its just uber frustrating when nothings really going on top of each other
To start it off on a lighter note, my new airbrush came in Badger 155 yay I've been working with a China style badger 150 for a long time and through all the research on the net the 155 looks like a sturdy excellent Brush, can't wait to try her on this bf-109

Next the instrument panel thats been agrivating me for 2 weeks now she came out great but the picture is odd with it turning out darker than whats displayed on my camera preview image :S you can't even see some of the reds and one of the green panels, fix that by next week hopefully and most likely re-take the shots. P.S. I also drilled in some tiny holes to the pedals in the cockpit so it gives it a more realistic look to the actual planes pedals.
http://shockwaveproductions.com/forum/viewtopic.php?t=5132 this site from a game has some good section screen shorts of the cockpit of the E-4, I used it along with some other pics from various other E-4 models to make my instrument panel. I'll add the wires connecting the pedals to the intrument panel in the next update.

Canopy, unfortunatley you don't get a option of posing the canopy open so I'll have to pose it closed spent most of this week just preping the canopy for paint, its agrivating but great when you finially get the hardest part finished

Borth parts of the fuselage section with some touch ups of paint I may add some black to highlight the wheel just to make it stand out a bit. + wiring to give it a bit of flare, hopefully it'll all fit well when i go to glue the two sections together. Again you can't see the red in the image for some reason *sigh* have to take a look about what the cause of the issue might be. The blotch on one of the fuselage sections is where I'll attach the center canopy section its sort of a guide I like to use where to strip the paint after what point so I can insert the glue np.


Last bit, the cockpit center section with the chair. I kinda liked the Tamiya decal for the seatbelts so I used it, they always sit down nicely and on a closed canopy model no one really notices the diffrence. The brown and reds in the pic are also not appearing.


Sorry all but most of the details and colors are almost faded into black in these pics even when I took the photos in pure daylight. I'll have to see whats up with the camera maybe shes low on battery and give it a good charge.
Thanks for checking it out
Igor
I'll post the update and try to fix her by next build update its just uber frustrating when nothings really going on top of each other To start it off on a lighter note, my new airbrush came in
Badger 155 yay I've been working with a China style badger 150 for a long time and through all the research on the net the 155 looks like a sturdy excellent Brush, can't wait to try her on this bf-109 Next the instrument panel thats been agrivating me for 2 weeks now
she came out great but the picture is odd with it turning out darker than whats displayed on my camera preview image :S you can't even see some of the reds and one of the green panels, fix that by next week hopefully and most likely re-take the shots. P.S. I also drilled in some tiny holes to the pedals in the cockpit so it gives it a more realistic look to the actual planes pedals. http://shockwaveproductions.com/forum/viewtopic.php?t=5132 this site from a game has some good section screen shorts of the cockpit of the E-4, I used it along with some other pics from various other E-4 models to make my instrument panel. I'll add the wires connecting the pedals to the intrument panel in the next update.
Canopy, unfortunatley you don't get a option of posing the canopy open so I'll have to pose it closed
spent most of this week just preping the canopy for paint, its agrivating but great when you finially get the hardest part finished Borth parts of the fuselage section with some touch ups of paint I may add some black to highlight the wheel just to make it stand out a bit. + wiring to give it a bit of flare, hopefully it'll all fit well when i go to glue the two sections together. Again you can't see the red in the image for some reason *sigh* have to take a look about what the cause of the issue might be. The blotch on one of the fuselage sections is where I'll attach the center canopy section its sort of a guide I like to use where to strip the paint after what point so I can insert the glue np.
Last bit, the cockpit center section with the chair. I kinda liked the Tamiya decal for the seatbelts so I used it, they always sit down nicely and on a closed canopy model no one really notices the diffrence. The brown and reds in the pic are also not appearing.
Sorry all but most of the details and colors are almost faded into black in these pics even when I took the photos in pure daylight. I'll have to see whats up with the camera maybe shes low on battery and give it a good charge.
Thanks for checking it out
Igor
Last edited:
Users who are viewing this thread
Total: 1 (members: 0, guests: 1)