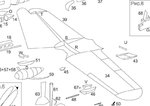
If you decide to follow Wurger's flat pattern lay-out method be sure to reduce the lower wing chord by about 10%. The lower wing in Wurger's drawing is a shade under 10% shorter in chord at the root. This will give the material needed in the upper wing half to bend in the airfoil section when you match upper and lower trailing edges. I would suggest coining the wing tips to give them their rounded shapes while in the flat lay-out stage. A small round tipped hobby hammer (ballpeen) would do nicely.
Navigation
Install the app
How to install the app on iOS
Follow along with the video below to see how to install our site as a web app on your home screen.
Note: This feature may not be available in some browsers.
More options
You are using an out of date browser. It may not display this or other websites correctly.
You should upgrade or use an alternative browser.
You should upgrade or use an alternative browser.
1:72 P-51B wood/metal rebuilt
- Thread starter imalko
- Start date
Ad: This forum contains affiliate links to products on Amazon and eBay. More information in Terms and rules
More options
Who Replied?You don't understand the paper wing construction Sweb I'm afraid.The lower wing chord is always smaller than the upper one in order to bend it according to the airfoils.Usually there are a few of them and the main iron inside to make the whole wing stiff and of the correct dihedral.
Attachments
Last edited:
You don't understand the paper wing construction Sweb I'm afraid.The lower wing chord is always smaller than the upper one in order to bend it according to the airfoils.Usually there are a few of them and the main iron inside to make the whole wing stiff and of the correct dihedral.
Ummm... no. Read my post again. I measured the lower chord on your illustration to be in the region of 10% less than the upper for the very reason you mention - regarding airfoil curvature of upper wing half over the lower wing half - so that the OP could plan his flat pattern layout accordingly.
I have changed my mind about the wing tips though. Cut them off and use balsa or styrene rather than trying to coin the aluminum.
- Thread starter
- #24
imalko
Chief Master Sergeant
I really feel overwhelmed with suggestions here... Don't get me wrong, that's a good thing and that's why this forum is so great. Lots of people with lots of ideas. However I started this thread just to show how I build my simple wood/metal models... 
Wojtek, regarding transparent conopies - moulding them is beyond my abilities at this time and that's why I'm looking forward for Terry's tutorial on the subject. However, think that this is something which is better suited if I ever undertake a scratch build of a plastic kit. I could try to make one on wooden model eventualy, but as I said earlier there wouldn't be much to see beneath it due to the nature of the build. I don't see the point of transparent cockpit conopy if there's no cockpit beneath it to see...
Also thanks for suggestions regarding the 3D wings as with paper models. Hope you will agree with me that if I am to try something like that in the future with metal sheets then I would need to build at least one paper model in order to get familiar with the concept and gain some experience in the field...
I know it's hard to imagine and it's also hard for me to explain just with words until I get to the point when I will be able to show you on photos, but the reason why I decided to use thicker metal sheet for wings on this model (in contrast with my earlier works) is precisely the issue of 3D effect on the wings. The thin metal wings and lack of 3D shape is something which bothered me the most with my earlier models of this kind. I hope to achieve just that with this experiment. So please, just stick around this thread for a while and I will show what exactly I have in mind with new photos over the time. If my experiment with thick aluminuim metal for wings proves unsuccessfull or impossible, my next step will be to atempt to build model with wooden wings again precisely for the sake of 3D effect...
Stay tuned...")
Wojtek, regarding transparent conopies - moulding them is beyond my abilities at this time and that's why I'm looking forward for Terry's tutorial on the subject. However, think that this is something which is better suited if I ever undertake a scratch build of a plastic kit. I could try to make one on wooden model eventualy, but as I said earlier there wouldn't be much to see beneath it due to the nature of the build. I don't see the point of transparent cockpit conopy if there's no cockpit beneath it to see...
Also thanks for suggestions regarding the 3D wings as with paper models. Hope you will agree with me that if I am to try something like that in the future with metal sheets then I would need to build at least one paper model in order to get familiar with the concept and gain some experience in the field...
I know it's hard to imagine and it's also hard for me to explain just with words until I get to the point when I will be able to show you on photos, but the reason why I decided to use thicker metal sheet for wings on this model (in contrast with my earlier works) is precisely the issue of 3D effect on the wings. The thin metal wings and lack of 3D shape is something which bothered me the most with my earlier models of this kind. I hope to achieve just that with this experiment. So please, just stick around this thread for a while and I will show what exactly I have in mind with new photos over the time. If my experiment with thick aluminuim metal for wings proves unsuccessfull or impossible, my next step will be to atempt to build model with wooden wings again precisely for the sake of 3D effect...
Stay tuned...
Last edited:
Airframes
Benevolens Magister
Tuned and frequency locked Igor!
Yep...ready and waiting!
Ummm... no. Read my post again. I measured the lower chord on your illustration to be in the region of 10% less than the upper for the very reason you mention - regarding airfoil curvature of upper wing half over the lower wing half - so that the OP could plan his flat pattern layout accordingly.
I have changed my mind about the wing tips though. Cut them off and use balsa or styrene rather than trying to coin the aluminum.
Oh...sorry I was missled myself slightly.Of course the pic is an example only.But I thought Igor could use the way of making wings.It will cause the better look of the model part.Taking Igor's skills and that his moddeling has a good base I've got the idea it was the time for a such improvement I mean following from flat 2D wing to the 3D one.
Also your idea od using balsa or styrene is doos though both materials need a lot of sanding and some of training certainly.But both are possible to use.
Igor M8
Don't get me wrong please.There is all fine with the simple wood/metal models.I like it very much.But as I have mentioned it above I thought I was the time for adding a few rationalizations. Of course if you want to continue modelmaking in that way go for it, please.It's OK.I'm looking forward to more pics of the model progress.
BTW I can make you sure the making transparent cockpit conopies isn't beyond your abilities.It is so easy than you can expact.
Last edited:
- Thread starter
- #28
imalko
Chief Master Sergeant
Catch22
Major
Nice!
- Thread starter
- #32
imalko
Chief Master Sergeant
I've been preoccupied with many other things lately so I was forced to pause work on this model for a while. Hope to have more spare time next week so to be able to continue the work.
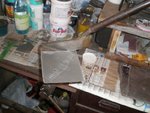
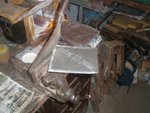
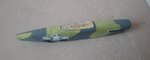
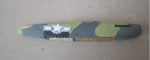
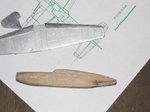
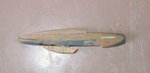
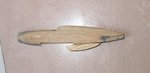
In the meantime just to do "something" I disassembled the old model and here is the basically only part of it which I will use to rebuild a new one.
In the meantime just to do "something" I disassembled the old model and here is the basically only part of it which I will use to rebuild a new one.
Attachments
Airframes
Benevolens Magister
Looking forward to the re-build Igor.
Tony Hill
Tech Sergeant
Very interesting model, looking forward to more
darryl
darryl
Heinz
Captain
Looking good mate
good luck with the re-build mate!
A4K
Brigadier General
Great project Igor! Looking forward to seing your progress!
Terry, I'd love a copy of that myself if it's no trouble!
Nice Igor. If you ever want to try moulding canopies, let me know, and I'll post a short, illustrated description / tutorial.
Terry, I'd love a copy of that myself if it's no trouble!
- Thread starter
- #38
imalko
Chief Master Sergeant
Thanks mates.
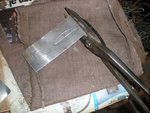
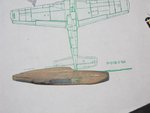
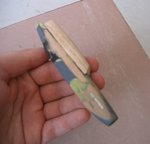
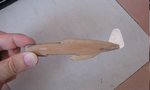
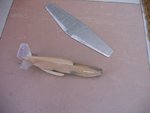
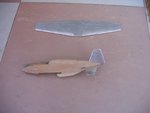
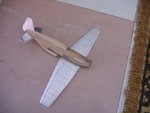
Well, finally here are some more of the progress photos, since I've done much of the work on fuselage today. Basically to achieve look of razor back Mustang, I've attached (with glue and nails) new wooden part on top of the fuselage. Next step was sanding (much of it and of course not by hand) the fuselage to the correct shape. Same was done for under fuselage radiator.
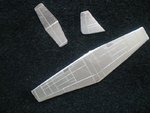
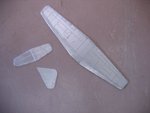
I've done some work on the wings too. Not exactly laminar flow wings, I know. But hope that by using thicker aluminium metal sheets and with the use of file I will achieve more or less 3D shape.
Well, finally here are some more of the progress photos, since I've done much of the work on fuselage today. Basically to achieve look of razor back Mustang, I've attached (with glue and nails) new wooden part on top of the fuselage. Next step was sanding (much of it and of course not by hand) the fuselage to the correct shape. Same was done for under fuselage radiator.
I've done some work on the wings too. Not exactly laminar flow wings, I know. But hope that by using thicker aluminium metal sheets and with the use of file I will achieve more or less 3D shape.
Attachments
Last edited:
- Thread starter
- #39
imalko
Chief Master Sergeant

Airframes
Benevolens Magister
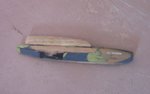
Nice work Igor. The main wing looks good, it's got the right look, being metal!
Users who are viewing this thread
Total: 1 (members: 0, guests: 1)