Navigation
Install the app
How to install the app on iOS
Follow along with the video below to see how to install our site as a web app on your home screen.
Note: This feature may not be available in some browsers.
More options
You are using an out of date browser. It may not display this or other websites correctly.
You should upgrade or use an alternative browser.
You should upgrade or use an alternative browser.
1/72nd heinkel he219 uhu by revell
- Thread starter woljags
- Start date
Ad: This forum contains affiliate links to products on Amazon and eBay. More information in Terms and rules
More options
Who Replied?")
- Thread starter
- #22
woljags
Staff Sergeant
progress so far,the kit interior was sparse to say the least only 2 seats and part of the floor,so after researching the rough shape of the interior i came up with this,i've trial fitted the canopy while doing this to see what can been seen,i've not gone to town to Terry's standard as to be honest i'm doing that everyday building the vintage cars and stained glass and don't want to get bogged down worrying about if i have everything perfect,maybe that will change with time,the canopy has now been sealed in the last pics and left to dry,i can't find much on extra details i could add to the engines or cowls,can anyone help please
dirkpitt289
Master Sergeant
This is a very odd looking aircraft but that's probably why I like it. I look forward to seeing what you can do with it.
Crimea_River
Marshal
There's not much to add on the cowls Bob. It's a pretty clean design but here's a shot of one at the NASM in Washington DC. The only thing you might add is a little elongated vent that stuck out the top of the cowl. I'll see if I can locate a pic.
Attachments
- Thread starter
- #26
woljags
Staff Sergeant
thanks Andy,i do have a line drawing and pics of the aircraft but it doesn't show that type of detail
Crimea_River
Marshal
- Thread starter
- #28
woljags
Staff Sergeant
Thanks Andy very kind,what scale is your bird ,nice detailing
Crimea_River
Marshal
It's 1/48 Bob. Build is here and it's a good resource for detail pics: http://www.ww2aircraft.net/forum/8-commonwealth-night-fighter/done-1-48-tamiya-heinkel-he-219-wnr-290123-1-njg-1-nightfighter-gb-26813.html
- Thread starter
- #30
woljags
Staff Sergeant
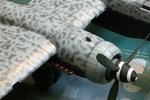
progress so far with new air vents made and fitted plus its 1st coat of paint.I now have a lighted magnifying lamp for detailing work instead of my failing eye-site
Crimea_River
Marshal
The magnifying lamp is a nice addition to the shop. Work looks good Bob.
- Thread starter
- #33
woljags
Staff Sergeant
progress showing a couple of evenings work,now in camo and markings,lots more detailing still to do including fitting the undercart doors and landing lights,i've finished her in a similar scheme to the bf110 although the pattern this time was harder to do,once i've finished putting the bits on i will give it a coat of matt varnish
- Thread starter
- #35
woljags
Staff Sergeant
thanks mate very kind of you,i plan to put the airel cables on the radio masts as well but i can't find any pics of the underside to see if there were any underneath the main fuselage ,can anyone help please
Crimea_River
Marshal
There were no wires on the underside, just one from each fin to the post on the canopy.
A couple of pointers for the next one Bob: watch the placement of the swastika on the tail. On the 219 it was in the bottom front corner of the fin. LW planes rarely, if ever, had the swastika span across the rudder except on prewar and very early war aircraft. Second, there's a technique to prevent the "silvering" you see on the decals (as evident on the left wing cross in the view from directly on top). If you have a glossy, clear finish (many people use Future floor wax but any hard gloss coat will do), paint that onto the model before you apply the decals. This will help the decals seat themselves better. Once the decals have set, paint on the matt varnish and you'll see that the decals look much better, like they've been painted on.
I like what you've done on this so far.
- Thread starter
- #37
woljags
Staff Sergeant
thanks for the tips Andy,i have seen posts saying about Future but didn't know what it was,i will be off to my local hardware shop this afternoon
Crimea_River
Marshal
I think it's called something else over there Bob. Here's a guide on its use: All about Future by Matt Swan
- Thread starter
- #39
woljags
Staff Sergeant
thanks again,love the info,i will try this with my next build thats likely to be allied this time for a change
Crimea_River
Marshal
Good on you Bob. I believe you're still using a brush rather than airbrushing? No problem brushing the Future (Klear?) on but if you spray, you need to be careful as it pools very quickly.
Users who are viewing this thread
Total: 1 (members: 0, guests: 1)