Airframes
Benevolens Magister
This is not intended as a GB entry, but, as it's a 'D-Day' striped Typhoon, and topical, I thought I'd commence this update now, in this section. Hopefully, it might also benefit Daniel (109 Roaming), who is intending to carry out a similar conversion.
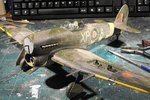
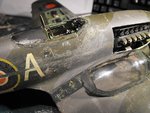
This is a conversion from the 1/32nd scale Revell 'car door' Typhoon, which I built back in 1989, and never did get around to finishing properly!
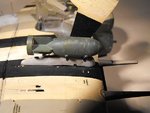
It had always been the intention to mount the 60lb RP's and rails to the model, as 174 Sqn were rocket equipped; however, just as I reached that stage in the build, the only available aftermarket RP's, in white metal, were discontinued! Consequently, as a temporary measure, I mounted the kit-supplied bombs instead.
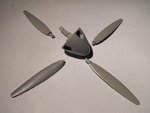
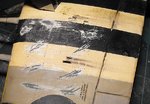
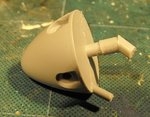
Having recently purchased a set of resin RP's, and a four-bladed prop, from MDC (Model Design Construction), I can now finally complete the conversion, whilst at the same time correcting and improving a few areas of the model, and giving it a bl**dy good 'spring clean' - afterall, it's been standing gathering dust for twenty years!!
So, a little bit about the model itself, just to set the scene.
The fuselage sides around the cockpit and car doors were 'plated' with plastic card and then filled as required to provide a single 'skin', as per the 'teardrop' Typhoon, eliminating the door openings and a rather irksome, though slight, depression along the fuselage at this area. This depression is very similar to the shape of the 'insert' found on the Hasegawa 1/48th Typhoon kits, and I always wondered if Revell had intended to release a 'teardrop' version at some point which, AFAIK, they never did. (strange they haven't re-released the kit again too - yet.)
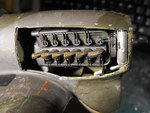
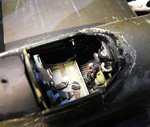
The kit-supplied cockpit is actually quite good, with the basic 'tubular' framework included, but this was enhanced by some scratch-building, particularly around the seat and the pilot's armour plate, and the addition of switches, taps, brackets and levers etc.
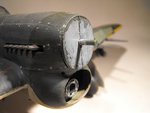
There is a fair representation of the big Napier engine, with removable cowling panels, but this was hidden by the closed cowlings on my example, and extra detail added around the radiator and oil cooler inlet, and also at the exit vent for this. The landing gear struts and wheel bays received some scratch-built detail and, the final fuselage modification, a 'teardrop' canopy was moulded, and 'temporarily' fitted, the intention being, eventually, to have this posed open.
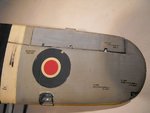
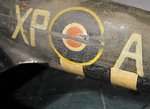
As this aircraft, in the MN serial range, had the slightly larger Tempest tailplane (horizontal stabiliisor), and a four bladed propellor, I had, at this stage, reached another slight stumbling block, inasmuch that those aftermarket accessories had also been disscontinued! So, slightly disgruntled, the model was completed with the 'standard' tailplane and prop, and then brush painted. The decals are a mixture of kit decals, and a few from the spares box, plus 'Letraset' rub-down letters and numbers for the serial number, whilst the code letters were hand-painted free-hand.
And so it has remained, for a touch over twenty years, until now!
And now, 'The Plan'!
The first job will be to give the model a really good clean, and then review the surafce detail and condition.
If it is possible to alter the tailplane without damaging the rest of the model, then this will be done. If not, the overall difference in dimensions will hardly be noticed - I hope - but the reinforcing 'fishplates' around the tail - unit joint will need to be removed anyway.
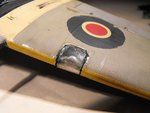
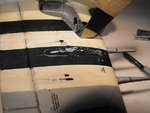
Next, the home-moulded canopy will be removed, as will the bombs and pylons, and the undersides of the wing prepared for the rocket launcing rails. Very small holes had already been drilled here, to serve as markers for the attachment points of the rails, which should make life a bit easier. I have yet to decide whether or not to make a new canopy, this time in the open position, but either way, the model will be re-painted in some areas, and some new stencil and serial number decals made and applied, and possibly new code letters, if the hand-painted examples become damaged.
Once all that's done, the very nice MDC rockets and rails will be carefully assembled, painted and fitted, followed by the huge, four bladed prop. The latter will take a little thought, as some modification to the prop shaft (on the model) will be required, in order to utilise the moulded-in shaft of the resin prop hub.
Minor detail will then be attended to, some of which will entail close study of film footage of 174 Sqn aircraft, in order to ascertain, for example, if the landing lamps were faired , a common feature on RP Tiffies, to prevent scorching of the lenses.
Given that all goes to plan, the model should then be a more accurate representation of MN371, XP-A, as it would have looked at Bazenville, France, in July 1944.
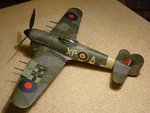
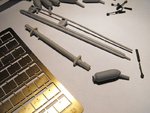
The pics below show how the model looks at present, and the MDC resin parts.
Thanks for your interest, and I'll post an up-date soon.
This is a conversion from the 1/32nd scale Revell 'car door' Typhoon, which I built back in 1989, and never did get around to finishing properly!
It had always been the intention to mount the 60lb RP's and rails to the model, as 174 Sqn were rocket equipped; however, just as I reached that stage in the build, the only available aftermarket RP's, in white metal, were discontinued! Consequently, as a temporary measure, I mounted the kit-supplied bombs instead.
Having recently purchased a set of resin RP's, and a four-bladed prop, from MDC (Model Design Construction), I can now finally complete the conversion, whilst at the same time correcting and improving a few areas of the model, and giving it a bl**dy good 'spring clean' - afterall, it's been standing gathering dust for twenty years!!
So, a little bit about the model itself, just to set the scene.
The fuselage sides around the cockpit and car doors were 'plated' with plastic card and then filled as required to provide a single 'skin', as per the 'teardrop' Typhoon, eliminating the door openings and a rather irksome, though slight, depression along the fuselage at this area. This depression is very similar to the shape of the 'insert' found on the Hasegawa 1/48th Typhoon kits, and I always wondered if Revell had intended to release a 'teardrop' version at some point which, AFAIK, they never did. (strange they haven't re-released the kit again too - yet.)
The kit-supplied cockpit is actually quite good, with the basic 'tubular' framework included, but this was enhanced by some scratch-building, particularly around the seat and the pilot's armour plate, and the addition of switches, taps, brackets and levers etc.
There is a fair representation of the big Napier engine, with removable cowling panels, but this was hidden by the closed cowlings on my example, and extra detail added around the radiator and oil cooler inlet, and also at the exit vent for this. The landing gear struts and wheel bays received some scratch-built detail and, the final fuselage modification, a 'teardrop' canopy was moulded, and 'temporarily' fitted, the intention being, eventually, to have this posed open.
As this aircraft, in the MN serial range, had the slightly larger Tempest tailplane (horizontal stabiliisor), and a four bladed propellor, I had, at this stage, reached another slight stumbling block, inasmuch that those aftermarket accessories had also been disscontinued! So, slightly disgruntled, the model was completed with the 'standard' tailplane and prop, and then brush painted. The decals are a mixture of kit decals, and a few from the spares box, plus 'Letraset' rub-down letters and numbers for the serial number, whilst the code letters were hand-painted free-hand.
And so it has remained, for a touch over twenty years, until now!
And now, 'The Plan'!
The first job will be to give the model a really good clean, and then review the surafce detail and condition.
If it is possible to alter the tailplane without damaging the rest of the model, then this will be done. If not, the overall difference in dimensions will hardly be noticed - I hope - but the reinforcing 'fishplates' around the tail - unit joint will need to be removed anyway.
Next, the home-moulded canopy will be removed, as will the bombs and pylons, and the undersides of the wing prepared for the rocket launcing rails. Very small holes had already been drilled here, to serve as markers for the attachment points of the rails, which should make life a bit easier. I have yet to decide whether or not to make a new canopy, this time in the open position, but either way, the model will be re-painted in some areas, and some new stencil and serial number decals made and applied, and possibly new code letters, if the hand-painted examples become damaged.
Once all that's done, the very nice MDC rockets and rails will be carefully assembled, painted and fitted, followed by the huge, four bladed prop. The latter will take a little thought, as some modification to the prop shaft (on the model) will be required, in order to utilise the moulded-in shaft of the resin prop hub.
Minor detail will then be attended to, some of which will entail close study of film footage of 174 Sqn aircraft, in order to ascertain, for example, if the landing lamps were faired , a common feature on RP Tiffies, to prevent scorching of the lenses.
Given that all goes to plan, the model should then be a more accurate representation of MN371, XP-A, as it would have looked at Bazenville, France, in July 1944.
The pics below show how the model looks at present, and the MDC resin parts.
Thanks for your interest, and I'll post an up-date soon.