174 Sqn Typhoon up-date, 1/32nd scale.

Ad: This forum contains affiliate links to products on Amazon and eBay. More information in Terms and rules

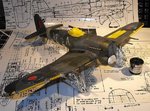
With my computer in for updating, I've got quite a bit done on the Typhoon over the last three days, although it doesn't seem like it! I can't seem to open pictures on the forum at the moment, some sort of glitch in the new hardware I presume, so if any of the following have already been posted, apologies - I'm unable to look to see what I've already posted!
Anyway, the model has been completely rubbed- down, and all the work required before painting has now been completed, including improving some areas originally modified when the model was first converted.
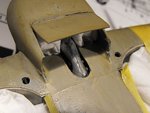
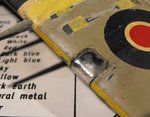
PIC 1. The rectangular hole for the spring-loaded hand-hold on the starboard side has been cut, and will have the open cover made and fitted after the model has been painted.
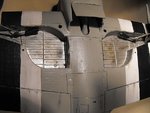
PIC 2. The two small holes shown here, at the forward edge of the wheel bays, will be glazed later, and are the twin, downward Identification Lamps. The radiator exit flap was cut open and the flap itself made from plastic card, with a stretched sprue actuating ram, when the model was first built. Note the tissue masking the rear of the radiator and ducting, and the wheel bays.
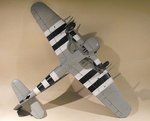
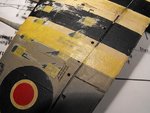
PIC 3.The wing underside has had a lot of attention. Here, small patches of masking tape can be seen covering the 'bare' areas where the rocket launch rails will eventually be mounted, and also the masking tape at the outer edges of the 'Invasion Stripes', which will be re-painted by hand later; this is just to minimise overspray. The small holes near the wing trailing edge are going to be the electrical connectors for the RP's firing wires, and will have connector sockets made and added later.
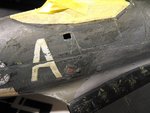
PIC 4. A mounting step had previously been made and fitted, which was removed to ease sanding and masking etc. The housing slot for this has now been cut in the lower, starboard fuselage, and the 'retractable' step will be re-fitted later.
PIC 5. Some light engraving has been completed around the cowling panel joints, and a few other small areas.
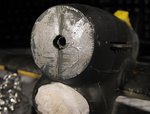
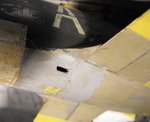
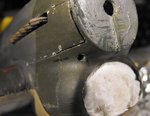
PIC 6. A small hole for the gun camera aperture had originally been reamed, and this has now been properly drilled. The radiator intake is stuffed with tissue, in preparation for painting the model.
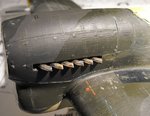
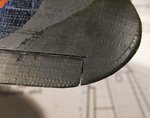
PIC 7. The edges of all the main control surfaces and trim tabs have been sawn through, to present a more realistic appearance, compared to the moulded lines of the kit.
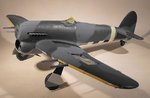
PIC 8. Rocket-firing Typhoons originally had both landing lamps faired over, as it was thought the rocket's exhaust blast would cause the Perspex to catch fire. This was found not to be the case, and quite often, one lamp was re-fitted. On the completed model, one lamp will retain its' clear lens, whilst this one has been lightly sanded, and will be painted over, to simulate the metal fairing.
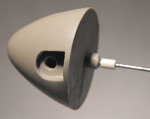
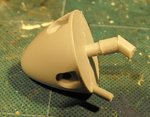
Next step is to adapt the new resin prop spinner in order to ensure a good fit to the nose of the model. Once that has been done, the model will be primed, checked for any surface imperfections, which will be corrected (within reason!), and then the camouflage colours applied.
I should have some pics of this later tonight. Thanks again for your interest.
 

Attachments

  • Bf109 and Tiffie 172.jpg
    Bf109 and Tiffie 172.jpg
    64.5 KB · Views: 84
  • Bf109 and Tiffie 173.jpg
    Bf109 and Tiffie 173.jpg
    40.1 KB · Views: 87
  • Bf109 and Tiffie 174.jpg
    Bf109 and Tiffie 174.jpg
    62.2 KB · Views: 88
  • Bf109 and Tiffie 175.jpg
    Bf109 and Tiffie 175.jpg
    35.6 KB · Views: 90
  • Bf109 and Tiffie 176.jpg
    Bf109 and Tiffie 176.jpg
    48.5 KB · Views: 109
  • Bf109 and Tiffie 184.jpg
    Bf109 and Tiffie 184.jpg
    46.6 KB · Views: 82
  • Bf109 and Tiffie 185.jpg
    Bf109 and Tiffie 185.jpg
    42.1 KB · Views: 101
  • Bf109 and Tiffie 178.jpg
    Bf109 and Tiffie 178.jpg
    40.8 KB · Views: 89
Thanks Andy, and you're not far wrong! It's now actually looking like it's just come out of the body shop, all dressed in grey primer. Reminds me of my old Escort rally car years ago - that was re-painted a couple of times too!
Anyway, the resin prop spinner, from Model Design Construction, has now been adapted to fit. The spinner has a 'prop shaft' moulded into it, but so does the engine in the model! A decision had to be reached on the best way to fit the new prop, and the pics tell the story.
PIC 1. The MDC four-blade prop spinner, showing the casting plug and substantial shaft. To utilise the model's prop shaft would mean cutting off the spinner's shaft flush with the back-plate, and then drilling the relevant sized hole. I envisaged possible damage to the spinner's edges if this was done, and possibly snapping the plastic shaft on the model due to the extra weight of the resin prop and spinner, so I opted for a different approach.
PIC 2. The 'plug' on the end of the spinner shaft was carefully sawn off, and then a hole drilled into the shaft. A length of wire was then superglued into the hole, and a collet added, made from a piece of plastic tubing. This somewhat Heath- Robinson assembly will then fit into a drilled and counter-sunk hole in the front of the model's engine and coolant tank, after removing and drilling-out the prop shaft moulded onto the engine's front casing!
Hopefully, you're still following this so far!
PIC 3. Just visible here is the larger diameter hole, where the prop shaft was removed and drilled-out. A smaller diameter hole was then drilled inside this, into the engine 'block'. The spinner's shaft, with the plastic collet, fits into these holes, with the wire providing reinforcement and balance. For a closer, tighter fit, I might yet end up supergluing the back-plate of the spinner to the front-plate of the model's nose.
PIC 4. Moving on, and masking is underway. As it wasn't possible to remove the main landing gear without incurring damage, the assemblies were wrapped in kitchen foil, gently pressed into place, just to protect from any possible over-spray.
PIC 5. The model now masked where required, ready for the primer coat.
PIC 6. The primer is also the underside colour, Medium Sea Grey, and an extra coat was applied here, especially over the fuselage AEAF stripes. These, and the 'old' stripes under the wings, will be re-applied/painted later, by brush, after the camouflage colours, and the 'Sky' tail band (not yet applied) have fully dried.
PIC 7. With the model primed overall, and no serious blemishes to worry about, it'll be left to dry and harden for around 18 to 24 hours, before spraying the upper surface colours of Ocean Grey and Dark Green.
That's all for now folks, and thanks again for your interest.
 

Attachments

  • Bf109 and Tiffie 180.jpg
    Bf109 and Tiffie 180.jpg
    83.3 KB · Views: 98
  • Bf109 and Tiffie 183.jpg
    Bf109 and Tiffie 183.jpg
    64 KB · Views: 79
  • Bf109 and Tiffie 177.jpg
    Bf109 and Tiffie 177.jpg
    44.1 KB · Views: 101
  • Bf109 and Tiffie 169.jpg
    Bf109 and Tiffie 169.jpg
    16.2 KB · Views: 94
  • Bf109 and Tiffie 168.jpg
    Bf109 and Tiffie 168.jpg
    47.2 KB · Views: 85
  • Bf109 and Tiffie 186.jpg
    Bf109 and Tiffie 186.jpg
    73.3 KB · Views: 89
  • Bf109 and Tiffie 189.jpg
    Bf109 and Tiffie 189.jpg
    65 KB · Views: 86
Thanks Wayne. But now it looks like it's all come to a halt! First the computer throws a wobbly, and is then re-built, only to find I can't open pictures in the forum, and now, half-way through spraying the second upper- surface colour, my airbrush has gone t*ts up !!
I'm not sure what the exact problem is yet, although I suspect it's the needle. It'll spray thinners beautifully, but as soon as even over-thinned paint (enamel) goes through it, it either won't spray, sprays very weakly, or pulses and / or spatters when the paint cip is used. Paint in the body itself seems to spray partially, so I reckon a sticking or slipping needle and maybe an 'O' ring worn.
I've part stripped it, adjusted the needle etc and got to the first stage of spraying, then - nothing!
B*ll*cks! It's one thing after another, and I'm more p*ssed off than a really p*ssed off thing on a bad day!!!
 
Hurray! The lack of pics problem has been solved!! My system needed to be switched to compatability view, since the up-grade to I.E.8, and now all appears to be working. Next job, get the bl**dy airbrush to work again!!
 
R.I.P. one airbrush I think!
The problem appeared to be a slipping needle, which had stuck slightly in the nozzle guide, causing the guide chuck to loosen slightly. I managed to get the Ocean Grey sprayed, doing just the camouflage pattern, instead of an overall coat, and had just started on the Dark Green when the problem occured.
So I then cleaned-out the brush, prior to stripping it to clean the needle thoroughly at the point where it passes through the mix chamber into the nozzle head. I'd just removed the nozzle jet when I dropped the bl**dy brush, which, of course, landed tip-down on a hard floor! One (only just) bent tip to the needle, and a shock-loaded chucking guide!
I should have wiped the paint and thinners off my hands before proceeding! So it looks like a new 'brush is the easiest solution, as by the time I've bought the spare parts, the cost isn't much different!
So, the model is now mainly airbrushed, with the Dark Green brush-painted, and looking a bit odd as the Green is satin finish, not that it matters after clear coats, and has dried patchily - bl**dy impostor- so-called - Humbrol!
Ah well! On to the next stage I suppose, and I guess I'll have to get a cheap, basic airbrush to apply the clear coats with, as I'll have to wait a couple or three weeks before I can afford a new, 'proper' airbrush, after paying for the computer up-date!
Anyway, here's how the Typhoon looks so far, with the Ocean Grey sprayed first, and then the brush-painted Dark Green.
Cheers, I'm off to bed - unless that's bust too!
 

Attachments

  • Bf109 and Tiffie 198.jpg
    Bf109 and Tiffie 198.jpg
    59.1 KB · Views: 92
  • Bf109 and Tiffie 193.jpg
    Bf109 and Tiffie 193.jpg
    31.3 KB · Views: 88
What a run of bad luck you're having mate! Glad your computer issue seems to be resolved at least. Tiffy is looking nice too. Perhaps a used airbrush on e-bay will do the trick. Any chance of bending the tip back? Nothign to lose since it's garbage anyway.
 
Sorry to hear the airbrush troubles Terry, but bloody nice work anyway!

Like your 'ignore this post' comment too - it's like when pople say 'can I ask you a question?' :)
Reminds me of a saying read somewhere too - 'If you notice this notice, you will notice it's not worth noticing'...
 
Beautiful work Terry! I can't believe that's the same Typhoon from earlier in the thread. I suspect an imposter!! :lol:

I'd give straightening the needle a shot if there is nothing to lose. I've had some luck by pressing it against a hard surface and rolling it as you draw it backward. It's given some extra life to a few of my needles.
 
Thanks very much guys. Hopefully it'll turn out alright in the end. I'm going to have a try at bending the needle tip back. If it doesn't work, then at least I can keep the brush for spares.
 
The main painting is now done, although there are a couple of small areas needing re-touching, mainly around the yellow, wing leading-edge I.D. stripes. I used acrylic paint for this, as I'd run out of enamel, and it has 'picked' and curled in a couple of places where the masking tape had been.
PIC 1. The Dark Green has now been brush-painted, since the airbrush went t*ts up, and the non-slip wing walkways painted on, then textured by stippling with a stiff brush. The green looks a bit streaky in this shot, due to it being satin finish, but this will smooth out and disappear once clear coated. The 'Sky' tail band was bush-painted, and I had to mix the colour to get near to the shade of the decals, which seem rather dark for 'Sky', especially when compared to the 1/48th scale version from the same manufacturer. I've compromised, and settled for a tone in-between 'true' Sky, and the decal shade, as the latter just might appear lighter once applied.
PIC 2. The AEAF stripes have been brush-painted on the lower fuselage, and re-painted on the wings, with a slightly streaky, patchy effect, and neat but not perfectly straight or equal, to mimic the 'real thing'. Note that on this particular aircraft, the fuselage stripes were further back than normal, aligning the rear-most white stripe on the 'Sky' tail band. Some very light panel line work has also been completed, visible in this shot.
PIC 3. The overall finish is relatively clean, with only light panel definition, as this was a replacement aircraft on the Squadron (full story later). Some very light weathering and staining will be applied once the decals are in place.
PIC 4. The next job is to add some detail to the bare wheel bays. The retraction jack seen here, in the centre of each bay, was made when the model was first built, using tube and rod, and a similar, smaller jack, plus hinges and locks, are on the inner bay doors, removed for ease of handling. Some wiring, pipework and structural framing will be added here, using copper and lead wire, plastic strip and stretched sprue.
When that's all done, then it'll be time to look at the engine, to see what can be done in the way of adding some detail, a job which would normally take place before the fuselage is assembled!
Thanks again for your kind comments, and I'll post another update soon.
 

Attachments

  • Bf109 and Tiffie 210.jpg
    Bf109 and Tiffie 210.jpg
    28.1 KB · Views: 69
  • Bf109 and Tiffie 201.jpg
    Bf109 and Tiffie 201.jpg
    38.4 KB · Views: 91
  • Bf109 and Tiffie 202.jpg
    Bf109 and Tiffie 202.jpg
    30.3 KB · Views: 102
  • Bf109 and Tiffie 205.jpg
    Bf109 and Tiffie 205.jpg
    59.5 KB · Views: 90
Thanks Daniel.
Evan, they aren't the mounting holes; as mentioned in one of the posts, they're the holes I drilled where I'll make and fit the plug-sockets for the 'pig-tail' firing- wire connectors from each RP. The RP rails have 'flat' mounting plates on the end of each stub pylon, which will be glued to small areas of bare plastic, scraped free of paint, which have been masked during painting with small squares of tape. Which reminds me - I forgot to remove the tape!!
 

Users who are viewing this thread

Back