174 Sqn Typhoon up-date, 1/32nd scale.

Ad: This forum contains affiliate links to products on Amazon and eBay. More information in Terms and rules
yep, coming along nicely...actually I find 'refurbishing' my old kits almost as much fun as building new ones.

Recommend the PremiAir G35 if looking for a new 'cheap' brush ...it's a dual-action Iwata entry level 'copy' for about £30 which I bought as a 'spare' ..but I've had so much fun with mine I haven't picked up either of my Badgers since...
 
Thanks mate. The 'brush I had was/is similar to the Iwata, made in the UK by AB, who have been around some time. Works great, and very well made. I think I've got it working to an extent, which will be good enough for general use, down to about 3mm, but the needle, now straightened out, won't allow the 1mm or less I could achieve. No problem, I'll get another one when there isn't as much month left at the end of the money! They're £28 direct from AB, and are also sold under other names, via dealers etc., so possibly the same one as the 'Premi Air'.
 
That's a awesome amount of work. You da' man! It's a good thing you live so far away from me because if you were in my neck of the woods I'd be a constant uninvited guest, always poking around and wondering what you're up to and grilling you with questions.
 
And now on to the fiddly bits - the Rocket Projectiles and rails!
The following is also intended as a guide for Daniel (109 Roaming), who also has a set of these RP's, and will be converting the old Revell kit to, so pleas bear with me..
The Typhoon was fitted to carry either bombs, or RP's, but not both. The model will be a rocket-carrying Typhoon, with a change of identity from the thread title, and will be the replacement 'mount' of Sqn. Ldr. Mc.Nair, of 247 Squadron, RAF, in late July,1944, coded ZY-G, serial number MN928.
The RP's were normally the 3 inch, 60 pound SAP/HE, although 25lb armour piercing missiles were also available, used mainly for anti-shipping strikes.
The RP's used in this conversion are the very nice resin set from Model Design Consultants, with the later launch rails and the 60lb warhead.
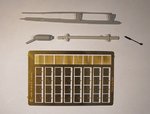
PIC 1. Shows the parts for one RP and rail set laid out, with the rail at the top, and below it the warhead and rocket motor body, with the electrical firing 'pigtail' at right, and below, the P.E. set for the fins and mounts.
The first job is to prepare each rocket-motor body, by cleaning-up any moulding residue or flash, and remove the moulding strip from the top of each launch rail, and the moulding plug from each warhead.
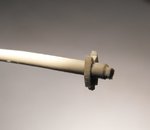
PIC 2. This is the forward end of the RP body, where the warhead attaches. The extreme end needs to be carefully removed with a razor saw, and the remaining 'stub' very gently sanded to remove any excess resin.
PIC 3. The end of the casting removed, showing where the warhead slides on.
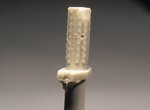
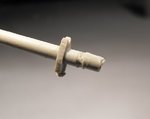
PIC 4. The tail-end of the RP body, with the grooves for the brass fins. The raised lines with small 'studs' are where the brass reinforcing strips attach. Note that the 'saddles', the brackets which mount the RP to the rail, have a groove on one end, and this is the end which attaches to the rail. It may be necessary to clean-out this groove slightly, but be careful - it's very easy to cut-in too far!!
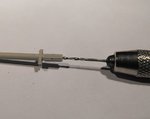
PIC 5. I drilled the tail-end of each RP body, in order to insert a piece of wire later, to facilitate painting. This is optional, and it might be best not to bother, as the resin can easily split, as shown later. The completed missiles can be clamped by one fin whilst painting, and then this fin painted later.
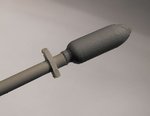
PIC 6. The casting plug has been carefully sawn from the warhead, the area gently sanded to clean it up, and then the part pushed onto the RP body, with a small spot of 'Superglue' on the end of the latter. NOTE: the notches on either side of the warhead nose represent the notches on the real item, where a spanner or 'key' would fit, to tighten the warhead after it had been fully screwed home on the body. The warhead has also been moulded with a textured finish, duplicating the rough-cast appearance of the real thing.
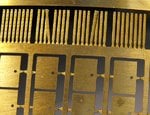
PIC 7. These are some of the brass photo-etched parts. At the top, the small strips with the 'pimpled' surface are the reinforcing strips for each fin, which fit one either side. The 'pimples' are supposed to locate into tiny dimples on the ridges along the end of the body - yeah, right!
The fins have a small, triangular 'tab' on one edge, below the round hole, and this fits into a tiny hole between the ribs on each RP body. I found that the 'tab' needed cutting down slightly to allow the fin to 'seat' properly.
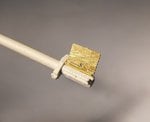
PIC 8. One fin in place, with the reinforcing strips either side, attached with small spots of 'Superglue'. For me, this was a fiddly, tiresome job, but for people with normal dexterity, it shouldn't pose any major problem. All that's required is patience and a relatively steady hand. But be warned, there are 32 sets of these to fit!!
Note the very small piece missing from the end of the 'exhaust' outlet. This is where the resin split whilst drilling.

That's it so far. Once each RP has been fully assembled, they'll then be painted, and fitted to the rails, which will also have been painted. The vinyl 'pigtails' will be fitted into the rear of each rocket-motor, and painted in situ, but left hanging, after each rocket and rail has been fitted, as a complete unit, to the underside of the wings. (NOTE: the 'pigtails' were only connected to the wing sockets immediately before start-up and take off, in case of any electrical 'short' or other malfunction causing accidental launch.)
Thanks again for your interest, and I'll post another update soon - or when I recover from handling tiny PE parts!!!
 

Attachments

  • Bf109 and Tiffie 263.jpg
    Bf109 and Tiffie 263.jpg
    36.9 KB · Views: 117
  • Bf109 and Tiffie 259.jpg
    Bf109 and Tiffie 259.jpg
    16.3 KB · Views: 62
  • Bf109 and Tiffie 255.jpg
    Bf109 and Tiffie 255.jpg
    15.5 KB · Views: 88
  • Bf109 and Tiffie 261.jpg
    Bf109 and Tiffie 261.jpg
    17.9 KB · Views: 72
  • Bf109 and Tiffie 265.jpg
    Bf109 and Tiffie 265.jpg
    20.2 KB · Views: 63
  • Bf109 and Tiffie 267.jpg
    Bf109 and Tiffie 267.jpg
    17.1 KB · Views: 93
  • Bf109 and Tiffie 264.jpg
    Bf109 and Tiffie 264.jpg
    73.9 KB · Views: 73
  • Bf109 and Tiffie 268.jpg
    Bf109 and Tiffie 268.jpg
    19.8 KB · Views: 69
What a great detailed finish to the wheel bays Terry, it looks as though you're also heading in the same direction with the rockets.

:hotsun: :hotsun:
 
Thanks very much guys. And the next time I announce that I'm going to restore and detail an old model. someone please tell me not to be so bl**dy stupid! These RP's are doing my head in! But you're right, they should look great when done - I hope!
 
Thanks Wayne! I'm doing this a bit at a time, as it's fiddly and repetitive, so I'll have another update in a day or two.
 

Users who are viewing this thread

Back