Acoustic Guitar Buildalong.

Ad: This forum contains affiliate links to products on Amazon and eBay. More information in Terms and rules
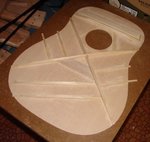
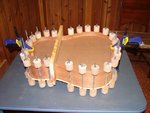
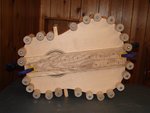
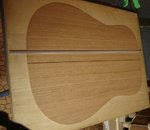
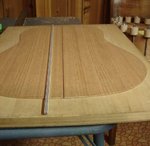
Bought the clamp on the left, built the others. Not as close of tolerance on the ones I built so they don't hold as tight, but enough tension for this job. I made 3 of the shorter ones, and 4 of the longer ones, but only one of the longer clamps turned out to be usable. They just did not hold well. May have to buy one more long one later so I have two of them.
 
Update, top bracing and tone bars are all glue into place. Two things I learned during this process. One, I need better lighting in my work area so I can see the glue I missed wiping off from the board. Two, I need spring clamps with weaker springs, the ones I used kept trying to pull the parts away form the area to be glue to.
First pic shows all the bracing and tone bars glued into place. Now they just need to be carved into thier final shape and sanded a little smoother before gluing the top to the sides.
Second picture shows the sides with the curved sanding stick I made to be able to sand the kerfing on the outer edges of the top and back to the right arch. Of coarse the top and bottom have different angles so I'll need to make another stick when the back is ready to be glue on.
Third picture shows two 1.25" rods that I need to make into a bunch of little spool clamps for gluing the top and bottom in place.
 

Attachments

  • Top Braced.jpg
    Top Braced.jpg
    35.3 KB · Views: 439
  • Top Sanding Stick.jpg
    Top Sanding Stick.jpg
    45.9 KB · Views: 453
  • Dowels.jpg
    Dowels.jpg
    107.1 KB · Views: 459
Dreadnaught. Don't play them anymore. Currently playing orchestra and concert types. Have plans for an orchestra which I will start once I get this 1/4 scale S.P.A.D. XIII off my building board. Keep the progress and pics coming. I love this stuff.
 
Been neglecting this thread and the Guitar build as of late. Been busy with other projects and trips and have not put much time in on this. Hope to get the top fitted tonight, and possibly glued on. So hope to have some progress pictures posted in the next couple of days.
 
Well, progress has been slow. I gotten a renewed appreciation of what a professional Acoustic Guitar maker puts into his craft. Also lost a little blood on during this last process. I guess I did get those wood Chisels razor sharp afterall;) Got a couple drops of blood on the top of the Soundboard, I hope they sand out.
Fitting the top to the sides has proven to be the most difficult and time consuming proceedure of the whole build so far. I was hoping to have the top glued in place this week, but had forgotten that I still need to build a couple cauls for aid in glueing the neck and bridge in place and I need access to the underside of the top while making them so it will be a while. In the meantime I have fitted the top to the sides, just needs some additional fine tuning and sanding for a perfect fit.
 
OK, now some pics. First picture shows the 24 spool clamps I made for attaching the top and bottom to the sides.
Second pic shows the top test fitted and clamped down, still neads some final fittiing work.
Third pic shows the top in place. I had to nail the top to a board so I could get the body length correct, was having problems just trying to push it together and clamping, so a couple nails on each end of the top to help pull the ends into the correct length.
Hope to have the top glued in place in the next week or so, then onto the back. Debating on inlaying a backstrip into place on that? I'll think about it while I'm working on the top.
 

Attachments

  • Spool Clamps.jpg
    Spool Clamps.jpg
    41 KB · Views: 457
  • Top Fitted.jpg
    Top Fitted.jpg
    48 KB · Views: 450
  • Top Fitted 2.jpg
    Top Fitted 2.jpg
    39.2 KB · Views: 431
Decided that the a plain Mahogany back was not fancy enough so I am going to inlay a ZigZag backstrip along the centerline of the back. Plus it will give me a chance to use the brand new Trim Router I picked up this week.

Here is the back and the Zigzag accent strip, and then a closeup of the Zigzag.
 

Attachments

  • ZigZag Closeup.jpg
    ZigZag Closeup.jpg
    65.2 KB · Views: 459
  • Back and ZigZag Backstrip.jpg
    Back and ZigZag Backstrip.jpg
    27.9 KB · Views: 419
OK, now to inlay the strip. Most Guitar builders glue this backstrip in at the same time the glue to two pieces of wood for the back together. Since my back was already glued up, I will need to route a groove for it to be inlayed into. Zigzag strip is 1/4" wide so to get a snug fit I started routing with a
3/16" straight router bit. Then I added masking tape to the length of the Carpenters level and routed again in order to get the groove a bit larger with each pass until I got a nice tight fit.
First picture shows my level clamped into place. Second and third are a bit hard to see, but show the groove routed almost all the way through the depth of the back.
Next I'll glue and clamp the backstrip into place, then use a cabinet scraper to scrape it down so it is level with the back wood.
 

Attachments

  • Jig and Router.jpg
    Jig and Router.jpg
    49.3 KB · Views: 455
  • Routed Groove.jpg
    Routed Groove.jpg
    34.9 KB · Views: 452
  • End shot of Routed Joint.jpg
    End shot of Routed Joint.jpg
    34.5 KB · Views: 433
Just glued that backstrip into place, needed the aid of some specialized guitar clamps to hold it in place with even pressure, OK, I just raided the weight bench and stole 2 ten pound weights for pressure. Now to let it dry overnight. Then it's time to break out the Cabinet scraper and clean up and glue squeeze out and level the Zigzag down.
 

Attachments

  • Strip Glued in place.jpg
    Strip Glued in place.jpg
    37.3 KB · Views: 453
Next step, and this will be the most daunting and tedious task of the whole build, I have to clean up my tool/workbench!!!
What a mess, I usually don't let it get this messy, but working on a couple different projects in different areas of the room the bench seemed to be the place where tools and stuff collected.
 

Attachments

  • Mess.jpg
    Mess.jpg
    75.4 KB · Views: 424
Yep;) First time they have been used for something in a long time! Now it's time to get some sleep as it's way past my bed time and we loose an hours on the clock tonight due to Daylight savings time, Holy cow it's nearly 2:30 A.M.!!!! I though it was the glue fumes making me light headed.
 

Users who are viewing this thread

Back