Acoustic Guitar Buildalong.

Ad: This forum contains affiliate links to products on Amazon and eBay. More information in Terms and rules

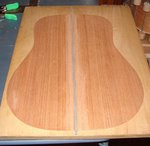
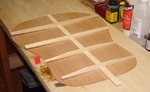
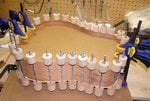
Took the "clamps" off this morning. Turned out pretty good. You can see the water stains on both sides of the strip from where I wiped the excess glue up with adamp rag, but that should sand away later.
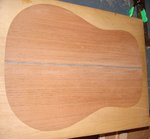
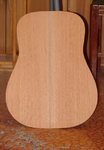
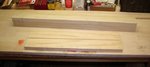
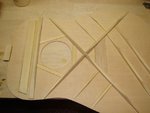
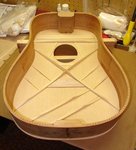
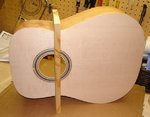
Last two pictures show the finished product, scraped and the ends cut off. You can see the scrapings on the floor in the last picture, yet another mess I have to clean up;)
I'm off to the Archery range with the Longbow now, got to get out of the house and get some fresh air before the snow moves in later.
 

Attachments

  • Clamps Removed.jpg
    Clamps Removed.jpg
    35.9 KB · Views: 170
  • Ends Trimmed.jpg
    Ends Trimmed.jpg
    34.2 KB · Views: 182
  • Curls.jpg
    Curls.jpg
    37.2 KB · Views: 203
Been neglecting the build for a couple weeks now. Finally got the workbench cleaned off so hope to get the top glue on later this week, then I need to build some cauls for glueing the braces on the back when I get access to my Bandsaw again. I really got to figure out how I can get that thing home so I can get more work done.
Managed to snap one of my pre-bent herringbone perflings as well so I need to order another set.
Been thinking of the next build as well, thinking a Gibson ES-335 Clone? Then a homemade Tube Amplifier?
 
Been floating between a Les Paul Copy, the 335, or a Strat. Strat would be the simplest, Les Paul or 335 would be a toss up as far as difficulty, carving the Les Paul top plate would be a chore, but bending sides for the 335 would be as much work, we'll see how this one turns out and how ambitious I get.
Class A all the way, thinking something small like a Fender Deluxe copy, 12-15 Watts.
 
Ok, back to work. First off notice how clean the workbench is compared to the last time you saw it;)
Top is almost ready to glue on. First I need to make a couple cauls to support the neck and bridge when they are glued into place. These cauls will provide pressure from the inside the body so I need to make them before I glue the top in place to make sure they fit correctly
I need to convert these two sticks into arched sanding/glueing blocks and cauls.
 

Attachments

  • Sticks and Back.jpg
    Sticks and Back.jpg
    26.1 KB · Views: 193
After I get those boards shaped the larger one will be used to sand the sides along the bottom edge to the proper angle for gluing on the bottom plate. It will also double as a back brace for glueing on the bottom back braces. Will Support the outside of the back when the braces shown in this picture are glued into place and keep the correct arch for the back.

P.S. Already gathering information in building an ES-335, looks like it will be a little simpler that I thought, still some work, but a bit simpler that trying to carve a top for a Les Paul style Guitar. Got plenty of time to change my mind though;)
 

Attachments

  • Back.jpg
    Back.jpg
    39.9 KB · Views: 174
Oh sweet Mother of Pearl look what I've done now. All this talk of building a 335 has got me looking into it. Just found this picture and it is pretty close to what I want to make. Highly Flamed Maple top and sides and maybe a Quilted Maple back. Probably replace that chrome hardware and white knobs with gold stuff.
This is a Collings I-35 Deluxe, which is essentially a 335 copy only with a carved top insead of a laminated top with bracing.
WOW!!! Have to finish this one before I can even contemplate starting another guitar.
 

Attachments

  • CollingsI35DLXRB-Front.jpg
    CollingsI35DLXRB-Front.jpg
    223.6 KB · Views: 187
She's a beaut mate. My ibanez has a quilted top its beautiful!

One thing though go for chrome Gold looks a bit tacky to me, unless its on a Gibson Custom Les Paul :D
 
Sander drew blood today;( Was extra careful with the bandsaw and the wood chisels, but managed to sand then middle finger knuckle up a bit on the oscillating sander while making some support braces for gluing on the back braces.
Hope to start gluing the back up tomorrow so should have some updates on Monday or Tuesday. Hopefully will not loose and blood in the glueing operations;) Wouldn't put it past me though.
I have determined that if I do not draw blood while working on a project I'm just not working hard enough!
 
Finally! Got the cauls built that I'll need when gluing the Neck and Bridge in position. These had to be made before I could glue the top in place as they need to be fitted to the braces before the top is in place.
These cauls will be inserted through the soundhole to support the Neck and Bridge when they a glued in place. They will then be removed once the glue is dry.
The one on the right was quite a contraption to build, but it's done finally. Hope to get the top glued on tomorrow evening.
Last pick shows the position they will be in when the neck and bridge are glued up.
 

Attachments

  • Cauls in Position.jpg
    Cauls in Position.jpg
    39.1 KB · Views: 1,108
  • Top.jpg
    Top.jpg
    34.8 KB · Views: 1,118
  • Neck and Bridge Cauls.jpg
    Neck and Bridge Cauls.jpg
    22.6 KB · Views: 1,245
Two back braces in place, only two more to go. Can only glue one on at a time due to limited amounts of proper clamps. Should have the last one in place on Thursday and then I can glue the center support strips in place between each rib.
Hope to have both the top and back in place next week sometime and have them trimmed up and ready to route the Binding and perfling channels.
Drew more blood with the wood chisel today. I need a supervisor I guess. I have never cut myself more times on a project than this one.
 

Attachments

  • Back Braces.jpg
    Back Braces.jpg
    50.2 KB · Views: 1,220
WooHoo, managed not to draw blood with the sharpies today!
Glued on more rib on the back this evening. Took the wood chisel to a couple of the top braces to get them to fit the top.
Checked, double checked, triple and quadruple checked the fit of the top to the sides and glued and clamped them in place. Hope nothing slipped in the process of putting on 28 various clamps. I know if I ever build another accoustic guitar it will be done with a form that goes around the whole body and keep the shape of the guitar better.
Going to leave these clamps on for at leat a day, probably two just to make sure everything sets up fully.
 

Attachments

  • Top Glued and Clamped.jpg
    Top Glued and Clamped.jpg
    56.4 KB · Views: 2,255
Clamps are all removed and the top stayed in place. Appears to have had not slipping so that was a relief.
Sanded the edges of the bottom of the guitar side witha 20' radiused stick with sandpaper stuck to it (same stick used to help glue the ribs onto the back plate).
Removed the cardboard forms from the inside of the body. Now I need to glue the side support braces and trim the top overhang off with the trim router with a flush cutting bit. Hope to have the bottom glued on next week some time.
Lots of work done this week.
 

Attachments

  • Top Inside.jpg
    Top Inside.jpg
    42.3 KB · Views: 6,477
  • Top Front.jpg
    Top Front.jpg
    41.5 KB · Views: 1,485

Users who are viewing this thread

Back