Cyber Hobby (Dragon) Bf-110D-3 Start to finish.

Ad: This forum contains affiliate links to products on Amazon and eBay. More information in Terms and rules

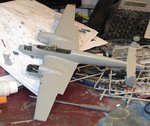
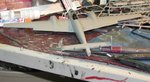
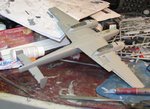
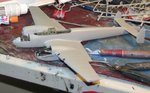
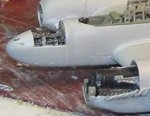
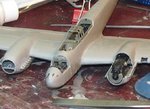
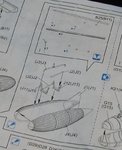
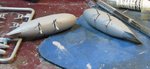
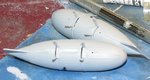
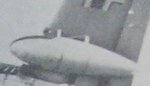
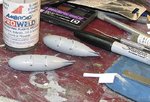
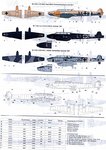
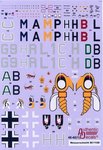
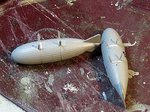
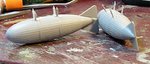
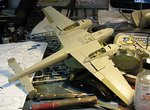
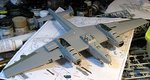
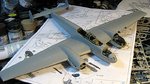
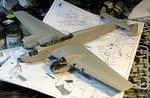
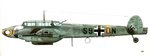
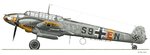
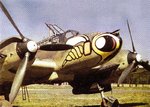
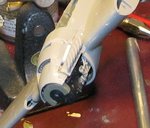
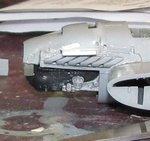
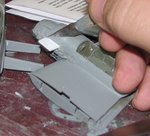
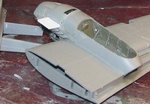
OK, so I had the lower cowl fit issue. I took some sheet stock and cut a piece to fit in the hole. I then cut it down to size fileed and sanded down then a little Tamiya gray putty and there ya go.
 

Attachments

  • 110cowl_2.JPG
    110cowl_2.JPG
    40.9 KB · Views: 72
  • 110cowl_3.JPG
    110cowl_3.JPG
    26.6 KB · Views: 73
  • 110cowl_5.JPG
    110cowl_5.JPG
    72.5 KB · Views: 73
  • 110cowl_6.JPG
    110cowl_6.JPG
    34 KB · Views: 69
Last edited:
Now on to the basic build, wings a tail and nose armament. It a beastly porcupine out the bloody nose.
 

Attachments

  • 110_1.JPG
    110_1.JPG
    79.4 KB · Views: 75
  • 110_2.JPG
    110_2.JPG
    70 KB · Views: 80
  • 110_3.JPG
    110_3.JPG
    87.4 KB · Views: 71
  • 110_4.JPG
    110_4.JPG
    71.5 KB · Views: 85
  • 110_5.JPG
    110_5.JPG
    27.6 KB · Views: 73
  • 110_6.JPG
    110_6.JPG
    63.2 KB · Views: 72
  • 110_7.JPG
    110_7.JPG
    63.2 KB · Views: 74
The Bf-110D-3 could carry either the large 900 ltr or the much smaller 300 ltr wing tanks. The aircraft in question (depicted by the kit) is a Med based bird. These flew shipping escort and interdiction as the D-3 was designed to preform bombing rolls. In these rolls they used the 900 ltr drop tanks. I am really not sure just what I plane on for final display as I have a set of decals coming in that has marking for the Russian front, bit I preped the kit for the 900 ltr tanks. I figure I can close the hoes if I don't use them. Following the destructions for the kit I put together the tank halfs and then the mounts. You will note that the bracing is go lower front to upper rear and the parts are to have a small tap to attach with. Well per the instruction I mplace the parts to find everything backwards and will you get a load of that gap in t he tanks. Don't fill this ting up to mch and don't fly upside down.
 

Attachments

  • 110tanks1.JPG
    110tanks1.JPG
    67.1 KB · Views: 66
  • 110tanks2.JPG
    110tanks2.JPG
    74.5 KB · Views: 70
  • 110tanks3.JPG
    110tanks3.JPG
    60.1 KB · Views: 80
  • 110tanks4.JPG
    110tanks4.JPG
    60.4 KB · Views: 65
  • 110tanks6.JPG
    110tanks6.JPG
    8.8 KB · Views: 73
  • 110tanks8.JPG
    110tanks8.JPG
    82.1 KB · Views: 69
  • 110tanks9.JPG
    110tanks9.JPG
    47.9 KB · Views: 73
well started to fox the hole in the tanks. cust some card stock sliver that fit the width and letting that dry.
 

Attachments

  • 110tanksfix2.JPG
    110tanksfix2.JPG
    121.9 KB · Views: 75
I have a set of decals coming in for this project that I bought of ebay, Authentic Decals 1/48 MESSERSCHMITT Bf-110D Fighter
 

Attachments

  • Authentic4840a.jpg
    Authentic4840a.jpg
    89.2 KB · Views: 70
  • Authentic4840b.jpg
    Authentic4840b.jpg
    88.8 KB · Views: 74
  • Authentic4840c.jpg
    Authentic4840c.jpg
    53.5 KB · Views: 79
  • Authentic4840d.jpg
    Authentic4840d.jpg
    49.3 KB · Views: 77
Got some tank repair done on those 900 ltr drop tanks.
 

Attachments

  • 110tankrep1.JPG
    110tankrep1.JPG
    132.5 KB · Views: 83
  • 110tankrep2.JPG
    110tankrep2.JPG
    68.5 KB · Views: 71
Got some more work done with the wings and bomb rack.
 

Attachments

  • Bf-110_1.JPG
    Bf-110_1.JPG
    32.4 KB · Views: 69
  • Bf-110_2.JPG
    Bf-110_2.JPG
    33.5 KB · Views: 76
  • Bf-110_3.JPG
    Bf-110_3.JPG
    106.2 KB · Views: 72
  • Bf-110_4.JPG
    Bf-110_4.JPG
    82.4 KB · Views: 73
  • Bf-110_5.JPG
    Bf-110_5.JPG
    83.1 KB · Views: 83
  • Bf-110_6.JPG
    Bf-110_6.JPG
    97.7 KB · Views: 75
First I want to thank everyone who has bee sending their support for this project. and thanks for the commits.

Good work Don. You may find those Wespe decals to be a challenge fitting them around the curved nose surface.

Yes I've had quite a bit of experience dealing with the odd ball compound curve and decal or masking, I am by no means a pro and I ma going to make it even worse because the gun bay cover will be off. BUT I GOTTA HAVE THEM, YA HEAR ME I JUST GOTTA HAVE THEM, come on now get a gripe, noe now that ok Don you'll be ok, STOP CRYING!
 
Well I received the decals last night and my Luftwaffe ground crew personnel and I brushed on a coat of Vallejo RLM 02 on the top pf the wings. I want to play with the paint masking as see how it goes. I picked up some Frisket sheets form Hobby lobby to work with the masking. Luftwaffe used a hard line on the wings and a hard/soft line on the fuselage.
 

Attachments

  • 1658535_10203083194096487_1352454562575404626_o.jpg
    1658535_10203083194096487_1352454562575404626_o.jpg
    29.9 KB · Views: 60
  • 10277104_10203083189296367_4163280323564071698_n.jpg
    10277104_10203083189296367_4163280323564071698_n.jpg
    32.4 KB · Views: 75
  • 10306480_10203083187176314_3611360129885958322_n.jpg
    10306480_10203083187176314_3611360129885958322_n.jpg
    185.8 KB · Views: 60
  • 10329905_10203083197176564_4975422697965794300_o.jpg
    10329905_10203083197176564_4975422697965794300_o.jpg
    28 KB · Views: 64
  • 10330263_10203083180816155_239261785379588210_n.jpg
    10330263_10203083180816155_239261785379588210_n.jpg
    25.5 KB · Views: 71
Last edited:

Users who are viewing this thread

Back