Cyber Hobby (Dragon) Bf-110D-3 Start to finish.

Ad: This forum contains affiliate links to products on Amazon and eBay. More information in Terms and rules

Donivanp

Captain
8,271
6,539
Feb 23, 2014
Katy Texas
Well I went up to Dales place Friday after work and the two of us were working on the Tamiya Spitfire Mk1. Had to leave this morning to come back home for Monday morning.
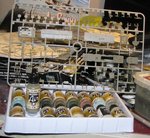
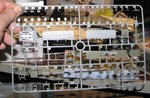
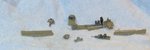
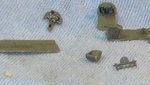
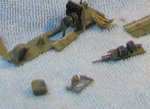
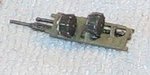
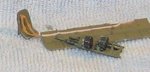
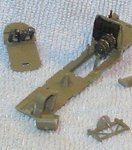
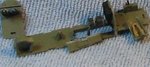
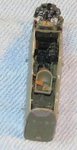
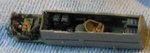
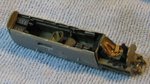
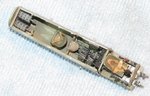
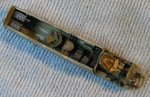
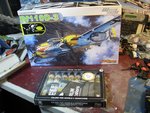
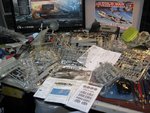
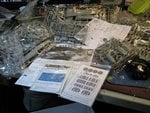
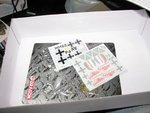
I doped the throttle control in the carpet and cant find it, looks like I will need to call Tamiya customer support. So I boxed her up and taped her up and got out what I've been biting at the bit to do. Here is the Cyber Hobby (Dragon) Bf-110D-3 in 1.48 scale. I also need to get away form enamels as it bothers the wife way to much so I jumped at a set of Vallejo Air for RML. 16 color set from Scale Hobbyist was $39.59 plush S&H for a total $48.54 so I am about set. I picked up a set of Luftwaffe interment dials and a mask set for it and am about ready to jump in with both feet. Bet it takes longer the the SBD did.
Would one of the admins mind putting this on a sticky please
 

Attachments

  • IMG_2271.JPG
    IMG_2271.JPG
    113.9 KB · Views: 256
  • IMG_2273.JPG
    IMG_2273.JPG
    112.1 KB · Views: 245
  • IMG_2274.JPG
    IMG_2274.JPG
    105.3 KB · Views: 235
  • IMG_2275.JPG
    IMG_2275.JPG
    75.1 KB · Views: 239
Last edited:
Well got home tonight and wanted to get started. First things first, see what was in the cockpit, ok it looks like the F tree is the cockpit. Get ou the new Vallejo Air (VA) and drop a few drops in the color cup (Dale supplied, thank you Dale), and with out mixing shoot some, seems to come out smooth, air at about 8 to 10 PSI in a Paasche VH single action with a fine head on it opened up about half way. Closer look seems not as much as expected, trun the pressure up to about 15 psi and flows nice but could use a little thining to run a the lower psi. The coverage was good but it looked like it might be too thick and orange peel but after a few hours ( i did not mess with it) it thightend up real nice,. I still have some playing with it but so far it has real promise.
 

Attachments

  • 110_1.JPG
    110_1.JPG
    131.3 KB · Views: 225
  • 110_2.JPG
    110_2.JPG
    88.8 KB · Views: 230
And on a lighter note I did find that lost tube of JB Weld hardener I lost and an F-4 engine can and some velco bundul ties and a clip and some pipe and a tooth pick, well I was still looking for the spitfire throttle.
 
vallejo bad not going to paint the model are somewhat fussy air, the climate affects long as there have trouble adhering high humidity, not dry well at all and the paint surface must be flawless the slightest speck of fat and adhering I have almost the entire collection of them both color and model air model.
 
Been working on the cockpit and instrument panel, all I have for reference is the Squadron Bf-110G walk around. So I a guessing a little as well. The colors are all over the place. I used RLM 02 as the main cockpit color. Including the instrument panel. The book shoes black but most B&W photos don't look black. Having never crawled around one (and there aren't many left) I'll just have to play it by ear. I'll post some more photos in a day or to. I am likening the Vallejo's though so far. I picked up some of the metallics and some black and white from Hobby Lobby. They are the "color" line for brushing. Pretty thick but brush nice. The gun metal was more like steel so I mixed in some black to darken it up. Started putting some of the cockpit together. Slow but steady, sill can't find that spit throttle. I should have used a sticky stick to hold it but I just started using them and don't always remember I have them.thank for the help. Color suggestion for cockpit are still welcome.
 
As an Amazon Associate we earn from qualifying purchases.
Don, I agree on the RLM 02 for the cockpit. My few references plus the eduard D kit indicate RLM02 for the cockpit. I sure did like walking through that kit when you were here. Seems like a damned nice kit, far less fussy than the eduard kit. Don't get me wrong, I like what I see with the Eduard kit, but I will need to have the stars aligned just so before I am ready to bite that one off. BTW, your resin molds are here as well. Found the hobby knife, but no glue.
 
OK got some sub assemblys done for the cockpit, need a little clean up on some of the paint but I am pleased. I used some air scale interment s for the instrument panel. They help but were not easy to deal with. and did not fit the subject well as they were a bit over sized.
 

Attachments

  • Bf-110cocp1.JPG
    Bf-110cocp1.JPG
    45.5 KB · Views: 204
  • bf-110cocp2.JPG
    bf-110cocp2.JPG
    28.1 KB · Views: 185
  • bf-110cocp3.JPG
    bf-110cocp3.JPG
    32.8 KB · Views: 194
  • bf-110cocp7.JPG
    bf-110cocp7.JPG
    10.1 KB · Views: 190
  • bf-110cocp6.JPG
    bf-110cocp6.JPG
    19.8 KB · Views: 206
  • bf-110cocp5.JPG
    bf-110cocp5.JPG
    27.1 KB · Views: 200
  • bf-110cocp4.JPG
    bf-110cocp4.JPG
    27 KB · Views: 203
Well I got some of the sub assemblies for the cockpit put together and I am please. Still quite a bit more to do but it is getting there. The lower 20 mm by th instructions are built out of the floor. When I do this again on the D-1 I will mount the floor battery with out the guns installed then install the guns and the ammo drums. it was a bit of a fight to get them mounted after build and it was unnecessary to do it that way. The over all buils is really not bad at all. good fit but you have to study the instruction and dry fit and dry fit and dry fit. Dragon /Cyber Hobby are noted for making very busy instructions.
 

Attachments

  • bf110cop1.JPG
    bf110cop1.JPG
    29.3 KB · Views: 198
  • bf110cop2.JPG
    bf110cop2.JPG
    25.4 KB · Views: 183
  • bf110cop3.JPG
    bf110cop3.JPG
    71.7 KB · Views: 190
  • bf110cop4.JPG
    bf110cop4.JPG
    74.1 KB · Views: 173
  • bf110cop6.JPG
    bf110cop6.JPG
    69.6 KB · Views: 164
Last edited:

Users who are viewing this thread

Back