- Thread starter
- #361
Crimea_River
Marshal
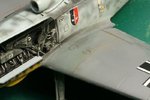
Went OK and will now move on, although there's still a slight mismatch in sheen. As Terry suggested, I'll do a bit of scuffing done around the walkways anyway and should finish her off this weekend.
Follow along with the video below to see how to install our site as a web app on your home screen.
Note: This feature may not be available in some browsers.
Ad: This forum contains affiliate links to products on Amazon and eBay. More information in Terms and rules
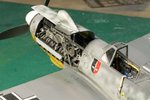
Great stuff Andy, and I like that hanging harness strap too. Missed one small area though, if you want to add them - the diagonal hand-holds/bracing at the top corners of the windscreen, and the small UV lamps at the bottom of the vertical frames. Shame to leave these off, with all that other detail.