**** DONE: 1/48 CF-104 Starfighter - The Jet Age.

Ad: This forum contains affiliate links to products on Amazon and eBay. More information in Terms and rules

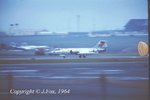
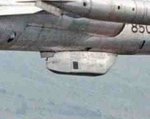
Here are a couple more definitive pics whihc, in my opinion, definitely show the white extension:

11130237_844757225615327_4839323681968966200_n.jpg
11149441_848332085257841_8996659315113519809_n.jpg
 
Yep, deffo white, without a doubt!
That'll do for me, and I'll re-paint mine white when I get back to it.
Now, what colour do you reckon the underside of the bar counter was in the Mess at Marville ................................
 
Ah, I see the visiting squadron had a bit of a heavy party !
Just been trying to check the scans I made of the original colour slides, from 1964, of the subject of my model - and I can't find them !!!
B*ll*cks !
 
Phew!
Found the scans. Looking closely at the pic below, it's not immediately obvious if the tail-plane is white - but having seen the original slide projected onto a large screen, in the original 'Kodachrome' hues, it is white, as are the other aircraft photographed at Prestwick on that day. The top of the fin extension is certainly bare metal in these pics, and also in some others I've filed from the 'net, and in my 'Canadian' book.
But !
All of these are in the period of the old Red Ensign flag, still in RCAF days, and all around the same period, which leads me to think that the 'white cap' to the fin is date related.
One thing I hadn't picked up on, until you mentioned it Andy, was the grey surround to the auxiliary intake doors, which is also on '771' in the pic below, so thanks for that - I'll add the outlines to my model.
 

Attachments

  • 2014-12-04_5.JPG
    2014-12-04_5.JPG
    72.7 KB · Views: 87
I posted another pic of 771 over on your old thread Terry. Here it is in case you can't find it.

10492433_865703263458557_99464500245720634_n.jpg
 
Thanks guys.

I've decided to depict my model with the new flag as seen in all the pics I posted of 846 and therefore painted the tail plane white which was almost certainly sported by this machine at the time of the photos. Below is the newly painted tail with the NMF strip on the leading edge faithfully represented!

15083102.jpg


Next, my attention turned to detailing the Vicon camera pod which Terry kindly donated from his older kit. The pod needs a bit of work in that the shape of the aft section is not quite right and there are no surface details to speak of.

15083101.jpg


I started by adding sheet styrene to the slope rear section to fill what would otherwise be a gap when installed on the underside of the model.

15083103.jpg


Next, I fabricated a fairing which is evident on photos of the installed camera pod, though I lack a good close-up to verify the exact details of this feature. This was done using more sheet styrene and filling the void with putty which is still wet at the tine the photo was taken.

15083104.jpg


The few photos I have of the pod are included below and it is evident that the fairing does not seem to be present on the pod when it is detached from the aircraft. However, pics of the installed pod clearly show the presence of the fairing.

20392_1595057534075893_4769508762698735607_n.jpg
1524732_10201257971992839_112301473_n.jpg
10641195_10154475419240231_1160896099799760345_n.jpg
10609411_10152678315428153_5721993110142111827_n.jpg
terry38.JPG
 
Great stuff Andy, and thanks for the pic of '771', which I'm guessing was taken before departure to Prestwick.
The 'fairing' on the Vicon pod is actually the end of the pylon, attached to the fuselage, which protrudes from the rear of the pod, hence the gap, or notch, in the kit part.
I think I have a pic showing this - I'll try to find t and post here.
 
Ah, that makes sense. I'll need to modify the look of this a bit to make it look like the "fairing" is coming from inside the pod, or maybe use a pylon from the kit if there is one. Thanks Terry.

The pod that you sent actually did not have a notch but rather a shallow slope away from the horizontal attachment joint line which would have left an ever-increasing gap toward the back. That's why I filled it in with steps of card.
 
No problem Andy. I couldn't remember what the kit part looked like, but I had realised a further slot would be needed, if I'd used the pod as originally intended.
If you look at the photos you posted of the pod, you'll see the 'step' at the rear, where it fits around the 'beam' of the fuselage pylon, which I presume is a 'common' pylon for all center-line loads. The pod mounts over the entire pylon, which, of course, is longer than the pod itself.
The enlargement of the pic we both have shows the protruding pylon, and how the pod tapers to the cut-out 'step'.
 

Attachments

  • Andy CF-104 2.jpg
    Andy CF-104 2.jpg
    19.3 KB · Views: 134
Andy, I forgot to mention this. On the main wings, the white area doesn't follow the line of the fuselage - there's a small 'step', then a narrow straight line to the joint of the trailing edge and flaps, which I presume is the wing root fillet, which remains in NMF.
This can be seen on the pic you posted of '771', and on the pic below of my model, shown by the red arrows, and is the same on top and bottom.
 

Attachments

  • Andy 1.jpg
    Andy 1.jpg
    110 KB · Views: 130
Thanks Terry. I'll look into that and possibly fix it, though at this point I'm a little leery of painting the lacquer-based Alclad over the acrylic Tamiya white. It will take a light touch with very thin coats to work methinks.

As for the center pylon, there is one supplied with the kit so I'll end up dismantling the extension that I made, cut a notch in the pod and refit a section of the pylon. Pics to follow.
 
Worked on the camera pod tonight. With Terry pointing out that the extension was, in fact, the center pylon, which makes total sense, I found that such a pylon was indeed provided with the kit:

15090101.jpg


So it was off with the home made jobbie and onward with installing the kit supplied piece into a notch that I cut into the back of the pod. Once that was done, I cut in some panel lines and added rivets with a pin head, then shot a coat of primer on to see how it all looked.

15090102.jpg


The close-up, as always, is brutally honest and has led me to the decision to sand down these details somewhat to make them less pronounced and then give the thing another squirt of primer before shooting on a gloss black coat.
 

Users who are viewing this thread

Back