Navigation
Install the app
How to install the app on iOS
Follow along with the video below to see how to install our site as a web app on your home screen.
Note: This feature may not be available in some browsers.
More options
You are using an out of date browser. It may not display this or other websites correctly.
You should upgrade or use an alternative browser.
You should upgrade or use an alternative browser.
**** DONE: 1/48 Me262A-1a KG(J)54 - Jet/Recon/Transport GB (2 Viewers)
- Thread starter Wayne Little
- Start date
Ad: This forum contains affiliate links to products on Amazon and eBay. More information in Terms and rules
More options
Who Replied?A4K
Brigadier General
Yep, looks great Wayne, and I also like that idea of the screws in the intakes...consider it stolen! ")
- Thread starter
- #163
Go right ahead Evan.. thanks again Guys...
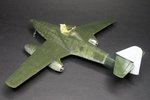
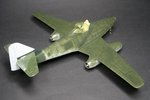
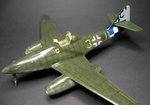
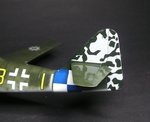
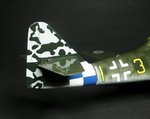
got the gloss on late yesterday and started on the decals today....going well until the final bit of the checkerband began to settle....then I was most unhappy....it started cracking and I could do nothing as i had put on some decal softener...touching it would only have made things worse, so repairs will be in order....will put the other side down first before repairs just in case there is more....
Even the Tadpole decal matched perfectly with my RLM70...
thanks again Guys...got the gloss on late yesterday and started on the decals today....going well until the final bit of the checkerband began to settle....then I was most unhappy....it started cracking and I could do nothing as i had put on some decal softener...touching it would only have made things worse, so repairs will be in order....will put the other side down first before repairs just in case there is more....
Even the Tadpole decal matched perfectly with my RLM70...
Attachments
nice Wayne though shame about those cracks
A4K
Brigadier General
With Karl, but no doubt you'll sort those out quicksmart Wayne!
Crimea_River
Marshal
Damn bad luck Wayne but I'm sure you'll get t sorted. I had misunderstood that you were going to paint the tadpole markings but the decals look good.
T Bolt
Colonel
Too bad about the decal Wayne, I'm sure you'll make it look like nothing ever happened. Again your airbrush works amazes me. Stunning!
Airframes
Benevolens Magister
Beautiful job, and those cracked decals are just a minor irritation to a man of your calibre!
I really like the look of the filled panel joints beneath the paint - been wanting to do one like that, just in primer and metal.
I really like the look of the filled panel joints beneath the paint - been wanting to do one like that, just in primer and metal.
meatloaf109
1st Lieutenant
My thoughts exactly!
Great work so far Wayne!
Vic Balshaw
Major General
Now that is a nice looking machine, but oh those fractured decals, don't it pi$$ you, they look nasty but I have faith I you Wayne.
- Thread starter
- #172
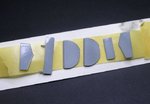
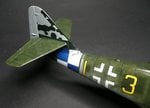
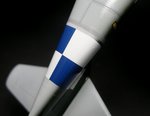
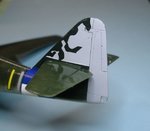
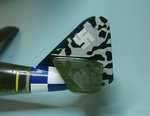
Thanks Guys, the other side cracked too....in 2 places... the worst was right through the middle of the Blue and white checker on the curve of the fuselage, boy did I swear.
removed the larger broken upper section and cut it directly along the edge of the checker pattern and then fitted the broken piece as best i could on the curve, got it pretty good but still visible as you can see in one of the close ups below...then i applied the upper section of the checker right up against the other section where i cut it that went on no problem until i had to get it to conform in the upper front section of the tail then it split again so more work there....other decals went on fine.
I'm considering just buying another set cutting out the squares and overlaying the damaged sections with new squares...I will never match that blue colour with paint....
Added the tadpole decal also didn't quite line up perfectly along the front edge of the vertical stab so added a bit of RLM70 with the brush, once this is glossed over it will blend just right.
i also determined that I had also used the wrong rudder....was going to leave it but the early 262's had a clear covered light on the bottom of the rudder and even though most of the 'tadpole' decal would cover it and it wouldn't be noticed I had to correct my oversight, so out came the small razor saw and i removed the corner section to put the clear one in place, will get that sorted tomorrow.
Attachments

Last edited:
nice Wayne
A4K
Brigadier General
Damn, not an easy fix then Wayne...
From memory, Humbrol's 14 French Blue was a a close match for that checker colour - might be worth a shot stripping the decals and airbrushing it, especially if you need new decals anyway..?
From memory, Humbrol's 14 French Blue was a a close match for that checker colour - might be worth a shot stripping the decals and airbrushing it, especially if you need new decals anyway..?
N4521U
Plastic Pirate
My lack of years in this slaps me in the face now and then..... well, more often than that.... So.... Hu 14 eh??? Ahmayzing.
You got another beaut there Wayne. Can't wait to see what the final solution will be for the decal.
You got another beaut there Wayne. Can't wait to see what the final solution will be for the decal.
Great work so far Wayne! Bummer about the decals though.
Crimea_River
Marshal
I'm kinda with Evan Wayne and think that with your skills you should be able to mask and paint the checker. Shame about the decals but not surprising really with the bends they need to make.
Still, it's looking really good, notwithstanding the cracks which I'm sure you'll get sorted somehow.
Still, it's looking really good, notwithstanding the cracks which I'm sure you'll get sorted somehow.
- Thread starter
- #179
Cheers guys...getting an extra decal sheet to hopefully solve the checkerband problem, should have it tomorrow, if I had plenty of time might have gone the mask and paint road but I don't want any further delays if I can avoid them...
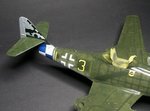
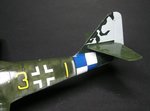
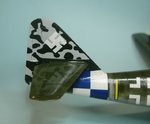
So, yesterday added the clear tail light cover and proceeded to apply the remaining tail decals, port side went on clean the starboard side rudder had a raised actuator piece so i decided to cut the decal in to 3 sections and apply it to avoid a wrinkle problem over the raised detail...this method sorted that issue out nicely..no problem!
Today lunchtime was cut short so only had time to add the white hakenkreuz to both sides of the fin...
Attachments
Vic Balshaw
Major General
That's a nice bit of tail work me'ol mate.
Users who are viewing this thread
Total: 3 (members: 0, guests: 3)