**** DONE: 1/48 Spitfire Mk.Vb Trop – Home Country Modern Aircraft/Spitfire Marks GB

Ad: This forum contains affiliate links to products on Amazon and eBay. More information in Terms and rules

Jayl

Senior Airman
351
36
May 29, 2009
User Name : Jayl
First name: Jason
Category : Advanced I suppose
Entry : Mk.Vb. Spitfire 601 Squadron
Kit : 1/48 Tamiya Supermarine Spitfire Mk.Vb. Trop.
Accessories : None, OOB.
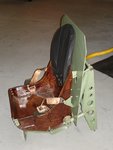
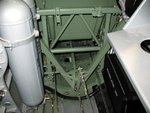
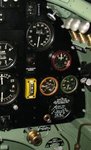
 :shock:

7634926016_44868a8648_c.png

IMG_4519

So this will be a pretty quick build, I've wanted to force my self to do a quick "shake and bake" and the Tamiya kit fits that description perfect.

I'm missing the piece of canopy glass behind the pilots seat and was wondering if any one had an extra they'd like to help me out with. It can be the original part or vac formed, either would help out immensely. PM me if you can help. Thanks.
 
Last edited by a moderator:
PM on it's way!

Nice project too mate, but you'll need some more details on the intro.

PM replied to, thank you.

I edited my post and added some additional details. I hope it's right.
 
Do it :D you have the power to finish in time :)

*Join the Tamiya side young apprentice, it is your destiny

*Tamiya is your father! :O

No seriously :) If the weather holds up you should be able to finish this one np :) Tamiyas are great kits and I'll enjoy checking out your thread :) Please excuse my star wars quotes atm :D
 
Thanks guys. So I have a couple of questions I'm sure some of you can help with. What color do you guys use for the red/brown seat color (the actual seat not the pad on the back). Is there something out of the bottle or do any of you have a mix that you've found that works? Also the instructions state that the oxygen bottles are to be painted the interior green color. Is this correct? I've only seen them as silver.

I also broke down and ordered metal gun barrels, resin exhaust and seat (with the harness molded in to not have to deal with any PE) , all just direct replacements so it's an easy upgrade.
 
Well, so much for OOB! :lol:

Jason, for the seat, I've been using old bottles of Testors gloss brown and flat red that I've had laying around. I mix these two together til I get what looks right and I've been pretty happy with the results so far. Can't tell you a ratio but I'd start with the brown and add red slowly.

I've done all my bottles bare aluminum.
 

Attachments

  • Seat.jpg
    Seat.jpg
    49.6 KB · Views: 590
  • 07ar_fuse_001-640x480.jpg
    07ar_fuse_001-640x480.jpg
    47.8 KB · Views: 184
I use the same technique I use for wood, minus the fan brush step. Its usually oil paints but to simplify it, use a Approximate color of Acrylic Red Brown and Brown, base coating the seat in brown then adding highlights (dry brushing red brown) after that if you want to add some "wow" factor use the Tamiya Clear Red and Clear Orange to give it a orangey hue to the seat and then varnish after its dry,

The Tamiya red and Orange arn't the "colors" there this kind of runy liquid that resembles red and orange and gives the paints applied a good "varnished" look to it.

I just can't wait for the WW1 builds and then you guys will see my passion for wood :S and leather mmm....that sounds somewhat strange so I'll stop here :D
 
Last edited:
see my passion for wood :S and leather mmm....that sounds somewhat strange so I'll stop here :D

Probably a smart move, don't think we need to delve into your wooden paddle and leather mask "passion". :puke:

Thanks for the tips on painting the seat though.
 
Like Andy, I normally just mix the seat colour, using either matt red and matt black, or sometimes wiuth a spot of Dark earth added (all Humbrol enamels, but obviously paints of choice will produce similar results.)
As shown in Andy's pic, the main oxygen supply, on the port side, was painted 'aluminium', with the feed bottle, on the starboard side, black, semi-gloss.
 
Good to see you jump in Jason!

and thanks for those answers Terry, was gonna ask you the same question on the tanks to confirm the colours!
 
No pics yet, I'm almost done with the cockpit but I have another question. On the right hand side of the ip there's two temp gauges a boost gauge and an oil pressure indicator. I've seen a lot of pics and also people painting these green, red, orange and yellow. The period pictures and illustrations I've seen show them as being black. Which is correct? Is it kinda like the pry bar on the cockpit hatch that often gets painted red but it's supposed to be green or silver?
 
The pry-bar should be bare metal. I've always painted my gauges the red/yellow green based on pics of this meticulously restored Spit V but there are also references with them just black.
 

Attachments

  • Panel 4.jpg
    Panel 4.jpg
    50.2 KB · Views: 203
So here are some pics of the cockpit. There are a couple of ejector pin marks and seams I didn't take care of but they're not going to be seen anyways. It's pretty much done except for things I noticed needed fixing once I took pics, I'll clean them up get it assembled and take a couple of more pics before closing it up.

7695979742_6af80944fa_c.png


7695979524_29f2009a68_c.png


7695978130_7062b83bc5_c.png


7695978332_ac9490b789_c.png


7695978540_fe643afdd4_c.png


7695979276_4e42d80c18_c.png


7695978794_e40e4c7c4d_c.png
 

Users who are viewing this thread

Back