looks great Matt
Navigation
Install the app
How to install the app on iOS
Follow along with the video below to see how to install our site as a web app on your home screen.
Note: This feature may not be available in some browsers.
More options
You are using an out of date browser. It may not display this or other websites correctly.
You should upgrade or use an alternative browser.
You should upgrade or use an alternative browser.
Heller 1/72nd F6F-5 Hellcat
- Thread starter Matt308
- Start date
Ad: This forum contains affiliate links to products on Amazon and eBay. More information in Terms and rules
More options
Who Replied?- Thread starter
- #42
Matt308
Glock Perfection
Yeah... flat tire. Bad alignment (exacerbated by constant tire rotations) has resulted in all tires worn to the secondary rubber.
So...
New tires $600
Alignment/Struts/Shocks $500
Front/Rear brakes/Rotors/Drums $600
Tough day. Can't complain though. New it was all coming. Just not on the same bloody day.
BACK TO MODELING!!!
So...
New tires $600
Alignment/Struts/Shocks $500
Front/Rear brakes/Rotors/Drums $600
Tough day.
BACK TO MODELING!!!
- Thread starter
- #43
Matt308
Glock Perfection
- Thread starter
- #45
Matt308
Glock Perfection
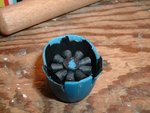
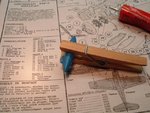
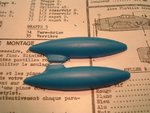
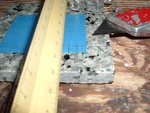
Machine guns and sleeves suck. To the chopping block they go. I'm gonna cut the plastic stock off and drill them out. I'll replace them with straight lengths of paperclip. This will better represent the outer cooling sleeves over the .50BMGs.
Attachments
- Thread starter
- #47
Matt308
Glock Perfection
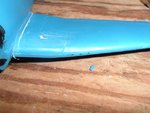
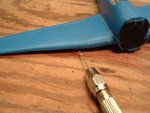
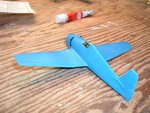
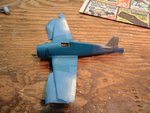
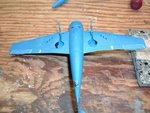
Next up, glue the cowling on, sand the seams and flush the wing joint. It has 1/8 inch joint finishing that will require some patience and dry/wet sanding for finishing.
Lucky13
Forum Mascot
Looks great Matt! I built the '72 Hellcat as well back in the day 20+ years ago, can't for my life remember the manufacturer though....
- Thread starter
- #50
Matt308
Glock Perfection
- Thread starter
- #51
Matt308
Glock Perfection
Airframes
Benevolens Magister
Hmm. Last batch of pics not showing on my screen, strange. Hopefully, they'll pop-up later.
If it makes it any easier Matt, a friend of mine has just had to fly back from Bulgaria, leaving behind his Mercedes to be sold. He was run off the road and, very suspiciously, a tow truck turned up 5 minutes later. Cost him 400 Euros to be towed out of a gulley, and a further 1,500 Euros for repairs - a small bit of welding and some cable ties!
So he's cut his losses, told an agent to sell the car for what he can get, probably only about 4,000 Euros, and he'll use his Porsche instead!
- Thread starter
- #54
Matt308
Glock Perfection
I see 'um, Airframes. Pics show up for me. It must be my Karma not wanting a "professional eye" on my shoddy work.
Airframes
Benevolens Magister
Can't get away that easily Matt, the pics are there now!
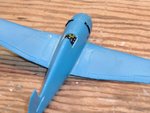
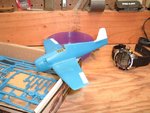
I think it looks great! The cowling gills certainly look the part, and the cockpit looks good, and will look even better when the fuselage is painted.
As Boris Karloff said "It Lives!"
I think it looks great! The cowling gills certainly look the part, and the cockpit looks good, and will look even better when the fuselage is painted.
As Boris Karloff said "It Lives!"
- Thread starter
- #56
Matt308
Glock Perfection
- Thread starter
- #57
Matt308
Glock Perfection
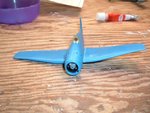
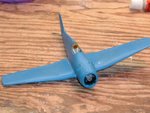
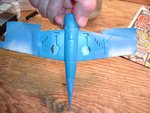
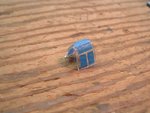
Some cockpit masking, landing gear primer flashing cleanup, and gluing them in place with the right alignment. Then the masking of the white ailerons. Note the additional putty work on the flaps to clean up my ham-handed jeweler saw work from my zero-length rocket rail modifications. 
Tomorrow, paint prep
Tomorrow, paint prep
Attachments

Hello Matt308,
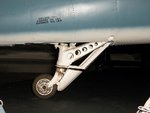
I generally don't build my planes with gear down, but you might want to go look at a walkaround set of pictures for the Hellcat. The tail gear struts and main gear scissors links are all wrong as they come in this Heller kit. That cockpit looks pretty good from my viewpoint.
One technique I usta use with 1/72 scale panels was to collect about a half dozen sizes of small plastic or metal tubing. I would hollow them out and dip the end in white paint. With the correct amount of paint remaining (take a brush and pretend you are painting the end of the tube), it can be used to stamp a very nice round circle to make a gauge on the panel.
Keep up the great work!
- Ivan.
Airframes
Benevolens Magister
Moving along quickly Matt. BTW, Aaron might like to know that Revell have just released some 1/72nd figures for Ground Personnel and, I believe, aircrew. I'm not 100% sure, but I think they have USAAF, Luftwaffe and RAF.
- Thread starter
- #60
Matt308
Glock Perfection
Hello Matt308,
I generally don't build my planes with gear down, but you might want to go look at a walkaround set of pictures for the Hellcat. The tail gear struts and main gear scissors links are all wrong as they come in this Heller kit. That cockpit looks pretty good from my viewpoint.
One technique I usta use with 1/72 scale panels was to collect about a half dozen sizes of small plastic or metal tubing. I would hollow them out and dip the end in white paint. With the correct amount of paint remaining (take a brush and pretend you are painting the end of the tube), it can be used to stamp a very nice round circle to make a gauge on the panel.
Keep up the great work!
- Ivan.
Thanks Ivan. Regarding the gear struts and tail assembly, I'n not that ambitious. But do appreciate the comment. I have pics of the rear wheel assembly and it look right to me. Just crude in 1/72nd.
But regarding the guage suggestion... THAT'S A FRICKIN' KEEPER. Thanks man!!! But now to find tubing that is as small is a pipette is another question for 1/72nd. That's about 1/24 inch or for simplicity 1/32nd in DIA. Not sure where I'm gonna find "spare" tubing lying around that size. But you got me thinkin'!
Attachments
Users who are viewing this thread
Total: 1 (members: 0, guests: 1)