Heller 1/72nd F6F-5 Hellcat

Ad: This forum contains affiliate links to products on Amazon and eBay. More information in Terms and rules

Hi Matt308,

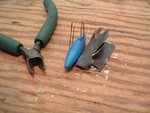
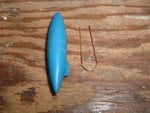
There are LOTS of sources for little tiny tubes and such. I tend to have a lot of little brass, steel, and aluminum tubing around because I very often try to make miniature stuff. I get them from the local hardware store. I also tend to accumulate Plastruct or Evergreen styrene tubes, rods and such for gun barrels for planes, ships and such. In fact, I would suggest you get a piece of very thin styrene rod for replacement gun barrels for the Hellcat rather than try to make the parts out of paper clips because it is much easier to file flat after you cut it. This is the same stuff I was planning to use for pushrods for the engine with slightly larger diameter pieces for the rocker covers. Instead of cardboard for the seats, I would have used styrene sheet just because I already had some from previous projects. McDonalds salads also have supplied some clear plastic that I have used for the reflector on model aircraft gunsights. The darn piece for the relector in 1/72 is so small that it is impossible to find if you should drop it though. You definitely need tweezers to put the part in place.

As for tubing, the refills out of dead pens are about the right size as are the Johnson Johnson swabs. You might need to thin them out from the inside with an Exacto knife though. For really LITTLE tubing, you can pull out the parts from dead mechanical pencils though I haven't found a good application for tubing THAT small yet.

- Ivan.
 
Thanks, guys. And good ideas on the tubing, but 1/72nd scale 3" dials make for about 1/24"-1/32"ID tubing. That is REALLY small. The dead mechanical pencil is a thought, though. I'll have to scrounge around. Paperclips work just fine and are easy to file flat. Already have done it in fact. And the reflector sight I made from a clear 2 liter bottle cut to size. And yes it is REAL small.
 
Okay time for some masking.
 

Attachments

  • DSCF2183.JPG
    DSCF2183.JPG
    50 KB · Views: 78
  • DSCF2184.JPG
    DSCF2184.JPG
    45.9 KB · Views: 84
  • DSCF2185.JPG
    DSCF2185.JPG
    60 KB · Views: 80
Alright, time to work some on the drop tank. The F6F had a drop tank supported in the rear by a pylon attached to the fuselage. To prevent a huge moment arm causing stress on the pylon two straps were used at the midpoint of the tank for structural integrity.

This requires stripping some small wire and rolling it perfectly flat. To do this, I put my "bent" wire on the flat anvil of my vice. Using another flat surface (marble counter top samples), I rub them together. This will take any bent wire and make it perfectly straight. Not a little bit straight. Perfectly straight. These wires will serve as my straps.

Next I use a center punch of varying diameter to roll my straight wires to be slight under diameter where they will attach to the drop tank.
 

Attachments

  • DSCF2186.JPG
    DSCF2186.JPG
    59 KB · Views: 95
  • DSCF2187.JPG
    DSCF2187.JPG
    77.1 KB · Views: 66
  • DSCF2188.JPG
    DSCF2188.JPG
    45 KB · Views: 72
Now to make grooves in the drop tank to allow the wire to fit almost flush. Using my razor saw, with multiple blades attached to get the width to match the wire diameter, I carefully cut the grooves, but only on the lower half of the tank surface.

Next I attached with wires with stoopid glue and sanded the tank to remove residue and rough edges. Using my pin vise, I then drilled 4 holes in the lower fuselage to allow for a clean interface of the wire "straps". And I glued her on.

Looks okay. In a larger scale I would have done the fuel and return lines, but was not that ambitious in 1/72nd.
 

Attachments

  • DSCF2192.JPG
    DSCF2192.JPG
    57.6 KB · Views: 107
  • DSCF2191.JPG
    DSCF2191.JPG
    55.6 KB · Views: 88
  • DSCF2190.JPG
    DSCF2190.JPG
    58.9 KB · Views: 78
  • DSCF2189.JPG
    DSCF2189.JPG
    77.9 KB · Views: 79
Okay slopped some paint on her. Model Masters Dark Sea Blue. The upper an lower ailerons are not molded correctly and don't match up. But the dark color is forgiving.
 

Attachments

  • DSCF2197.JPG
    DSCF2197.JPG
    86.2 KB · Views: 77
  • DSCF2196.JPG
    DSCF2196.JPG
    69.1 KB · Views: 81
  • DSCF2195.JPG
    DSCF2195.JPG
    56.6 KB · Views: 82
  • DSCF2194.JPG
    DSCF2194.JPG
    43.8 KB · Views: 70
  • DSCF2193.JPG
    DSCF2193.JPG
    62.4 KB · Views: 79
  • DSCF2198.JPG
    DSCF2198.JPG
    66.2 KB · Views: 86
  • DSCF2199.JPG
    DSCF2199.JPG
    65.7 KB · Views: 87
The windscreen, canopy and propeller as just sitting on the model for grins. I'll glue them on last.

I forgot to mention that I cut off the elevators and respositioned them at a down angle. I also put the vertical trim tab a few degrees to the port. I found a pic of 32 prepping for a launch and noticed that in the pic the trim tab was cranked to the port quite a bit. Must be to help counteract that massive 2000hp engine torque on takeoff.
 

Attachments

  • DSCF2202.JPG
    DSCF2202.JPG
    62.8 KB · Views: 60
  • DSCF2201.JPG
    DSCF2201.JPG
    58.8 KB · Views: 78
  • DSCF2200.JPG
    DSCF2200.JPG
    53.4 KB · Views: 85
Looking good.Isn't the main colour too dark or it is my display?
 
It is pretty damn dark. Though it looks darker in the pics than it does in person. It is more blue in person.

Here is a pic of a pitot probe from a "dark" F6F. You can see that the paint is real dark.
 

Attachments

  • Pitot probe.jpg
    Pitot probe.jpg
    99.4 KB · Views: 80
I went back and looked at my pics again. I think my flourescent lights above my work bench and the flash give the color a strange hue. You can see in some pics the blue popping out more. And in others it looks almost black. Oh well. Once I get her weathered up a little and outside in natural light, that will probably help too. I'm gonna go easy on the weathering/wear on this one. Most all pics that I found of 32 did not show much wear at all.
 
I pulled the yellow decals out of the bay window. They cleared up rather nice! Thanks for the tip. I thought it was Wurger who pointed it out, but he humbly denied it was his. So whomever it was, thanks. That tip is a keeper. The first pic is a before and the others after a week or two in a sunlit window.
 

Attachments

  • DSCF2130.JPG
    DSCF2130.JPG
    48.3 KB · Views: 67
  • DSCF2204.JPG
    DSCF2204.JPG
    56.5 KB · Views: 66
  • DSCF2205.JPG
    DSCF2205.JPG
    58.7 KB · Views: 90

Users who are viewing this thread

Back