Monogram P-61 Black widow Build

Ad: This forum contains affiliate links to products on Amazon and eBay. More information in Terms and rules

deckape

Staff Sergeant
769
63
Jul 26, 2011
Moraine Ohio U.S.A.
Ahoy
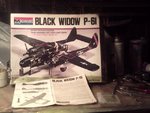
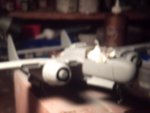
I my as well dive in and get my boon dockers wet, Instead of posting all my finished builds. After Browseing around where I keep my lifes stash of kit I had scince young man to old fart in the wind, I stumbled across this kit. I purchased this kit when it first came out this is the first issue of this kit 1974 It came out right after Monogram issued their Douglas TBD Devestrater torpedo bomber. These were the very first of the highly detailed kits of the new 1/48 scale range. Before most of monogram kits were designed as gimic models with action features and they never intended to add the detail in their kits like this one and the TBD. for a kit that 37 years old it still holds a candel to what they have on the market today. there are a few things on the kit I dont like but there were no nit picking back in those old days.

The Build Begins

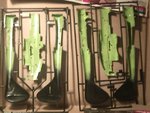
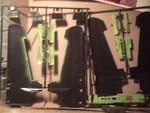
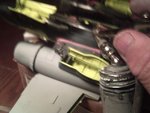
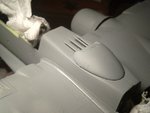
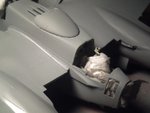
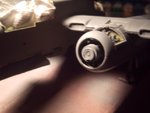
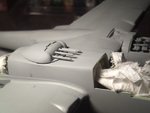
After reviewing the parts of the kit everything is there very little ejector pin holes not really noticeable. when the parts inspection was completed its time to start. I washed the kit with hot soapy water to rid the release agent oils on the kit. when dry I shot on 3 coats of zinc chromate green and let dry for the night. the kit will be built useing sub assemblies. any seams that need to be filled which there are a few I will fill them in with bondo glazeing putty. I used the stuff for years drys fast and sand easy without going through the plastic and destroying the detail. Tommorow I will start with the cockpit detail and work aft.
Boats:D:D:D:D
 

Attachments

  • PICT0001.JPG
    PICT0001.JPG
    58.8 KB · Views: 262
  • PICT0002.JPG
    PICT0002.JPG
    62.7 KB · Views: 242
  • PICT0003.JPG
    PICT0003.JPG
    53.7 KB · Views: 204
Ahoy
the build still continues Been at this all day long time to knock off and save some work tommorow the photos below show the fuselage construction and its interier parts. I have no after market parts such as photos etched parts and resin parts as well. I have no idea that there are parts for this kit i been building card kits to long and forgot the plastic world of modeling. If I had these parts it would make like easy. I am building this kit SOB straight our the box. Last night i gave the ship a wash down with soapy water and airbrushed the zinc chromate green interier details I let these dry over night. I removed the cockpit parts and cemented them together I gave the fuselgae another coat of zinc chromate green the final color. useing two zinc chromate green shades. touched up as I go. Gave the raised areas a wash of flat black paint to raise the details up a little picked out the dial on the consol board. added seat belts from masking tape the seat buckles made from metal foil. the 20 mm guns were painted gun metal i didn,t have the gun metal paint so i made my own useing black silver and blue, when the gun metal paint had dried, I dry brushed the 20mm guns with a dry brush of aluminum paint.


when all paint has dried I scraped away the paint on the joining surfaces so the glue will adhere to the fuselage halfs. useing 5 minute epoxie to join the fuselgae phalfs together when dried I added the filler Bondo glazeing putty i will let this ry until tommorow sand well with water mask the intereir details and give the ship a coat of gray primer paint to check for any imperfectiopns if so the process will have to be done all over fill sand and prime. Next attachments will be the primed completed fuselage and then I will proceed with the two booms. and wings. before I get started oin the morning I will add a few moew details to the cockpit. Here below are the pictures of the build.

Boats
PICT0014.JPG
PICT0015.JPG
PICT0016.JPG
PICT0017.JPG
 
Looking good so far. I don't know if you know this or not, but these need a lot of weight to keep them from sitting on the tail. Many people end up having to add weight in the front of the wings even. Somebody makes shaped lead plugs for this plane and they're cheap, like a couple of bucks. I have the website saved and can pm you the link if you're interested.
 
Looking good so far. I don't know if you know this or not, but these need a lot of weight to keep them from sitting on the tail. Many people end up having to add weight in the front of the wings even. Somebody makes shaped lead plugs for this plane and they're cheap, like a couple of bucks. I have the website saved and can pm you the link if you're interested.

Ahoy Jayl
sounds great Like I mentioned on the thread I have no after market parts for the kit I can use what they have to inhance this kit I need a little more tune up work on the interier of the cockpit there is still room for me to do this.

Thanks Boats
 
Great start.

I recomend following up on Jayl's suggestion for aftermarket lead weights. I started the same build a while back and found out too late how back heavy the plane is. I'm not a big fan of the era correct interior green so I painted mine a little different.

http://www.ww2aircraft.net/forum/st...-p-61-black-widow-build-feb-2011-a-28286.html

I put completion off for now, because of working 15hrs per day for next 8 weeks, but once I have free time I will finish my build.

I will probably buy another set to combine with the one I started because I half-way destroyed it trying to make it stay level.

I look forward to coming back to look at your progress.

cap
 
Ahoy
Still at the build Had a large honey do list I had to fill up it took me away from the modeling bench. As for the update all sub assemblies have been completed I checked for anything i missed on the fuselage assembly and cleaned up a few hollidays I left behind. As mentioned before there are no after markey detail sets so i am building this one out of the box. Useing filler I filled in all seams and letting dry next i will sand and add my primer paint before i apply the finishe coat of paint.sib assembly No. is the fuselage and wings are joined so that there will be proper alignment of the twin booms. Sub assemblie No. 2 I constructed the two fuselage booms and the horizonal stabilizer same as the wing sib asse,bly makeing certain the alignment of the booms are in lined with the wings and fuselage mot modlers attach the wings to the booms and add the horizonal stabilizer if you do that there could be a mis alignment issue with the whole assembly this way Everything is aligned properly. the engines were painted flat black when dry it was dry brushed with aluminum color to bring out the high lights of the detail to the engine .. Letting the units dry from the filler putty next
I will sand same and give thge model a primer coat and go so on herer are the update pix.

Boats
PICT0001.JPG
PICT0002.JPG
PICT0003.JPG
PICT0004.JPG
PICT0005.JPG
PICT0006.JPG
 
Getting a shape.... nice. :) What is the name of the pink putty?
 
Getting a shape.... nice. :) What is the name of the pink putty?

Ahoy Wurger
Yep its takeing shape looks like a P-61 to me, it will look better as I go. The red putty is Bondo glazeing putty I call it magic in a tube this stuff sands like spackle dries in munutes. it dont shrink or crack with time. thanks for the reply my man.

Boats
 
Getting a shape.... nice. :) What is the name of the pink putty?

Better watch there ole man Aaron would of jumped in here slapped you around abit for not knowing :) being it's part of the trade.The 61 is looking very good for an OOB build keep it up ;)
 
Ahoy
I must be having a senior moment I forgot to get this thread finished on my monogram P-61 Black widow I,ll finish this one up befor i get started on another I just plum forgot about having a build thread on this gem. later this evening i,lpost some progress pix.

Boats:sign3:
 
Ahoy
Scince the KATE is Done now its time to finish up the P-61 build. dont know why I forgot this I guess I got a bad case of modlers syndrome. Ok for now from the last update the model is pretty well assembled adding putty here and there sanding and priming. the model is give 4 coats of Nuetral gray primer letting it dry over night. The paint schedule I selected is olive drab over nuetral gray with invasion stripes. Of all P-61,s I,ve seen on every forum they are painted all black. So I will be different this time Olive over nuetral gray will fill the bill for me. Here are the update pix of the build, While the model is drying and letting the paint cure I will mix up a batch of olife drab.

Boats
 

Attachments

  • PICT0001.JPG
    PICT0001.JPG
    44.7 KB · Views: 186
  • PICT0002.JPG
    PICT0002.JPG
    38.6 KB · Views: 171
  • PICT0003.JPG
    PICT0003.JPG
    35.2 KB · Views: 167
  • PICT0004.JPG
    PICT0004.JPG
    34.6 KB · Views: 150
  • PICT0005.JPG
    PICT0005.JPG
    31.8 KB · Views: 158
  • PICT0006.JPG
    PICT0006.JPG
    38 KB · Views: 169

Users who are viewing this thread

Back