My BF-109

Ad: This forum contains affiliate links to products on Amazon and eBay. More information in Terms and rules

Hallo Charles,

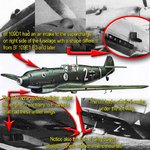
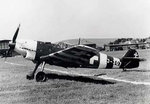
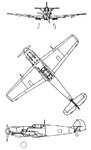
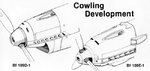
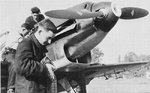
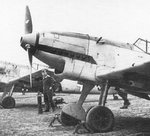
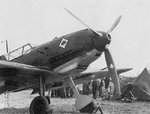
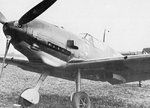
THX for the pictures of the front part of your model.For me it still looks like the B/C/D version.The nose is shorter than the E1,E3,E4 had.I think that the firm which made this kit did somethig what would be a Bf 109 generally only.Probably the kit is a compromise between a capability of the model for flying and possibility of accurate reduction.Simply it can be a BF 109 only but not an accurate maquette.To make the engine cowling problem clear,I've upload some pics I found in Squadron-Signal.-.Messerschmitt.Bf109.(Part.1) book.If you look at them you will be sure wchich one is more similar to your model.The other differences of these two planes are a piece of cake to correct them.So if you like the White 12 of Richthofen's squadron or another it is your choice and you will make it what you like,right?
 

Attachments

  • Bf109E3 front plan.jpg
    Bf109E3 front plan.jpg
    32.5 KB · Views: 160
  • Bf109B C D front.jpg
    Bf109B C D front.jpg
    45.1 KB · Views: 154
  • Bf109B C D front1.jpg
    Bf109B C D front1.jpg
    62.6 KB · Views: 165
  • Bf109E3 front.jpg
    Bf109E3 front.jpg
    50.3 KB · Views: 151
  • Bf109E3 front1.jpg
    Bf109E3 front1.jpg
    62.5 KB · Views: 161
Charles, as usual great work mate. Agree with Wurger the nose definately is the B/C/D version. so you have. There are few Aces or Experten markings to work with for this early period, Gentzen would be a primary choice being the "first" to claim 5+, alternatively you could go with the Condor Legion where there are a few Experten including Werner Moelders 14 pre WW II victories. Depends on whether you want the Greens over Light Blue 70/71/65 with any variation in colourful alternative markings that Wurger has provided or something completely different, the choice as I have said before still remains yours in the end. No matter which you choose I'm sure you will be happy with it.
 
Wurger: It appears my nose ass'y is of the BF-109D1. However, the exhaust
stacks are like the E1. I suppose I could fabricate the stubby round stacks
like the D1. On the right side of the fuselage, of the D1, is there an oil cooler
or supercharger intake ? My plans show an oil cooler intake in the left side
but this can either be omitted or moved to the right side. I think I am going
to go with either the White 12 or the 109 flown by Gentzen. So the choice
is down to two.

Wayne: Thanks for the kind words. I learned quite a bit doing the FW-190,
and have vowed not to make the same errors..

Charles
 
Hi,

I'm not at home now,but when I'll return I'll upload the differences that you have to correct in order to make D1.And yes,there was an air intake to the engine carburettor.I'll post proper pics.Or if you want I can put there drawings of Bf109D.

greetings from my friend's shop. :)
 
Hi Ccheese,

There is a pic for you which can be useful for you with corrections you want to make.It is a short description of the main adjustments.

regards,
 

Attachments

  • Bf109D1.jpg
    Bf109D1.jpg
    170.4 KB · Views: 155
Wuger: Thank you, that settles it, I'm going to make mine into a BF-109D1.
I'm sure I can fabricate the short round exhaust stacks and the intakes for
the supercharger and the oil cooler. Do you (or anybody) have a head on
view of the D1 ?

Thanks....

Charles
 
Wurger and all: Here's where we are with the bf109D1. The Tail ass'y has
been mated to the fuselage and the nose piece has been added. The wings
are under construction....

Charles
 

Attachments

  • Fuselage5.jpg
    Fuselage5.jpg
    56.8 KB · Views: 136
ccheese
How do you get the paper skin so tight??

Dave: It's not paper, it's called silkspan. I believe it a composite of paper
with a cotten or silk content. It actually has a "grain" like wood. You put it
on using clear dope as an adhesive. After the section is done, you spray it
with water. and it shrinks !

Charles
 
Thanks, but not all that nice! Sometimes I gotta really look at something before assuming! That profile is NOT a D-1. Not with three blades. When am I gonna learn?

But those sites do have some great pics of a D-1.
 
Don't worry friend I also make mistakes.Someone who doesn't do anything at all - doesn't make any mistakes only.
 
Chris: Those are good pic's of the 109's. Thanks.... I'll have to go thru them
and print out what I want. I need to see where certain external fittings are.

Thanks....

Charles
 
Dave: It's not paper, it's called silkspan. I believe it a composite of paper
with a cotten or silk content. It actually has a "grain" like wood. You put it
on using clear dope as an adhesive. After the section is done, you spray it
with water. and it shrinks !

Charles


Does it stay tight after painting, and what kind of paint? Sorry for all the Q's but every stab I have taken at flying models has been a disaster.
 
Hi Tpikdave,

If I can put there some my cents.If the covering is varnished you can paint it with all paints.A trouble can appear when the varnish gets a reaction to a paint.Some of them don't "like" each other.If you use paints for modellers you won't have any problems.These colours are avialable as two kinds.The first are oil enamels and the second kind are acrylic water ones.For sure you know that the acrylic paints
(for example:pactra,Tamiya,Gunze,ModelMaster and Revell recently) can be diluted with water but the oil ones with a special thinner for them ( for instance Humbrol,Revell ).So I think your problem is with covering and preparing all surfaces of a model for painting.Ccheese uses a clear dope to glue the covering to balsa elements and then he sprays it with water in order to make it tight.In Poland, modellers don't use a silkspan, although it seems to be almost the same what we call "Japanese paper".For gluing and making the Japanese paper tight to a construction we use a varnish named "Nitrocelon".It makes the covering tight and waterproof.One or two layers on it are enough.Then paints can be put on model.Using an airbrush it is easy and accurate.
To be honest Ccheese's method remainds me my first steps with flying models.For covering of them my mates and me used a brown or grey paper that was used for wrapping parcels at a post office.The paper was adhesived with so-called "Nitroglue" named AK-20 and then sprayed with water and dry with the Sun or a hair-drier to make the covering tight.When we tried to paint it the covering always rippled because it wasn't prepared for paints.But when we put a clear varnish on it and then a paint as a next layer everythig was OK.
I hope I helped a bit.

regards

BTW. It is better to put an acrylic paint on an oil colour than vice versa.
 
Does it stay tight after painting, and what kind of paint? Sorry for all the Q's but every stab I have taken at flying models has been a disaster.

tpikdave: Wurger is quite right. What I do after the spraying with water to
tighten the silkspan it to make a mix of 50/50 clear dope and thinner. I paint
the piece I'm working on (i.e. fuselage), with three coats, sanding lightly in
between. The clear mixture seals the pores of the silkspan and the light
sanding will cover up the joints where the silkspan was joined. Then when
you put the final coat of paint on, the silkspan stays tight and does not
absorbe the paint. Just be careful sanding across ribs, formers or spars.

Charles
 

Users who are viewing this thread

Back