Navigation
Install the app
How to install the app on iOS
Follow along with the video below to see how to install our site as a web app on your home screen.
Note: This feature may not be available in some browsers.
More options
You are using an out of date browser. It may not display this or other websites correctly.
You should upgrade or use an alternative browser.
You should upgrade or use an alternative browser.
No 56 Squadron, RAF, 'The Firebirds', 1918 - 2008.
- Thread starter Airframes
- Start date
Ad: This forum contains affiliate links to products on Amazon and eBay. More information in Terms and rules
More options
Who Replied?- Thread starter
- #282
Airframes
Benevolens Magister
Thanks guys. If a move is required, then I'll have to stay in this area I think, as I can't afford to move elsewhere, and all my medical needs are here.
A4K
Brigadier General
Hope you don't have to move then Terry, or if so, that there's a good place in the area.
- Thread starter
- #284
Airframes
Benevolens Magister
Thanks Evan - just have to see what develops.
Good luck with it Terry!
- Thread starter
- #286
Airframes
Benevolens Magister
Thanks Wayne.
- Thread starter
- #287
Airframes
Benevolens Magister
As a diversion from working on the Harrier, and whilst waiting for its clear coat to dry fully, I've decide to make a start on the rigging.
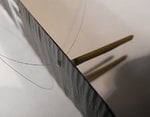
This is being done using 'Invisible' mending thread, which is about as fine as human hair, and available in various tints, including 'clear'. One problem using this material is that it is almost bl**dy invisible, making it tricky to handle, even when using a magnifying glass!
Once the model is fully rigged, the individual lines can be coloured as required, using the edge of a paint brush.
PIC 1 Shows the thread used, in this case a steel grey colour, which cost £1 ($1.6 US).
PIC 2. Before attaching the upper wing, each rigging line is attached by selecting a long length of the thread, and passing it through the pre-drilled holes. This is then knotted, and the knot pulled into the hole, where it is secured with a drop of CA applied with the tip of a pin or needle. In this, the first line fitted, I was a bit over enthusiastic with the CA, but the excess is easily scraped off. Note that the externally visible mounting holes are filled by the CA, on top of the knot, and can be retouched later. On the top wing, these points are also covered by the decals.
Each line is done separately, with certain lines being 'doubled back' to complete the geometry, most notably on the control surfaces.
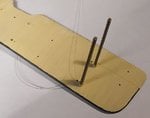
PIC 3. The line on the underside of the top wing. Note that plenty of free length is used, to facilitate fitting and fixing to the lower wing, once the top wing is firmly in place. When all upper lines are fitted, the details on areas such as the inter-plane struts can be painted.
This is going to be a slow job, as and when I have the time (and patience!) to continue, but I'll try to post regular up-dates as I proceed.
This is being done using 'Invisible' mending thread, which is about as fine as human hair, and available in various tints, including 'clear'. One problem using this material is that it is almost bl**dy invisible, making it tricky to handle, even when using a magnifying glass!
Once the model is fully rigged, the individual lines can be coloured as required, using the edge of a paint brush.
PIC 1 Shows the thread used, in this case a steel grey colour, which cost £1 ($1.6 US).
PIC 2. Before attaching the upper wing, each rigging line is attached by selecting a long length of the thread, and passing it through the pre-drilled holes. This is then knotted, and the knot pulled into the hole, where it is secured with a drop of CA applied with the tip of a pin or needle. In this, the first line fitted, I was a bit over enthusiastic with the CA, but the excess is easily scraped off. Note that the externally visible mounting holes are filled by the CA, on top of the knot, and can be retouched later. On the top wing, these points are also covered by the decals.
Each line is done separately, with certain lines being 'doubled back' to complete the geometry, most notably on the control surfaces.
PIC 3. The line on the underside of the top wing. Note that plenty of free length is used, to facilitate fitting and fixing to the lower wing, once the top wing is firmly in place. When all upper lines are fitted, the details on areas such as the inter-plane struts can be painted.
This is going to be a slow job, as and when I have the time (and patience!) to continue, but I'll try to post regular up-dates as I proceed.
Attachments

Lucky13
Forum Mascot
Excellent work old chap!
- Thread starter
- #289
Airframes
Benevolens Magister
Thanks awfully old chap. I really should go to bed, but .... bl**dy difficult to get away from the forum, what!
T Bolt
Colonel
Nice start with the rigging Terry. Looks like a long term project in its self.
- Thread starter
- #291
Airframes
Benevolens Magister
Thanks Glenn, and yes, slow work. Might get it done by my next Birthday .... er, hang on .... I only have one every four years !!
Vic Balshaw
Major General
Might get it done by my next Birthday .... er, hang on .... I only have one every four years !!
Plenty of time then old fruit……………………..Spiffing job by the way.
- Thread starter
- #293
Airframes
Benevolens Magister
Thanks Vic. Need to pick your brains re 56 Sqn Camberra - seen the Airfix kit on offer at half price, so got to be done!
I'll send you a PM.
I'll send you a PM.
Vic Balshaw
Major General
Canberra B.2 WE188 used for target towing at Akrotiri, Cyprus while squadron equipped with Lightning F.6s if memory serves. Big bu$$er to build as well with lots of lead needed.
- Thread starter
- #295
Airframes
Benevolens Magister
Thanks Vic, just sent PM.
Crimea_River
Marshal
Looks great Terry.
Lucky13
Forum Mascot
Where you gonna find space for that bird then old boy!
Reminds me....I've got 5!

Agree btw, totally addictive forum, with them...eeerrrrmmm.....eeehhhh.....caracters!
Reminds me....I've got 5!
Agree btw, totally addictive forum, with them...eeerrrrmmm.....eeehhhh.....caracters!
- Thread starter
- #298
Airframes
Benevolens Magister
Yep - didn't think of that, did I ?!! The bl**dy thing is as long as a 1/32nd scale Hunter, and with a longer span!
B*ll*cks - need a bigger house !!
B*ll*cks - need a bigger house !!
T Bolt
Colonel
That's what stopped me working on my Monogram 1/48th B-24D. Got to the point of installing the wings and realized I didn't have a shelf wide enough to display it so it went back in the box and has been there for 10 years!
Last edited:
Vic Balshaw
Major General
Got mine to fit okay Glenn, arse end hanging out.

Users who are viewing this thread
Total: 1 (members: 0, guests: 1)