P-51D "Shu-Shu/Chuck-o" Mjr Norman McDonald 325th FG - Aircraft of the Aces GB

Ad: This forum contains affiliate links to products on Amazon and eBay. More information in Terms and rules

ozhawk40

Master Sergeant
Username: Ozhawk40
First name: Peter
Category: Advanced
Scale: 1:48
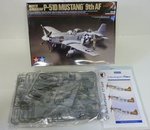
Manufacturer: Tamiya
Model Type: North American Aviation P-51D-20-NA 44-63512
Details: 325th Fighter Group, 318th Fighter Squadron
Aircraft Assignment: Major Norman McDonald
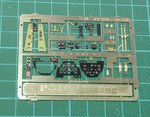
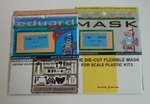
Accessories: Ultracast exhaust, seat and propeller. Eduard Etch and Masks.
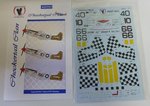
Decals: Eagle Strike Productions 48090​


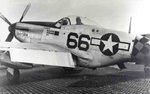
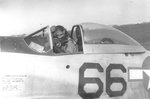
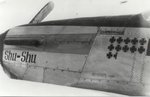
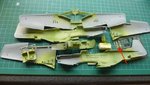
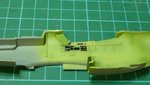
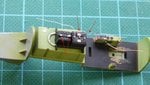
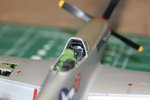
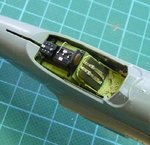
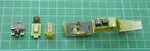
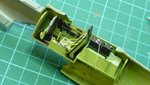
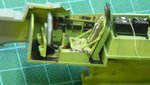
For my second entry I have chosen the aircraft of Major (Later Lieutenant Colonel) Norman L. McDonald, or "Mac" for short. "Mac" flew ship 59 and later ship 66 as CO of the 318th Fighter Squadron, 325th Fighter Group, the famous "Checkertails". This one is #66 serial 44-63512.

I just don't know what I'm getting myself in for with this one, as I want to try a couple of new things, not to mention a rather tricky paint job if I decide to paint the tail, or a rather tricky decal job.

Cheers, and more soon.

Peter
 

Attachments

  • PE and masks 001 - resized.jpg
    PE and masks 001 - resized.jpg
    68.1 KB · Views: 277
  • plastic 001 - resized.jpg
    plastic 001 - resized.jpg
    77.9 KB · Views: 305
  • decals 001 - resized.jpg
    decals 001 - resized.jpg
    69.7 KB · Views: 311
  • McDonald Norm climbing in cockpit.jpg
    McDonald Norm climbing in cockpit.jpg
    92.2 KB · Views: 333
Last edited by a moderator:
Lieutenant Colonel Norman L. McDonald

Norman McDonald was born 21st January 1918 in Framingham, Massachusetts. He graduated from high school and attended Balmont Abbey College in North Carolina.

It is reputed that he was a leader of a outlaw motorcycle gang in his early years, however it is confirmed that he later enrolling in the Civilian Pilot Training program, where he excelled, he went on into the USAAC Cadet program and he won his pilot's wings in December of 1941.

He was assigned to the 52nd Fighter Group in May of 1942 in England, and flew with the 2nd Fighter Squadron, moving with them to North Africa.

Although credited with damaged and probable claims, his first success was made on the 22nd March 1943 when he downed two Ju88 in the one action. His report stated the following:

"On our return trip ( from Mezzouna ) Lt Beard called out two JU88's directly above us heading southest. We were at this time as about 2,000 feet in the area of T5053. I saw the e/a at about 1,000 feet above us and I climbed directly up at them. They were flying a two ship formation slightly echeloned to the right. I levelled off behind and slightly below their #2 ship. From 50 yards with 5 degrees deflection to the right I opened up with cannon and machine guns. My first cannon shells knocked out his right motor out and the engine caught fire. Then the cannon shells exploded in the cockpit and along the fuselage and the whole ship seemed to explode in mid air. It went down burning. In all I gave him about 4 seconds of cannon and machine gun. I then closed on the #1 aircraft who apparently had not seen me yet and from a range of 25 yards I opened up with cannon and machine guns with a 4 second burst. I set his right motor on fire, his right wing dropped and my cannon fire hit his left motor setting it on fire also. Then I saw several other strikes of cannon fire along his fuselage. The plane went into a spin toward the ground. I then looked around and saw the first Ju88 hit the ground in flames."

By this stage a Captain, Norman McDonald or "Mac" made a shared claim on the 1st April 1943 with Capt George Williams of another Ju88. His greatest success however came two days later when the 2nd came across a formation of 14 Ju87's with a Bf109 escort.

As my flight was nearest the Stukas, we went after the farthest formation. They were very slow, so we caught up with them easily. I closed to within 25-30 yards of the trailing Ju87 and opened up with both cannons and machine guns, using about 5 degrees of deflection. A two- to three- second burst was sufficient. The motor belched black smoke and slight flame. The aircraft dove down to the left and flew straight into the ground from about 1,000ft. I closed to the same distance on the next Stuka, and using a similar angle of deflection, opened up with cannon and machine guns in three second bursts. The aircraft erupted in flames and broke into pieces in the air. This combat took place at 1,000ft

The third victim was about 500 yards ahead. I closed on him easily. He was in a slight climb. Again, my range was no more than 35 yards, with very slight right deflection from slightly below. The rear gunner was firing intensely at me. I opened up with cannon and machine guns, again firing three second bursts. Just as we entered a cloud, great chunks of his propeller and parts of the aeroplane flew back, just missing me. When I came out of the cloud, the Stuka was spinning into the ground, emitting much smoke and with pieces still flying off.

Along with Arthur Vinson, also of the 52nd, Capt Norman McDonald became jointly the first USAAF spitfire aces on that day.

normanmacsspitv.jpg


Mac completed his tour with the 52nd and was sent back to the zone of the interior and assigned to a P-47 training squadron at Bradley Field, Connecticut in October 1943. Soon, tiring of this assignment, he asked for a second combat tour and joined the Checkertails in August of 1944. He was given command of the 318th Squadron.

SHu-Shuprofilesignalresized.jpg


Mac flew a total of 249 missions and flew right up to the war's end in Europe.

He added four victories while with the 325th to bring his total up to eleven and a half along with five probables, seven damaged and a number destroyed on the ground. These feats brought him the DFC w/cluster, the British DFC and the Air Medal w/26 Oak Leaf Clusters.
 

Attachments

  • P-51D66MajNornMcDonaldCO318thFS.jpg
    P-51D66MajNornMcDonaldCO318thFS.jpg
    60.3 KB · Views: 361
  • majnormmcdonaldco318thfs1945.jpg
    majnormmcdonaldco318thfs1945.jpg
    36.9 KB · Views: 372
  • p51shushumcdonald.jpg
    p51shushumcdonald.jpg
    41.3 KB · Views: 403
Last edited:
looking forward to seeing this one Peter, any hints on the things you want to try

Oh, sure Karl. I've always wanted to try metal foil for adding that aluminium look to the airframe. In the past week I've been experimenting in the Lab to see how easy it is, or is not! :rolleyes:

Anyway, I've nearly completed one part, the port flap, and I'm happy with the result, so I'm going to carry on with the entry and see how I go.

In the pic below, I just need to finish off more rivets along the bottom edge to complete (which I've since done).


Cheers

Peter
 

Attachments

  • flaps 001 - resized.jpg
    flaps 001 - resized.jpg
    47.2 KB · Views: 275
Last edited:
This looks to be really nice already. I have never tried metal foil for large areas so I shall watch this with interest.
 
Thanks Jan, Bruce, CR, T (yes T, different shades) , and Karl

Okay, time to get going on this one too.

Pic 1
For this interior I will be using Eduard photo etch. The interior of the Tamiya is a bit basic, and the Eduard etch really give it a boost. I hate mucking around with etch though, fiddly stuff that it is. :rolleyes:

Pic 2 3
The interior sidewalls need to be scraped back in the areas that are replaced by the etch. Simple job with the soft Tamiya plastic.

Pic 4
To save time scraping away the paint in the areas I need to apply super glue, I've masked up these areas prior to painting.

Pic 5
Sprayed the interior zinc chromate green. A bit tricky in that I had to match the colour of the pre-painted etch, rather than using the paint straight out of the bottle, which in this case was Model Masters. Added white and yellow to get as close as I could. Eduard used some strange colours for their pre-painted stuff, for sure.

Pic 6
I sprayed the cockpit floor a 'wood' colour in preparation for an overspray of black. The D had a wooden floor, but was covered in black non-slip paint, which wore away in high wear places.

End of update. 8)

Cheers

Peter
 

Attachments

  • etch 005 - resized.jpg
    etch 005 - resized.jpg
    58.1 KB · Views: 248
  • etch 004 - resized.jpg
    etch 004 - resized.jpg
    71.5 KB · Views: 254
  • etch 002 - resized.jpg
    etch 002 - resized.jpg
    66.4 KB · Views: 270
  • etch 001 - resized.jpg
    etch 001 - resized.jpg
    60.6 KB · Views: 283
  • etch 003 - resized.jpg
    etch 003 - resized.jpg
    48.9 KB · Views: 255
  • etch 001 A - resized.jpg
    etch 001 A - resized.jpg
    121.9 KB · Views: 249
Thanks Karl, Terry and CR

Small update.

Pic 1 2
Here is the canopy frame, which has a curved stiffener half way down. These should have a series of holes running along the centre. I don't know why Tamiya did not mould this feature, which is a rather obvious one, in an obvious location. You can get resin replacements, but I chose in this instance to carefully drill them out.

Pic 3, 4 5
The seat I'm using is an Ultracast resin one, with the belts incorporated. After painting the frame zinc chromate, I painted the cushion dark Khaki and the belts 'buff'. Aluminium buckles, leather brown tabs and finally, stitching. A couple more touch ups and it's good to go.

Pic 6
Added the black to the cockpit floor and then created some wear marks each side of the control stick position. First etch controls in place and the radios painted black.


Cheers

Peter
 

Attachments

  • canopy frame 003 resized.jpg
    canopy frame 003 resized.jpg
    65.8 KB · Views: 245
  • canopy frame 001 resized.jpg
    canopy frame 001 resized.jpg
    100.2 KB · Views: 216
  • seat 003 resized.jpg
    seat 003 resized.jpg
    77.5 KB · Views: 250
  • seat 001 resized.jpg
    seat 001 resized.jpg
    91.2 KB · Views: 240
  • seat 002 resized.jpg
    seat 002 resized.jpg
    95.5 KB · Views: 399
  • etch 006 - resized.jpg
    etch 006 - resized.jpg
    65.3 KB · Views: 238
Thanks Andy

A bit more today.

Pic 1 2
The instrument panel as it comes on the sprue. All the detail on the front is scraped off and then you add the Eduard etch in three layers on the front, covering the whole panel and lower switch panel. Not too much skill involved, but the etch panel is a beauty. :)

Pic 3 4
Etch is also added to the cockpit sidewall to represent radio controls and various switch panels.

Pic 5, 6 7
The radio left as is, is a bit plain, so I decided to add some more details. Here I've added wires and terminals to the top of the radio with copper wire. Also I found some great placard decals, and have added those to the top of the radios.

Cheers 8)

Peter
 

Attachments

  • etch 007 - resized.jpg
    etch 007 - resized.jpg
    66.8 KB · Views: 229
  • etch 008 - resized.jpg
    etch 008 - resized.jpg
    62 KB · Views: 239
  • etch 009 - resized.jpg
    etch 009 - resized.jpg
    63.4 KB · Views: 226
  • etch 010 - resized.jpg
    etch 010 - resized.jpg
    61.2 KB · Views: 242
  • panel 002 - resized.jpg
    panel 002 - resized.jpg
    118.1 KB · Views: 245
  • panel 001 - resized.jpg
    panel 001 - resized.jpg
    119.7 KB · Views: 234
  • etch 012 - resized.jpg
    etch 012 - resized.jpg
    69.3 KB · Views: 249
That's looking fabulous Peter. I really like the details on the radio and that Eduard set is a beauty. I used it on my Mustang build a coupl of years ago.

Are you going to try to add the white or yellow line around the flight instruments like Glenn did on his build? I think all D's had it. I found it to be not too hard to do with a pin and some acrylic paint. Here's mine:
 

Attachments

  • IMG_1079.jpg
    IMG_1079.jpg
    46.6 KB · Views: 242
I was thinking about it Andy, but could come up with a strategy to make it neat enough. The Eduard instrument dials are very close together, more so than the Tamiya panel. You've done a great job though.

Cheers

Peter
 
Very nice Peter. I might just borrow your 'wire in the radio' idea.

No probs Glenn. I stole it from elsewhere anyway! :evil:

Here's how the cockpit turned out. Pics tell the story.

Oh - I also painted underneath the cowl matt black before final assembly, but I didn't take a photo

Cheers for now.

Peter
 

Attachments

  • cockpit 005 resized.jpg
    cockpit 005 resized.jpg
    94.3 KB · Views: 225
  • etch 013 - resized.jpg
    etch 013 - resized.jpg
    44 KB · Views: 230
  • cockpit 001 resized.jpg
    cockpit 001 resized.jpg
    70.4 KB · Views: 208
  • cockpit 002 resized.jpg
    cockpit 002 resized.jpg
    63.9 KB · Views: 238
  • cockpit 003 resized.jpg
    cockpit 003 resized.jpg
    62.7 KB · Views: 243
Last edited:

Users who are viewing this thread

Back